Sew Pencil Case - Instructions for Pencil Case / Pencil Case

- material selection
- patterns
- Sew pencil case
- Quick guide
They love sewing and DIY ">
I have already written two instructions for Utensilos for Stifteaufberwahrung, but now I ran a pencil case on the way, because I can not help but sew it. And it is an English manual for a pencil case with customs information, which you can find under the following link: sewing instructions in English
The original pattern for this pencil case is "for free" and I sew it down here and write a German manual for those who are not so easy with English and customs information.
The original pattern for the pencil case can be downloaded for free here: pattern
The special feature of the "Zola Pen Case" pencil case is that it can be opened wider than the conventional pencil case and so the whole is much more visible. It is of course not just for pens - these pencil cases can be filled with anything. I think I will use one of them for my make-up.
Difficulty level 2.65 / 5
(conditionally suitable for beginners)
Material costs 1.5 / 5
(depending on the choice of fabric per pencil case between EUR 0, - from the remainder utilization and EUR 25, -)
Time required 1.5 / 5
(per pen bag about 1h)
material selection
Here are best not stretchy, thin, woven fabrics. Particularly high quality are patchwork fabrics. These are also available as perfectly coordinated series in smaller cuts under the term "Fat Quaters".

So that you can distinguish the individual cut parts even if you print this manual in b / w, I have chosen four different fabric patterns. You can combine the motifs with your case as you like. Even brightly colored pencil case made of fabric remnants look great!
The pen case should have a square side when it is closed and does not sag, so you need a very sturdy insert. In the original "Peltex72F double sided fusible ultra firm stabilizer" is recommended, which you can refer, for example, on Amazon. The delivery time is quite long and the material is not too cheap. Also Schabrackeneinlage would be suitable as a stabilizer, but this wrinkles very easily and is also not cheap.
Tip: I experimented a bit with specimens and finally decided on a slightly firmer plastic folder. When testing, I worked with the iron on level three and everything was fine. At the actual pencil case, the fabric has warped slightly when ironing. I attribute this to the larger area. So if you also use a plastic insert for your pencil case, iron it to a maximum of two!
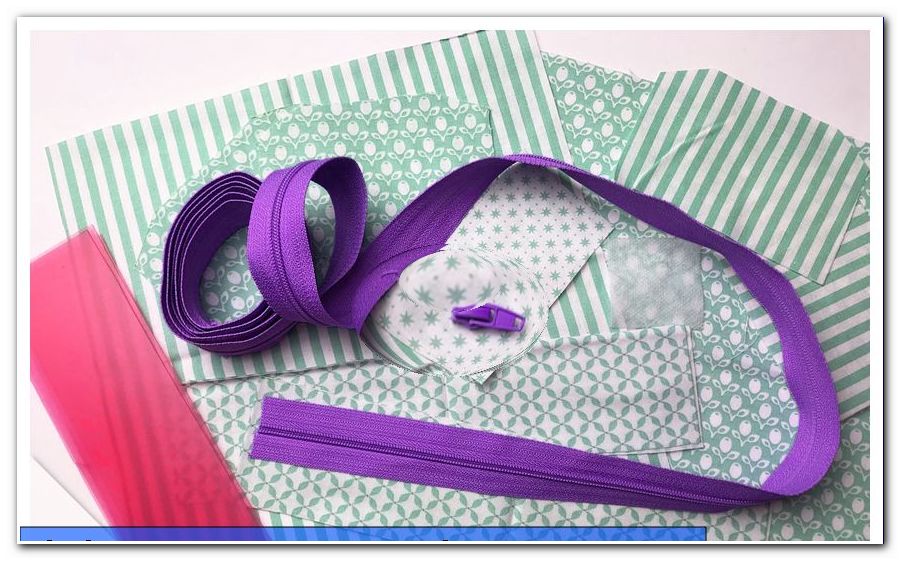
In addition, you need for the pencil case a zipper that should be at least 46cm long, better longer. I used endless zipper. For the conclusion of the zipper I have also used a small square of a thinner ironing insert.
patterns
I have converted the inch specifications of the original tutorial to centimeters for this manual. During sewing, there have been small deviations here and there, but I will always address them separately. All sections contain exactly 0.635 cm seam allowance. Here I would cut a few millimeters more generously - according to your usual seam allowances. With me that is 0.7 cm.
You need two side parts of the inner and outer fabric for the pencil case.

The bag itself consists of two squares of 21.6 x 21.6 cm (once inside and once outside fabric).
- For zipper closure you need two strips of 43.18 x 5.08 cm.
- The zipper rectangle is sewn from a piece of fabric measuring 5.08 x 8.89 cm.
- For the zipper rectangle you need a thin ironing fleece in the size 3.81 x 3.81 cm.
To reinforce the four sides, cut your insert into two 4, 45 x 17, 78 cm strips for the outer ends (where the zipper is sewn in) and two 5, 08 x 17, 78 cm strips for the two inner parts. Here it has been shown during sewing that it can be quiet 1-2 mm in width less, unless the fabric parts are correspondingly wider.
Sew pencil case
It is ironed - And the strips for zipper enclosure once longitudinally centered. Fold the strips apart again and fold both outer edges to the fold in the middle and iron again. Finally, fold the strips back in the middle and finally iron over them again. This corresponds to the procedure that you may already know sewing from the bias binding, except that in this case you do not necessarily have to cut it at a 45-degree angle, as this strip is being sewn straight.
Now place one top of the zipper (the side to which it is pulled) with the serrated bead upwards at a 50-degree angle in the edging strip about 1 cm from the edge.

Sew on 2-3mm and then bend the zipper so that the sides disappear in the edging strip. Quilting edged.
Tip: If you are still inexperienced, leave 1-2 mm space next to the caterpillar, so you can open and close the zipper later, without affecting the fabric. The same is the case on the other side.

While sewing, they eventually get in the way of the zipper. Be careful not to let it slip off your teeth. Lower the needle, lift the presser foot, and gently push it up past the needle.
This is how the framed zipper looks. Sew on the lower end and cut it off with 1-2 mm seam allowance.

Now place one inner and one outer part of the sides right to the right - for the second side as well - and put the layers together with pins. On the short top I have also marked with the pins with the red heads the route that I will not sew together as a turning opening.

Likewise, put the two squares for the bag together and sew everything together. Cut off the corners at an angle so that the seam allowance does not bulge out the fabric, turn all three parts and fold the seam allowances in the turning holes inward. Iron everything nicely smooth.

The zipper rectangle is ironed once in half and reinforced on one side with the ironing insert (on the left side of the fabric). Then fold it right to right and sew the two sides together and cut the seam allowances at the corners at an angle. Sew the beginning and end of the seam at the same time. Now also stitch the short edges of the side parts with a narrow edging.
Turn the zipper rectangle, which is almost a square by now, fold the seam allowances inwards on the open side and iron it tightly.

In the next step, first slide the narrower strips of your stabilizer up and down into the square. Then in the middle also the two wider stripes. I have marked the interstices with pins for better visibility. That was also a good help, so that nothing slips when ironing. Here, as already mentioned, unfortunately the fabric has moved a bit and became wrinkled. With the plastic insert so no higher than level two ironing! Now step off the gaps. Sew each beginning and end of each seam.

The first side of the zipper is then attached to the outside (parallel to the seams). For this purpose, the end of the zipper should end exactly at the (in this picture) top edge. Open the zipper and attach it with pins - or even better with Wonderclips. Now stitch both sides of the edging tight-edged onto the square. Close the zipper and attach it to the opposite side. Secure with a clip or pin, open the zipper, and also sew the second side to the square.

Fold the short ends of the zipper inwards and stitch them, then shorten the seam allowance to 2-3 mm. Unfortunately, I made the mistake of cutting before sewing and thus had my trouble with sewing. That's why it did not turn out so nice.
Now put one of the side panels left to left center on the square on a side to which no zipper is sewn. First, stitch the long side with a short edge and sew at the beginning and at the end. Now you can open the side panels carefully and fix them sideways. With it helped to bend away the zipper part at a 45-degree angle. Also sew the sides. Likewise, you sew the second page.

Mark the top center of the side panel and sew together a wedge of about 1-1.5 cm. Sew on beginning and end. Repeat this step on the other side of the bag as well.

Slide the long side of the zipper into the zipper square and stitch around with a square edging.

Finally, attach the push buttons. For this I have the "female" part attached to the outside of the bag at the bottom center and the "male" counterpart on the zipper square. When you close the push button, it zips up a loop where you can carry or hang your pencil case.

And already your pencil case of the special kind is ready! It is closed square when viewed from the side. When you open it, it opens up to the rectangle and you can see the much better.

Have fun sewing!
Quick guide
1. Create and cut patterns (dimensions and seam allowances may need to be adjusted by 1-2 mm)
2. Cut the non-woven fabric and inserts into place
3. Pre-press zipper trim (technique bias binding)
4. Sew side parts and pocket squares together right to right (turning opening!)
5. Bevel, turn and iron corners
6. Sew off the short sides of the side parts with a short edge
7. Strengthen the zipper rectangle, sew sides, turn, iron
8. Sew the zipper on both sides into the borders, sew on the underside and shorten
9. Place stabilizers in square and sew.
10. Stitch the zipper on both sides parallel to the seams on the square
11. Fold the short ends of the zip fastener inwards, sew on, cut short
12. Attach the side panels left to left and topstitch the outer edge, then the sides
13. Sew center wedge
14. Slide the zipper square onto the zipper and topp all over
15. Attach pushbuttons and fill
16. And done!
The twisted pirate