Crochet baby toys - handguns and baby rattle homemade

- Material and preparation
- Instructions - Crochet baby rattle
- Instructions - Crochet the toy
Babies want toys that stimulate the senses. Especially very young babies exercise the gripping and ability to guide an object by hand to the mouth. A little later, the exciting experiences for the eyes and the ears are added. Crocheting baby toys yourself is as much a pleasure for the expectant mother as it is for anyone else who longs for the arrival of the earthly citizen. The baby rattle and the rattle presented in the instructions are great as baby toys for the first weeks after birth.
Baby toys above all else must be safe. Above all, care must be taken to ensure that no small parts that could ingest the baby can be detached. The processed material should not rub off and contain any toxins, because babies put everything in the mouth. In addition, at the beginning of their lives, babies are much better able to recognize bold colors than pastel shades. For this reason, the snail grab and the caterpillar are crocheted in bright green with sun yellow. On the feelers was waived. Even if they are perfectly placed, they could break loose due to heavy use and endanger baby safety.
Material and preparation
For these two cute toys cotton was used. It feels good and is durable. In addition, the cotton, which most of the elementary school know, crochet very easily. It does not stain or fuzz when the baby has it in the mouth. If you want to use other wool, make sure the wool does not fluff. Even a small woolen fleece could swallow the baby. In the choice of colors you are completely free, but, as mentioned above, choose rather strong colors than pastel shades if the baby is younger than six weeks. Thus, the two toys can also help the baby to train his vision.
The meshes used are: Knittmaschen, Luftmaschen, fixed mesh. Thus, the manual is also very suitable for beginners.
You may still find your materials in the leftover box. Baby toys are very easy to crochet from wool scraps.
You need this:
- 50 g cotton, green, needle size 3.5
- 50 g cotton, yellow, needle size 3.5
- a rest of cotton violet
- a rest of cotton purple
(The purple and purple stripes can of course be replaced by any color.)
- Filling material, here fine new wool, synthetic material is also possible
- 1 darning needle with point
- 1 crochet hook in matching thickness
- if desired, an empty plastic capsule from a children's egg, a few rice grains
Tip: If you do not want to incorporate a plastic capsule, simply fill the head of the caterpillar with filling material. The plastic capsule with rice grains ensures that the rattle can rattle during the baby's movements. Due to the plastic capsule the baby toy can be washed without hesitation.
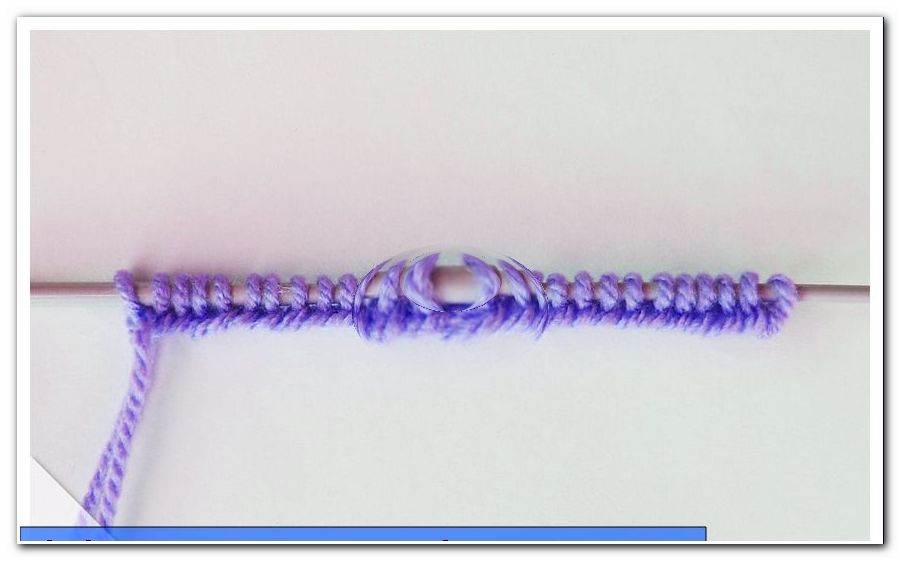
Start by crocheting the baby rattle, because this baby toy will make you crochet faster. The toy will follow the same instructions in many steps. [Photo baby rattle]
Instructions - Crochet baby rattle
1. Take 9 meshes of green cotton and make a ring.

Crochet 8 rounds of sturdy stitches. Please note, at the end of each round with a chain stitch to close. Always start a round with two air meshes.
Then crochet one round in purple, one round in green, one round in purple and two in green.

2. Continue working with the cotton in sun yellow. Crochet a round as before. Then crochet as follows:
1st round: 2 stitches, * 2 stitches, two stitches in one stitch *. Repeat this order until the end of the round. Close with a chain stitch.
Round 2: Like Round 1, your work is now enough to get the plastic capsule working.
3rd to 6th round: Crochet the crochet as they appear, start with 2 stitches and finish the rounds with a slit stitch.
Round 7: 2 air stitches, * 2 stitches, skip one stitch *. Repeat this order until the end of the round. Close with a chain stitch.
Round 8: Crochet all the stitches as they appear, complete the work and leave the thread quite long to use for sewing.
3. Now embroider eyes, attach the thread to the back of the work so it will not come loose. Insert the plastic capsule and sew the head of the caterpillar together above.

Now fill the body of the caterpillar with new wool or another, washable filling material. Close the bottom end and the baby rattle is ready.

Instructions - Crochet the toy
Take 9 small meshes of green cotton and make a ring. Crochet 8 rounds of sturdy stitches. Please note, at the end of each round with a chain stitch to close, you've already done so in the caterpillar. Always start a round with two air meshes.
Then crochet two rounds in the color purple, two rounds in the color violet and again two rounds in purple. Then you continue working with 8 rounds in the color green. Repeat the stripe pattern, make another 4 rounds in green and start crocheting the head with yellow wool. Crochet 4 rounds as before. Then follow the instructions.
1st round: 2 stitches, * 2 stitches, two stitches in one stitch *. Repeat this order until the end of the round. Close with a chain stitch.
2nd Round: Like 1st round, your work is now far enough for the snail's head.
3rd round: How to crochet the 2nd round.
4th and 5th round: Crochet all the stitches as they appear.
6th and 7th round: 2 air stitches, * 2 fixed stitches, skip one stitch *. Repeat this order until the end of the round. Close the round as usual with a chain stitch.
To close the gripper, sew the back, green end to the transition to the yellow section. This section is not stuffed. So he offers the little baby hand more opportunities to train gripping. Sew the thread so that it does not come loose.

Now you open your eyes. Use a well recognizable contrast yarn for this. A snail has no eyes, but feelers, but for babies this variant is safer.
Fix the yarn end well to the inside of the work. Then fill the screw head and pull the opening together. Your toy is ready. You can have the baby perform the first practical game test.

If you still want to decorate the rattle and baby rattle, sew on one or two flowers, as you can see in the photo below. The flowers are crocheted as follows:
1st round: Make 3 circles into a circle.
2nd round: Work 5 tight stitches in the circle and finish the round with a slit stitch.
3rd round: Start with two air stitches, make 3 stitches in the same hole, then follow a slit stitch. Repeat the process until the end of the round. Sew the flowers tightly. If you discover that the flowers are loosening after a wash or game, repair the damage immediately.

This baby toy works well when you have wool left over from a major job. So you are always well prepared when neighbors or friends announce offspring.