Fold origami swan out of paper - folding instructions

- Instructions: Fold simple origami swan
- Instructional Video
The art of origami is noble and stylish. From a sheet of paper, you can easily create decorative paper art works - just like this Origami Swan. In this folding guide you will learn step by step how to fold a paper origami swan. This simple guide will inspire you. Have fun refolding! Origami, the Japanese art of paper folding, enables you to do little from a lot. Just a sheet of paper and you can give yourself or others a treat. Especially traditional and decorative is the origami swan. In the following tutorial, we'll tell you how to fold a swan out of a single sheet of paper.
You do not have to be a pro for this guide, even beginners can handle it. Once you have the bow out, you do not need five minutes and Paper Swan is ready.
Instructions: Fold simple origami swan
You need:
- a sheet of square origami paper
- bonefolder
- pen
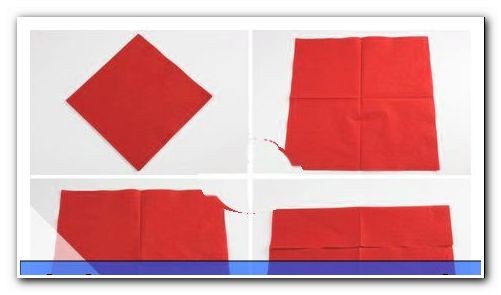
Step 1: Place the sheet of origami paper on the table in front of you. The paper should be positioned so that the side down corresponds to the color that the swan should then have. In our case, white is below and yellow above. Fold one of the two diagonals on top of each other. Open the fold again afterwards.

Step 2: Now the paper should lie in front of you so that the folding from the first step is perpendicular to you. Fold the corner pointing to the left towards the center with the outside edge along the fold. The right corner folds in just as well. In front of you is a dragon.

Step 3: Now turn this kite to the back. Then the duller tip of the kite is flipped over. Fold exactly where the edges begin at the back. Then there should be a triangle in front of you.

Step 4: Afterwards, fold the tip that was just folded over in step 3 back to the outer edge and open this fold again.
Step 5: Now fold the tip again to the outer edge - but continue to fold, until the fold from step 4 lies on the outer edge underneath.

Step 6: The next step is to fold the kite. Bring the side tips together upwards. Put the paper on the table.

Step 7: In front of you is now a large, pointed triangle (later neck and head), from the left a smaller, yellow triangle (later tail) looks out. Their upper, horizontally running edges are still in line. Now move the small triangle a bit downwards. For that, fold it inside a little more - so the top shifts diagonally down.

Step 8: Now fold up the top layer of the down-facing tip so that this edge closes with the top outer edge.
Step 9: Apply the paper, then repeat step 8 on the other side. The result is a very pointed triangle with the smaller triangle on the side.

Step 10: Now put the two outer points, the big triangle and the small triangle, together and fold the paper in the middle. Open this fold again.

Step 11: Now connect these two points with a pencil. At this line, you then fold the paper in one direction. Turn the paper over and fold at that point in the other direction as well and open this fold again.

Step 12: Now fold the triangle in one piece so that the folds from step 11 form a curve to the rest of the piece. The long tip on the other side should stand by itself. Then fold the tip in the middle, so that the left side, where a rounding was just visible, disappears between half of the tip.

Step 13. Now fold the now thinner, long tip to the right. Fold these so that the right outer edge terminates with the left outer edge of the other element. Then open this fold again.

Step 14: In this step, the tip is folded once and turned over. Just open the tip a bit and fold in at the edge of step 13. The tip makes such a curve, but still points in the same direction as in the previous step.

Step 15: Now place the paper in front of you so that the long tip is pointing diagonally upwards to the right and the lower edge is horizontal. Open the long tip once. Then fold them down center to your own center line and shortly thereafter offset a bit back up.

Step 16: Then fold the long Spitz back together. You see, the head with the beak is already recognizable.

Step 17: The swan is still looking back. So now fold your neck forward. Then you open the long tip as before and hit the neck once in itself - so he makes a turn again. The swan is now looking forward. Now you can leave the neck like this or you repeat this step again at the front of the neck - then the tail even looks down a bit.

The Origami swan is made of paper! You see, so quickly you can create such a beautiful orgami swan from a single sheet of paper. Set accents and integrate this swan into your decoration at home. Or place the swan at the next dinner on the banquet table - your guests will be amazed.