Retrofitting the window lock - instructions for installing

- Note the material of the frame
- Instructions plastic frame
- Instructions wooden frame
- Different screw heads
- Screws in plastic windows
- Gluing window locks
- Furnish patio door with a lock
- Find the right height
If you decide for the subsequent installation of a window lock, then you increase the burglary protection. At the same time you also improve safety, as little children can no longer open the windows unobserved and fall out of the window. But not only the windows but also the patio door can be equipped with a lock.
After installing the lock, you can use the window as usual, ie open, close and tilt it. The products offered on the market differ significantly. While some models are locked with a key, other variants have a latch. In a violent opening attempt, this engages and provides for a blockage or is already advanced and blocks the window. In addition, the window locks can have a detector and thus transmit burglary attempts or open windows to the existing alarm system.
Note the material of the frame
Window frames can be made of different materials, which differentiates the installation of the lock. Plastic or aluminum frames are among the most commonly used materials. Here, the installation of a new window handle with integrated window lock designed particularly simple, since usually the window can be opened and tilted by turning the handles.
Instructions plastic frame
Step 1 - First you have to gain access to the screws of the window handle. These are usually located behind the closure cover. Often the cover can be pulled up and rotated 90 degrees. However, there are differences between the individual window models, which must be taken into account. 
Tip: Be careful not to accidentally break the cover. Mostly it can be removed relatively easily and without much resistance.
Step 2 - Once you have removed the cover, the view of the screws is now free. These are mostly countersunk screws. Through them, the handle is attached to the window.
Step 3 - Next, loosen the screws and remove the handle.
Step 4 - Insert the new handle including the lock.
Tip: Pay attention to the fit of the lock. For standard windows, suitable locks are usually offered in almost all DIY stores.
Step 5 - Retighten the new handle. As a rule, the screws should be suitable. When tightening, be careful not to screw tightly so that the plastic of the frame will not be damaged.
Instructions wooden frame
Often it is not possible to replace the handle, because, for example, no matching model is offered. In this case locks are the right choice, which work with the help of a bolt. For this purpose, one element is mounted on the casement, the other on the window frame. The attachment takes place in wooden frames by a screw, on plastic frame you can either also screw or opt for a glued model.
Tip: Screwing is the safer option. However, you must note in rental apartments that you thereby damage the window frame. Therefore, it is necessary to obtain the written permission of the landlord before starting work.
Step 1: First, find the right position for the window lock. To avoid damaging the glass, you should choose a location near the outside edge of the sash. A distance of a few centimeters from the edge is considered ideal.
Step 2: The lock usually has a plate, which you can remove. This will identify the positions of the screws.
Step 3: Hold the lock to the frame and mark the holes with a pencil. This ensures that you maintain the correct distance later. It is also important that the locking mechanism is horizontal. Use a spirit level to test whether the lock is aligned horizontally. Take the smallest possible spirit level and place it on the lock. Now the bubble should be in the marked area. Otherwise, correct the position of the window lock again before drawing in the holes.
Tip: If the spirit level is too large to be placed on the lock, you can either stop it on the top edge or use the vertical direction of the lock to check. The spirit level can be used in two directions, which facilitates handling.
Step 4: Next you need to draw in the holes for the second part of the lock. Make sure that both elements harmonize with each other from their position. In this case, the level is less important than the orientation to the first lock component.
Step 5: Use wood screws for attaching. The size of the screws depends on the existing dimensions of the lock and the window frame. In general, the screws are either already included in the set for the window lock or you will find in the manual notes on the dimensions in terms of diameter and length. First select the appropriate screws.
Step 6: First, drill out the holes. Use a diameter that is slightly smaller than the diameter of the screws to be used. The depth should also be a bit shorter when pre-drilling.
Tip: When considering the depth, keep in mind that the screw head is held a little bit apart by the lock element and therefore the screw does not turn with its entire length into the material.
Step 7: Then tighten both components. Be sure to tighten the screws tightly but not too tightly for a tight fit, but not to damage the material.
Different screw heads
Screws are available with different screw heads. The knowledge of the differences enables the selection of suitable materials. The most important thing is to select the right bits or screwdrivers for the screws. Only then is an effective work possible and there is no damage to the material.
- Simple slotted head : This is a linear opening for which the slotted screwdrivers are suitable.
- Phillips (PH): PH features a particular type of Phillips screws. Compared to the PZ screws, the PH screws have no additional slots. The associated screwdriver is equipped with a thin tip and has tapered blades.
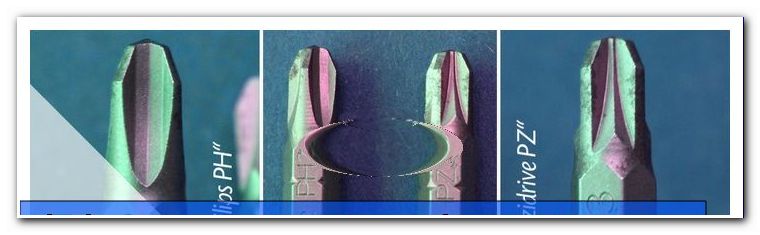
- Pozidriv (PZ): Pozidriv screws are Phillips screws. In contrast to the PH screws, the PZ screws have additional thin slots. If you look at the associated PZ screwdriver, you will notice straight notches and parallel blades. The blades reach into the slots of the screw head, which transmits the power very well.
Tip: Pozidriv screwdrivers can be recognized by their rounded tips. The advantage is that the screwdriver is inserted deeper into the screws and thus has a better grip.
- Torx (TX): Torz refers to a screw variant that has a star-shaped shape and is equipped with rounded corners and points. It ensures a very good power transmission.

Screws in plastic windows
When it comes to plastic windows, the procedure for attaching the window lock is similar to the above instructions. However, there are two main differences:
- The holes are often difficult to mark with a pencil, so editing is necessary. Make sure that it is suitable for the surface and not smudged.
- The drilling is different to drilling in wood.

- To drill the screws in the plastic, proceed as follows:
- Be careful in any case, so that the plastic does not break out and cause no damage.
- When drilling, there is a risk that you will slip off with the drill first. The reason lies in the smooth and firm surface. Therefore, you should try to find a starting point and find a small hole for the drill before setting up the drill. You can use a hot nail for this. Press this lightly on the plastic, so that the surface melts.
- When adjusting the drill, make sure that the drill is opposite to the cutting direction . The goal is for the drill to melt through the material. This creates clean holes.
Tip: If you want to remove the window lock later, this is easier with a clean hole.
Gluing window locks
As an alternative to the screws, the gluing of the locks remains. However, this should be the second choice, as the screw connection is safer. If burglars use a lot of force, then screws are much safer. But they too can be spoiled with the right tool. Absolute safety does not exist with any attachment method. If you live in a rented apartment, then you must pay attention to the following:
- Is it allowed to drill into the window frames ">
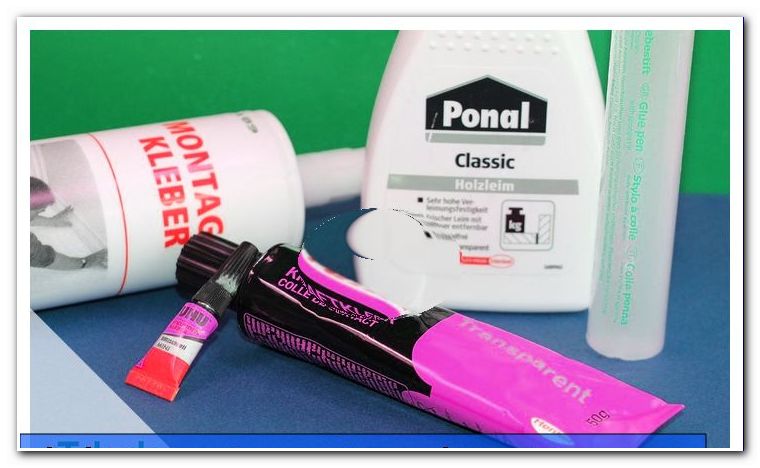
Different adhesives - different ways - Choose the right glue. Make sure that it has a high adhesive force and is suitable for plastic.
- Clean the surfaces thoroughly. After removing all visible contamination, you must clean the plastic again with alcohol to thoroughly remove any residue of grease. If particles are left behind, the optimal adhesion is no longer given.
- Apply the adhesive according to the instructions on the package. Be sure to comply with the recommended amount and drying time.
Tip: First of all, you can press the lock against the plastic and hold it. In order to allow enough time for the glue to dry, you should temporarily provide additional stabilization. For example, fix the component with an adhesive tape so that the grip is improved. After the glue has dried, you can remove the tape again.
Furnish patio door with a lock
To improve the security of the patio door, you can also attach a window lock here. This differs in principle from the design not from the variants for the windows. Often you can even use the same models. Please note, however, the following special features:
- If you attach the window lock to a window, then the frame is usually positioned lower than the sash. This difference is compensated by the lock. Large patio doors are often realized as double doors so that the next door is directly next to a door. In this case, there is a flat surface. With some window locks, you can vary the height of the components, for example, by placing small plates under them.
- Since the patio door is larger than a normal window, here the mounting height plays an even greater role than in the windows.
Find the right height
The optimal height is very important in the attachment. It depends on several factors:
children
The purpose of the lock is primarily to keep small children from opening the window or the patio door. Then the window lock must be attached as high as possible for the sake of safety. This prevents the children from reaching the opening mechanism.Tip: When retrofitting, consider the other residents in the house and their physical characteristics. It must be ensured that all persons who are to open the lock can do so. If, for example, older children are living in the home, the elderly or people with physical limitations, they must be able to reach the lock easily in all situations.
protection
If the lock is placed in the middle, then the best way to distribute the protection is to try to break in. The lock should not interfere after installation, so mounting in close proximity to the handle should be avoided. A few inches above the handle are ideal, but make sure that the handle for tilting the window can still rotate easily.