Tile cutting - Instructions for corners and curves
- Cut corners
- preparation
- parallel routing
- diagonal installation
- manual
- Cut curves
- preparation
- manual
They want to renovate and revamp their kitchen ">
If you want to cut tiles, you have to proceed differently with curves and corners. These cuts are used, for example, for the tile that rests directly against the toilet so that the floor does not remain free at this point. At first glance, this work seems complicated, but it's easier than you think, especially if you use the right tools, such as the tile cutter, the jigsaw or the classic, the Flex. Since you do not cut a corner like a curve, you must do something different for each one. Nevertheless, with no Schmitt increases the level of difficulty and can be easily performed.
Cut corners
preparation
Corners do not really require a heavy cut, but have to be measured differently in comparison. The reason for this is the size of the tiles and the surface to be tiled. It is normal that the edge and corner tiles always have to be cut, as they are not measured directly on the room surface. Especially with the corner tiles must be measured exactly before the cut takes place. To measure the corner tiles, proceed as follows:
Depending on the tile installation technique, you will have to measure the corner tiles differently. These include parallel and diagonal laying . While the parallel laying technique does not differ from measuring the actual edge tiles, it is a bit more difficult when laying diagonally.
parallel routing
- Take a tile vertically in your hand
- set them so that the space between the wall and the next tile is bridged
- this gap is the part of the tile that will be used afterwards
- mark the tile at the point where it touches the already laid one
- Alternatively, measure this distance with a ruler and make a note of it so that you have it at hand later
Now you have your mark and you can inquire about it at the cut.
diagonal installation
With a diagonal installation, this is a bit complicated. Since the corners are mostly crooked here, this corner piece is harder to measure than in a classic parallel installation. You must do one of the following to allow the corner to be accurately marked:
- Here too, look for the tile that is closest to the corner of the room
- since one side to the corner is typically longer than the other, you must set your own markers for both sides
- Take the tile vertically in your hand and attach it first to the wall at the shorter space
- at the same time the bottom of the tile has to point to you
- mark the spot where one tile touches the other
- Now the tile is tilted once, so that the long side can be measured
- here must also show the bottom to you
- Now mark again the spot where one tile touches the other
In this way, you will quickly and easily get the exact mark, through which you can cut the tiles. Markers can be set with different pens. These work as follows:
- bright tiles: pencil
- dark tiles: white crayons
- smooth tiles: thin marker and painter's crepe

Since smooth tiles can only be marked with a marker, you should place them here on one that is not too thick. Alternatively, use the painter's crepe, which can simply be glued to the surface and then marked with a pencil. In addition to the marking you also need the right tool for the cut:
- Tile cutter: costs between 30 - 160 euros, depending on tile thickness and quality
- Tile hammer or tweezers for tiles: costs between 5 - 10 euros
- Parrot tongs: costs between 10 - 15 euros
- Whetstone with fine grain size, for example 400/1000: costs about 10 euros
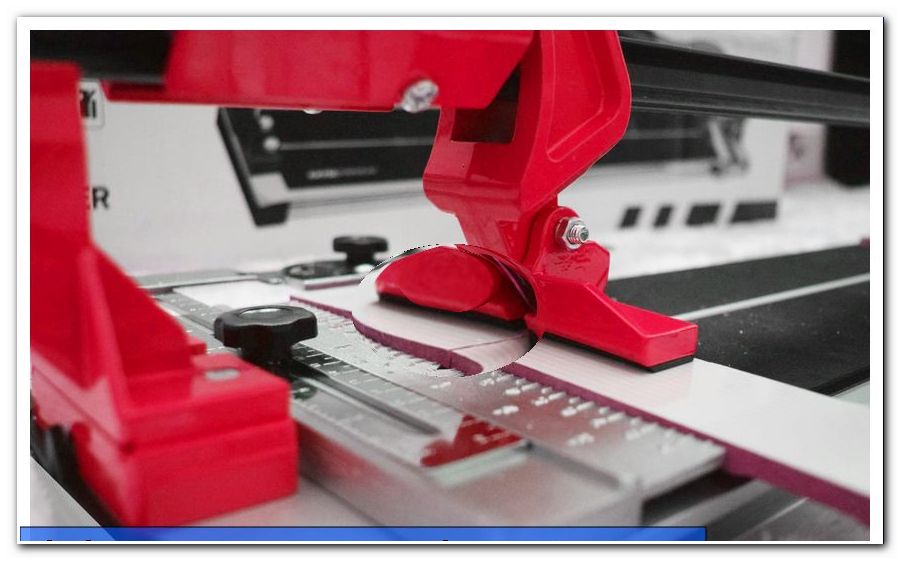
The tile cutter is much better suited for tile cutting a corner than the Flex. The tile is simply placed in the apparatus and is thus fixed. In addition, the tile cutter allows only one cut in one direction and does not slip off. If you use a flex instead of a tile cutter, you can easily slip or skew, which is not ideal. Also, electric tile trimmers are not recommended, as these are similar in function to a circular saw, which requires a lot of effort and precision. It also causes unnecessary noise and dust.
Tip: if you do not have a tile cutter available, you can rent it at DIY stores or specialist dealers, usually for a flat rate of around 40 euros per day. If you decide on a tile cutter, you should choose a high-quality device, so that the scoring of the tiles succeed quickly and easily.
manual
If you have your utensils handy, you can cut the tiles. Do not be surprised if the tile cutter initially looks as if it would not cut. This device is not a cutting device, but a device that scratches the surface of the tile so that it can be broken off afterwards. This works better than many believe in the beginning and make tile cutting easier. Proceed as follows:
Step 1: Insert the tile into the tile cutter and align the stop angle with the marker on the tile or the dimensions noted. Take this step as carefully as possible, because too much removed material can not easily be re-glued. Leave a little more edge left over.
Step 2: Now take the lever and drive with enough pressure over the entire tile along the marking. The tailor is now scratching the tile. You only need to drive over the interface once and excessive pressure is not required. Too much pressure could lead to a break of the tile. On the other hand, too little pressure does not scratch the tile. It is especially important that you run the track to the end and not just stop in the middle.
Step 3: Then remove the tile from the device and break it in half with a hammer or pliers. Be sure to hold the piece of tile in your hand that you want to use.
Step 4: If the breaking edge is still too long, use the parrot tongs and nibble on excess. Finally, use the whetstone and smooth the edges created by cutting.
Cut curves
preparation
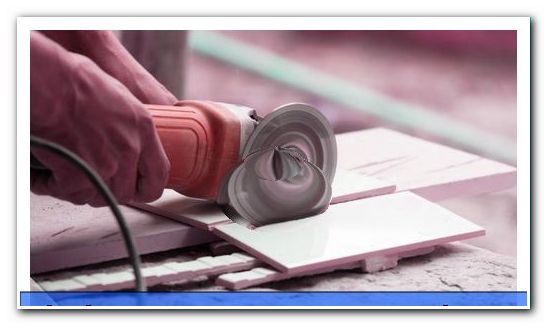
When cutting tiles, curves are often associated with a little more work. They can not be cut with a tile cutter, as this only allows straight cuts. For this reason, the only devices for this purpose are the jigsaw or the angle grinder, so the Flex. To prepare the cutting of the tiles, you need the following materials in addition to one of these tools:
- Flex or jigsaw: costs between 30 - 200 euros depending on quality and design
- Diamond blade at angle grinder: costs between 15 - 50 euros depending on quality
- Tile saw blade for jigsaw: costs about 15 euros
- parrot pliers
- Pen for marking or masking tape and pencil
You do not need more for tile cutting. Follow the above information when selecting the marker marker. After you have the necessary materials and tools at hand, you can start preparing:
- lay the tile in front of you and pick up the pencil or masking tape
- After measuring the required diameter of the recess, draw it on the tile
- You should take your time and measure accurately, so that the tile fits in the end
After the marker has been recorded, you can now continue with tile cutting. Please make sure not to clamp the tiles in a vise or similar. As a result of the resulting pressure, the tension in the tile would become too great, which in turn could lead to breakage. For this reason, hold the tile by itself as you cut it. This allows you to regulate the force that is applied.
Tip: if you do not own a Flex or a jig saw and you do not want to buy one, you can borrow it from a hardware store. So a jigsaw costs about 12 euros per day, while an angle grinder can be rented for about 24 euros a day.
manual
After the completed preparation, you can now start cutting. To do this, pick up your corresponding tool and follow the instructions below:
Step 1: Place the tile so that you can easily hold it in your hand, but your fingers are not in the cutting direction of the flex or jigsaw.
Step 2: Place the tool on the edge and start cutting individual cuts with the tool to the edge of the respective marking. These should best be laid out in a fan-shaped pattern, if possible.
Step 3: While making the cuts, the resulting strips should have a maximum thickness of 2 cm. The thinner the strips, the easier they can break out. This work can be done easily with the Flex and the jigsaw, but you usually need a little more time with the jigsaw.

4th step: Make sure that none of the cuts reaches the mark, but stops slightly before it. This reduces the risk of rounding becoming too large.
Step 5: After all cuts have been made, carefully break off the individual strips. Now use the parrot tongs to cut away the remaining material to the marking. Take small steps so you do not cut too much. So take some time and concentrate to achieve the shape of the curve bit by bit. Make sure the cut edges are as round and smooth as possible. This is no problem with the pliers, it only takes some time.
Step 6: After you have cut the curves exactly to the mark, you should dispose of the removed material in the trash and then work the cutting edge of the tile with a whetstone. As a result, the cutting edge is "defused" and can be laid easily.
In this way, you can effectively cut curves from the tiles. The tile can then be used immediately and the risk of breakage is extremely low due to this shape of the cut. This makes this method so effective, because you can concentrate fully on the cut without worrying that the tiles will break.