Sewing borders - overcasting corners & edges

The overcasting of corners and edges, as well as the sewing of borders are now part of the basic basics of the sewing world. Since most fabrics fray at the edges, bordering offers a practical way to ensure a beautiful finish without having to hem. Here you can play with different colors and shapes.
Today I am going to show you a variety of ways that you can easily frame fabric edges and corners. We sew these borders on the machine and use homemade or purchased bias binding . Both variants offer a nice finish for bags, placemats, arm and neck openings and any type of hem. Binding not only offers a visual way to overcast the fabric edge, but also protects the fabric from fraying. It also helps to achieve a certain stability and fixation of the fabric edges.
content
- Material and preparation
- Manufacture of bias tape
- Sew borders
- Border straight with bias tape
- Border the outside corners with bias tape
- Border inside corners with bias tape
- Include cutouts and curves
Material and preparation
We will start with the production of self-made bias binding, we will continue with the bordering of straight lines, inside and outside edges and we will finish the instructions with bordering curves, which is ideal for arm and neck cutouts, for example.
Manufacture of bias tape
Making bias tape yourself is anything but difficult.
You only need:
- Jersey fabric or woven goods
- scissors
- ruler
- Iron

1st step: First cut strips of fabric with a width of 4 cm.

The longer the strips of fabric, the easier. However, you can easily sew several strips of fabric together.

To do this, cut off the strips of fabric at an angle of 45 degrees.

Put both strips together with the diagonal right to right.

Topstitch the interface with the straight stitch.

Iron the seam by pushing the seam allowances aside and cutting off excess material.

This is what your first sewing result looks like.

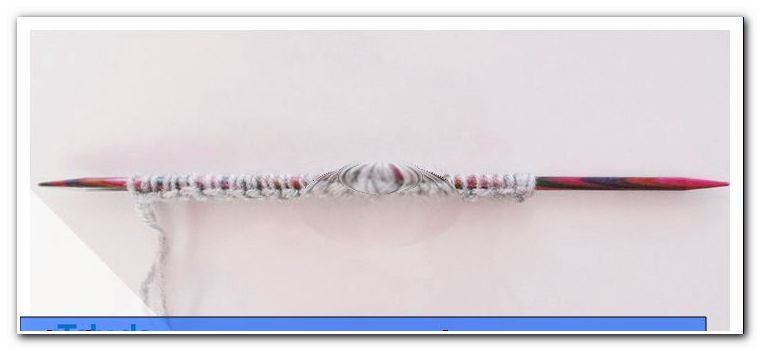
Step 2: When you have cut the bias tape to the desired length, fold it once in the middle (left to left) and iron it.

Unfold the tape again and put both edges to the middle (also left to left) and iron the tape again.

The tape is ready and can be used for binding clothes or other sewing projects!

This is what your finished nutritional result looks like!

You can create your own custom bias binding so quickly.

Sew borders
Binding and overcasting with bias tape
Purchased and homemade (ironed) bias tape is used in the same way. Sometimes it is a little easier to process purchased bias tape, because the edges are a bit stronger than with homemade bias tape. Therefore, when ironing, be sure to iron the edges as precisely as possible towards the center.
Border straight with bias tape
Step 1: We now start with a straight line.

Apply the piece of fabric to the left side of the fabric. Now place the bias binding with the right side of the fabric down on the edge and pin it with clips or needles.

Now the sewing machine is used.

Now stitch the tape approx. 3 mm (depending on the size of the bias tape - in the first quarter) next to the edge with the straight stitch on the fabric.

Step 2: Now hit the bias binding on the right side of the fabric.

Fold in the edge and attach it to the front of the fabric to be edged with needles.

The bias tape is now firmly attached to the edge, where sewing is about to begin.

Now topstitch approx. 1 mm next to the edging edge with the straight stitch. Your further nutritional result is shown as follows in the next picture.

Border the outside corners with bias tape
Step 1: Basically, there is no need to cut on outer edges.

As soon as you have reached the end of the back of the fabric (diagonally to the corner point), fold up the bias binding and attach it to the top edge of the fabric with a needle or clip.

Place it again along the next straight line.

Step 2: Now sew to the crease, lock the seam and cut the threads.

Fold the fold over and continue sewing at the exact point where you left off.

Your current sewing result is shown, as in the following picture.

Step 3: When sewing the front, fold the bias tape forward.

At the outside corners, the bias tape is now beautifully overlaid from behind. On the front, first fold the left side, then the right side, one above the other, so that a pretty letter corner is created.

Now it continues with the sewing machine.

Again, sew with the straight stitch approx. 1 mm from the edge of the bias tape.

Your finished stitching shows up in the result, as in the next picture.

Border inside corners with bias tape
Step 1: Sewing a little differently on inner corners. First cut the fabric in the inside corner diagonally inwards in the width of the folded bias tape.

This is what your incised fabric looks like.

The cut will make later work easier.

Step 2: Then the bias tape is placed on the back with the right side of the fabric down on the edge as usual and quilted. When you arrive at the inside corner, pull the fabric underneath and the bias tape straight so that you can continue sewing comfortably.

Step 3: At the seam on the front, stop briefly before you reach the inside corner. Then fold the bias tape into the existing cut of the fabric on the right side so that two layers of bias tape lie on top of each other.
Step 4: Next we sew to the inside corner, turn the handwheel until we have reached the middle of the corner and leave the needle in the fabric. Then fold the presser foot up, turn the fabric 90 degrees, fold the presser foot down and continue sewing as usual.

Include cutouts and curves
Border cutouts and curves with bias tape
Sewing borders is also a pleasant way of finishing over the neck and armholes. Here, however, you will find curves where the tape has to be stretched or laid loosely.
Step 1: As with straight edges, pin the bias tape on the back of the fabric.

As soon as you have arrived at a curve, fix the bias binding loosely to the curve so that it can be folded onto the front more easily later.

TIP: Due to the loose pinning, there will be enough bias tape later on so that we can pin the front nicely. If you are stuck stretched when rounding the outside, the fabric will undulate in the end result.
ATTENTION: With curves that go inwards, we do exactly the opposite: Here, the bias binding - when it is sewn on the back - is stretched a little so that no wrinkles can occur on the front.

Step 2: After the tape has been quilted on the back, fold it to the front.

Since the sewing was very loose beforehand, there should be enough bias tape left to fix it to the curve.

Now stitch the bias tape on the front as usual.

With these techniques you are equipped for all eventualities and can frame many different sewing projects with bias tape .

I hope you prefer sewing borders and hope you enjoy trying them out!