Sewing Baby Bodysuit - Free pattern guide and fabric tips

- Material and preparation
- preparation
- mounting
- Sewing baby bodysuit
Today I would like to show you how you can sew a nice Baby Body in the size 62/68 for your little darling with relatively little effort. As a template serve our free instructions and the enclosed pattern.
Especially in the first months of life, the body is probably the most popular piece of clothing for our little treasures. The press buttons at the bottom of the body allow him to change diapers to open and close easily. Due to the long sleeves, it can also be worn in the sleeping bag at night or under a sweater or rompers.
We sew the baby bodysuit with a so-called "American neckline", whereby the head of the baby has enough space in any case and the body can be easily taken off and on. By binding with bias binding he is a bit difficult to work, but in the end the more beautiful and practical!
Material and preparation
material
Depending on how you would like to sew the baby bodysuit, different fabrics can be considered. In my opinion, a simple cotton jersey fabric is best. It is soft and stretchy and can be easily washed in the washing machine even at 60 ° C or more.

Jersey is also very comfortable on the bare skin and has a warming effect. Due to its elasticity, it adapts perfectly to the natural curves of the body and is also breathable.
It is not for nothing that Jersey is one of the most sought-after fabrics when it comes to making T-shirts, children's clothing or underwear. You have the choice of different fibers such as cotton, silk or viscose. The processing of jersey fabrics is comparatively easy.

ATTENTION: When sewing jersey, ideally use a jersey needle in your sewing machine! Sharp needles hurt the fabric structure and it can lead to unsightly holes in the garments. A jersey needle has a slightly flattened tip and thus slides more easily into the gaps between the textile fibers.
In order for the jersey fabric to stretch in the right direction, it has to be cut against the threadline. This is drawn on the pattern. Basically, the following rule should be observed: The garment should be stretched from right to left further stretched as from bottom to top. This property can already be tried out while cutting and prevents the baby's body from warping.
What you need for a baby body:
- about 1/2 m jersey fabric
- scissors
- ruler
- pen
- our free guide
- the enclosed patterns (size 62/68)
- if necessary bias binding
- Sewing machine or overlock
- Download Sewing Pattern Baby Bodysuit Front
- Download Sewing Pattern Baby Bodysuit Backside
- Download Sewing Pattern Baby Body Sleeves

Difficulty level 3/5
Bordering the body requires some practice!
Time expenditure 2/5
2 h
Cost of materials 1/5
5 - 10 EUR for the jersey fabric, depending on quality and pattern
preparation
Step 1: First, print out our enclosed pattern on A4 paper, making sure that the print size is set to 100%. This setting is possible with every common printer.
Step 2: Now we cut out the pattern with scissors and glue together for the front and back with Tesafilm. The pattern for the sleeves fits on a sheet of paper.

ATTENTION: The sleeves are slightly longer than usual for this pattern. That's because my kids have very long arms and legs. I also find longer sleeves a bit more practical.
If that does not suit you, you can cut the pattern of the sleeves at the lower part (straight line) by about 2-3 cm.

Step 3: When you have the three finished parts of the pattern in front of you, place them on the left side of your jersey fabric and draw the lines on the fabric with a pencil.
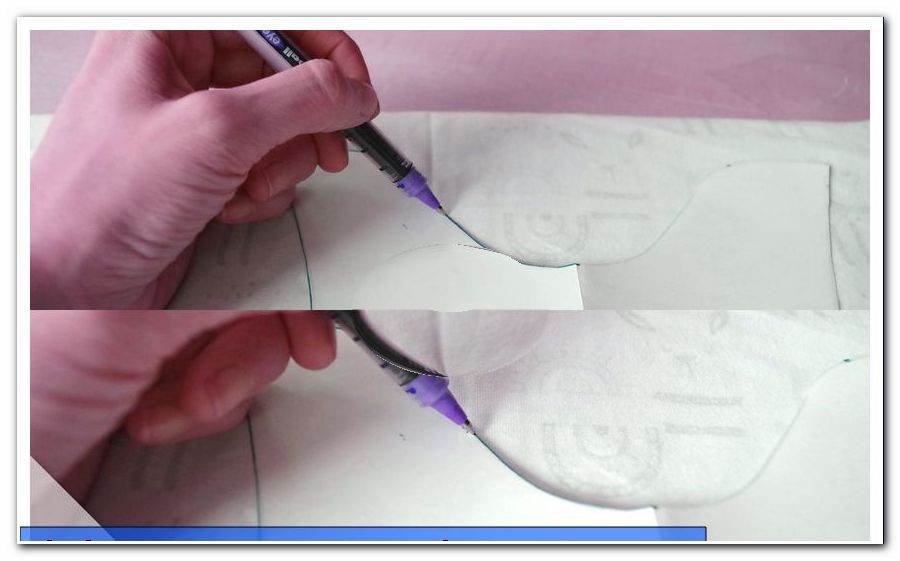
ATTENTION: The sleeve pattern is cut twice, once in the original and once the pattern is reversed. The difference is minimal, but the armhole of the back is slightly shorter. As a result, the sleeve can not be cut twice identically!

4th step: Now all fabric pieces are cut with scissors.

mounting
In order to be able to frame the edges of the bodysuit, we either need ready-made bias binding (available in almost all fabric stores) or selfmade jersey bias binding. I usually prefer self-cut bias binding, it is quick to produce and the fabrics or colors can be better matched in advance. In this case I happened to have matching prefabricated bias binding at home and use this.

If you want to make the bias binding yourself, cut a strip with a width of 4 cm and a total length of approx. 1.5 m . Of course you can also cut two strips 75 cm in length.
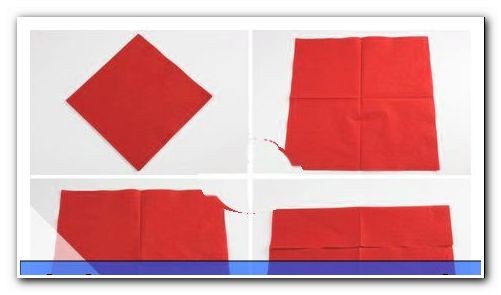
Now place the bias binding with the right side of the fabric on the ironing board, fold it once left to left and iron the entire strip to form a fold in the middle. Next, open the strip again and iron both sides to the middle.
Step 1: We begin by framing the front and back of the body.

To do this, place the edge of the bias binding with the right side (!) On the back of the neckline and fix everything with pins or clips.

We'll do the same for the leg cut.

In the case of the sleeves, we grasp the cut out of the hand with a straight piece - to do so place the edge of the band with the right side on the left side of the jersey fabric.

2nd step: Now follow the back seams of the bias binding.

Sew with the straight stitch of your sewing machine (and matching yarn) about 2-3 mm from the outer edge of everything.

This is how your sewing result looks now.

Step 3: Next is the visible front side.

Now fold the bias binding onto the right side of the jersey fabric. The bias binding is also folded inwards.

Now that you have pinned everything, tap the right side with the straight stitch again.

This is how your next sewing result looks like.

TIP: Stay very close to the edge! Thus, the first seam is nicely covered and the bias binding looks beautifully processed!
Step 4: When all parts are trimmed, cut off the threads and protruding bias tapes.

Now at the front and back part of the neck and leg cut, as well as the sleeves should be bordered and we can sew the cut pieces together.

Your sewed result is now shown as follows.

Sewing baby bodysuit
Step 1: For the US section, we first place the front and back sides left to left.

We fold the end of the back over the front to create an overlap of 5 cm each.

Stick the two fabrics now.

Step 2: With the straight stitch of the sewing machine we quilt the overlap with a short edge. This seam disappears later when we attach the sleeves.

Step 3: Now put the body on the left side of the fabric and put the sleeve cuts right to the right at the openings.
(The sleeve according to pattern is the left sleeve, mirrored cut it is the right sleeve!)
TIP: To see which sleeve fits the particular opening, fold the sleeve once in the middle (at the highest point). The shorter side belongs to the back part of the body.
Step 4: After pinning the sleeves, sew the sleeve cuffs together with the zigzag stitch of the sewing machine or with your overlock machine.

So now shows your sewing result.

Step 5: Finally, stitch the sleeves lengthwise and the sides of the bodysuit together.

The body is put back together on the left side of the fabric and closed with a zigzag stitch.

Step 6: The body is almost done!

In order to be able to close it in the step, we need 2-3 push buttons at the bottom.

The attached push buttons on the baby bodysuit.

Voilà - the baby body is ready! Have fun sewing!