Sewing corner pieces - Instructions and tips for sewing corners

- Material and preparation
- Corner seams with equal hem additions
- Corner seams at different hem widths
For curtains, placemats, tablecloths, the open slits in skirts, borders and much more, beautiful corners are essential. Today I would like to show you how to sew two different versions of corner letters. So both sides are sewn beautifully and the fabric piece can be shown on both sides.
In the first part of our guide, the hem is equally wide on both sides, in the second part we work with two different sized hem additions. This is a great advantage especially when sewing curtains, because here the hem at the bottom is often larger than the hemmed fabric on the sides.
Material and preparation
You need this:
- Piece of fabric or sewing project with right-angled corners
- scissors
- ruler
- pen
- Iron

Difficulty level 2/5
Sewing corner pieces on different sizes of fabric requires some practice
Material costs 1/5
Depending on the existing sewing project
Time expenditure 1/5
10 min. per corner / depending on the variant
Corner seams with equal hem additions
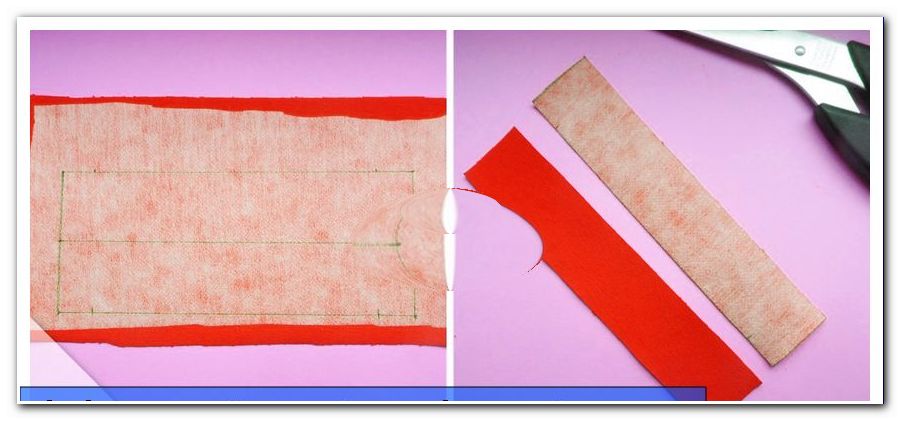
Step 1: First we define the size of the seam allowance that will be taken later. For my specimen, this distance is 1 cm. Next we need the size of the hem, in our case that is 2.5 cm, so we measure a total of 5 cm.
2nd step: Now we record the distances on the corner of the piece of fabric. The seam allowance, which will later be on the inside, will be marked first on the outside edge. Second, the hem is drawn.

Step 3: To make sewing easier, iron both lines with the iron.
4th step: Next, we fold the corner left to left straight inwards. The ironed lines should be exactly the same. We iron again along this new line, so that the line is then clearly visible.

Step 5: Then fold the fabric together right to right. The just ironed lines should meet here. The seam allowance of 1 cm is folded left to left.

Step 1: Sewing the corners requires very few seams, one of which is the right-angled seam we just ironed. The excess fabric can now be cut off at a distance of approx. 5 mm from the seam.
2nd step: Now the corner can be turned outwards. If necessary, you can help with sharp objects, so that the fabric unfolds completely in the corner.

Step 3: Finally, we sew the edged machine with the straight stitch of the sewing machine and the matching yarn along the seam edges. When the corner crease is reached, use the handwheel to turn the needle into the fabric, lift the presser foot and turn the fabric piece accordingly.

After lowering the presser foot can be sewn on and the seam runs nicely along the edge.

Corner seams at different hem widths
Especially with curtains it can come to different hem widths. This means that unfortunately we can not sew the corners as described above, otherwise they would be distorted or skewed. Now I'll show you how you can still sew straight corners.
1st step: Again, we mark the hem width on the left side of the fabric. I have used a distance of 4 cm on one side and a distance of 8 cm on the other side, so that you can see the difference in the widths nicely.
Step 2: Next, both sides of the lines can be ironed in again so that the seams are straight at the end. Now the fabric is turned over and the first side is placed on the right edge on the edge. At the end of the hem we mark a dot with a small line on the side. We do the same on the other side. Two markings should now be visible on the right side of the fabric.
Step 3: We now place these markers on right to right, with the fold point of the fabric lying exactly at the intersection of the hem markings. From this point, we use the pen along the ruler to draw a line to the meeting point of the two markers.

Tip: If you want, you can also calculate a seam allowance of 1 cm and fold it in or fold it in before the next step!
4th step: Before the line is stitched with the straight stitch, we put the fabric firmly.

Step 5: As with the first part of the manual, we also cut off the excess fabric by about 5 mm along the stitched line and turn the corner to the right. To make the corner look nice, you can use a pen or needle to nudge the corner from the inside.

Step 6: And here too, the straight stitch is stitched along the hem edge using a straight cut. If you want, you can also stitch along the seam in the corner.
 However, this seam can also be seen on the other side of the fabric piece.

That's it! I wish you a lot of fun practicing and sewing!