Folding Paper Boat - DIY Paper Ship in just 3 minutes

- Which paper should I use "> Step-by-step instructions
- How can I make the boat more stable?
- Improve buoyancy
- Instructional Video
The paper boat is one of the classics of folding art. It can be produced in a few easy steps and can even ride on the water for a while. As a result, the paper ship inspires both large and small craft fans. Learn in our guide how to proceed in detail and which points are crucial. In addition, we offer you exciting ideas for variation and possibilities for improvement.
Anyone who can fold a paper hat has already learned the basics of crafting paper hat. Both works are similar in the initial steps, but the construction of the paper ship is a few steps longer. In both cases, only one material is needed for the production: A sheet of paper. They have folded the boat quickly and act spontaneously and without long preparation time. So that the boats are better on the water and have a good driving behavior, there are various possibilities for improvement. So you can make the bottom waterproof or increase the stability of the ship.
Which paper should I use?
Choosing the right paper is crucial to the function of the paper boat. Keep in mind that you have to make a lot of creases while crafting, making a light paper sheet very suitable. If you were to use heavy materials, it would be hard to create clear and straight edges. Crafting from the paper ship is an origami technique. This art traditionally uses thin yet sturdy papers. Below is an overview of the possible paper types:

Construction paper: Construction paper is theoretically suitable, but very heavy. The edges are difficult to set correctly.
Printer paper / copy paper: The thin yet sturdy paper is very well suited. It can be easily folded and has a high tear resistance. The edges are easy to retighten and can be tightened with the edge of the hand. This gives the boat a high stability.
Origami Paper: This traditional paper is available at craft shops for crafting or art supplies. It is thinner compared to copy paper, but has similar properties. The special feature of this paper is that it often has a particularly decorative design.
Newsprint: Newsprint is also suitable for crafting. However, the disadvantage here is the lower stability. This makes the boat easier to tear.
What are the costs of building the paper boat ">
The cost of crafting the boats depends solely on the expenses of the paper. A journal is usually immediately at hand and the cost of printing paper are close to zero. If you opt for origami paper, then costs of a maximum of one euro per sheet, often the sheets in the set but also much cheaper available.

Step-by-Step Guide
Step 1: Lay the paper on the table and fold it in the middle from top to bottom.
1 of 2

Tip: If it is important, due to the nature of the paper or the color, which side touches the water later, then note the following: The side that is placed in the water must now be on the inside of the bend.
Step 2: Now you have to set a second kink. Fold in the opposite direction, ie from left to right and then unfold the fold again. The kink serves to determine where the center is located.
1 of 2

Step 3: Now take one of the two lower corners and fold them to the middle so that a triangle is created. Pull the fold with your hand. It is important that the open side of the paper is at the top.
Step 4: Repeat step 3 with the other bottom corner, creating another triangle. Both triangles must be flush with the centerline.
Step 5: Now flip the paper over and fold one of the lower edges up along the bottom of the triangle. Then turn the boat and fold the second lower edge upwards as well.
1 of 2

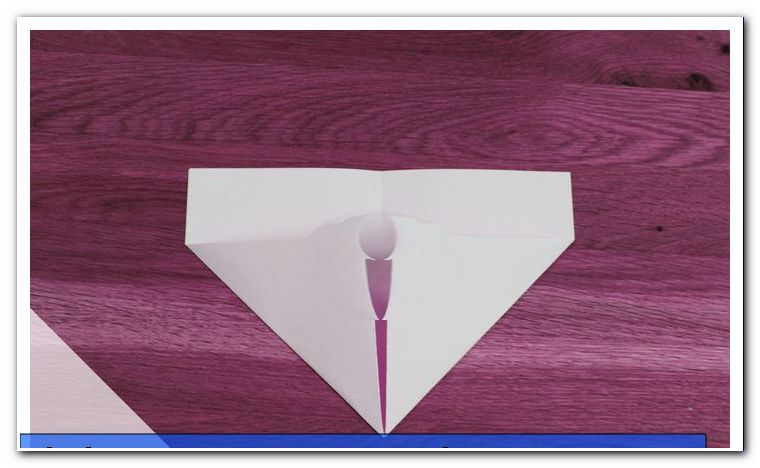
Step 6: Now fold the protruding corners along the triangle so that the corners are hidden and a proper triangle is formed.
1 of 2

Step 7: Fold this triangle together to form a square by joining the two equal corners of the triangle.
1 of 3


Step 8: Place the square in front of you, with the corner where the two edges overlap pointing to you. Fold this corner up. Turn the paper over and repeat with the other corner. You now have a triangle again.
1 of 2

Step 9: Fold this triangle into a square as you did in step 7.

Step 10: Grasp the paper boat by the two facing corners and pull them apart. The finished ship is created. Finally, re-shape the edges and sides of the boat with your fingers to ensure that its shape is stable.
1 of 2

How can I make the boat more stable?> Improve buoyancy
1. Measure: By suitable modifications the buoyancy of the paper boat can be improved. The decisive factor is the width of the underside. The corresponding surface can be widened slightly. To do this, pull the diagonal edges outwards. The bottom becomes flatter and the boat floats better on the water. Since at the same time the contact surface at the bottom increases, the paper ship gains stability.
2nd measure: If the boat is more stable on the water, then the swimming properties also improve. Use two ships and plug them into each other. The boat gains lift by this measure. You can also optimize the stability of the paper ship with small pebbles. The stones provide additional ballast and the ship is upright. Lay the pebble stones around the triangular middle section.
Tip: The stones allow you to vary the weight. Through skillful distribution, it is feasible that irregularities are compensated and the ship is better straight ahead.
Helpful tips for the paper boat
- The paper should not be square. An elongated shape at the rectangle gives the paper boat a more suitable shape for water travel and makes crafting easier.
- Although masts and sails can theoretically be attached to the paper boat, but provide for an unfavorable weight distribution. If the boat is to serve decorative purposes, then you can make any embellishments and additions. For a ride on the water, however, a low center of gravity is advantageous. Shift the center of gravity upwards through a mast, then the ship can easily tip over.
- If you use writing paper from a block for construction, note that the sheets have a punched hole. The holes should not be in close proximity to the water. This could otherwise cause moisture to enter the boat.
Tip: Stick the holes with Tesafilm before tinkering.
- If you paint faces on pebbles, you can put them on the boat as passengers.
Instructional Video
Tips for quick readers:
- Printer paper is well suited for construction
- Origami paper looks decorative
- the first steps similar to paper hat making
- Pebble for variation of balance
- Cover the underside with Tesafilm: waterproof
- Paper should not be square
- Paper should not be too thick