Crochet bracelet - free instructions for friendship ribbons

- Crochet bracelet - 4 ideas
- Strap Bracelet
- Flowery friendship ribbons
- Shell Bracelets
- Crochet with wire
You have a beautiful outfit hanging in the closet, but not the matching jewelry to ">
We have something for every style of clothing. Decide for yourself whether you want to crochet a romantic rose bracelet or rather a sparkling hoop of wire and pearls. Such a bracelet is made quickly and is ideal for giving away. For the simplest of our friendship ribbons, you do not have to do anything except mesh and stitches. Therefore, the friendship bracelets are ideal crochet work for beginners who want to improve the regularity of their stitches with simple patterns. But be careful! The bracelet crochet is quickly addictive! With every bracelet, there are endless variations that you will definitely want to try out soon.
Crochet bracelet - 4 ideas
Strap Bracelet
Prior knowledge:
- stitches
- Fixed stitches
Material:
- Needle size 3 wool (one or more colors)
- Crochet hook size 3
- stud
- embroidery needle
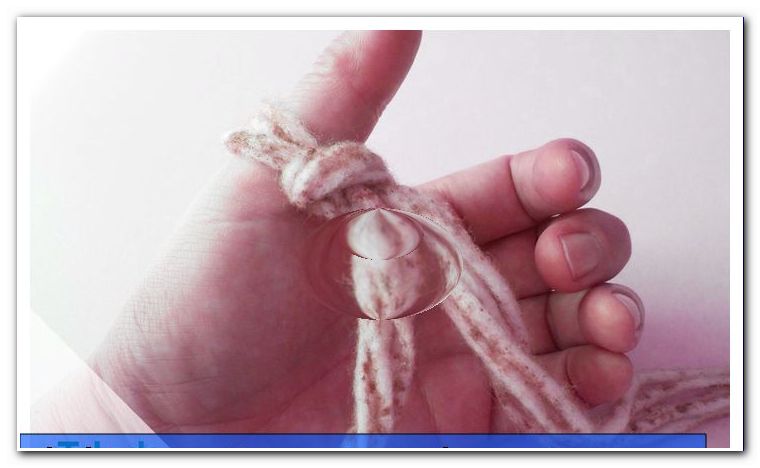
Slap a 51-mesh air chain. The last stitch is a turning pocket. Crochet the first sturdy stitch of the back row into the penultimate stitch. Make a total of 10 stitches. This is followed by an air chain with 30 stitches. If you find that a 50-mesh bracelet is too big or too small for you, vary the length by the number of meshes at this point.

Note: It is very important to crochet regularly with the chainstitch chains. Otherwise, the individual chains will be different lengths.
Now look for the 10th Air Mesh from the beginning. Crochet a tight stitch in there. This is followed by another 9 stitches in the remaining 9 stitches. The 2nd row is now finished. Crochet a spiral air mesh and turn the work over. Now it always goes on the same pattern: 10 strong stitches, 30 stitches, 10 stitches.
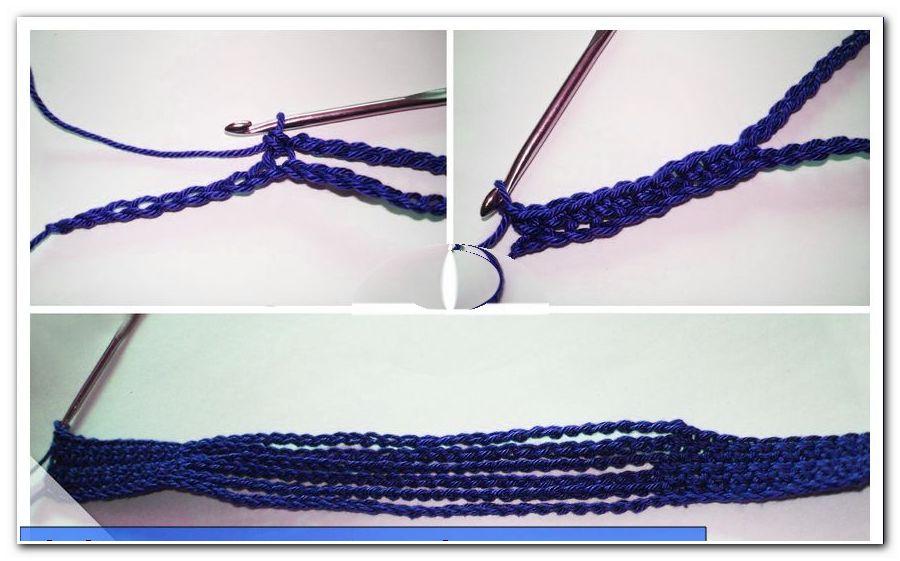
Tip: Friendship ribbons are colorful! Crochet different rows in different colors.
After half of the rows, the buttonhole must be incorporated. For our bracelet this is the case after the 6th row. Put your button on the crochet piece. Estimate how many stitches the button is wide. If in doubt, you opt for a stitch less. Wool is stretchy. The button is 4 stitches wide. So at the beginning of the 7th row we crochet only 3 stitches. Then come 4 air meshes. For 4 stitches are skipped: The next fixed stitch is only in the 5th stitch. After a total of 3 fixed stitches, we arrived at the end of our usual 10 fixed stitches and crochet as usual. In the back row crochet in the 4 air mesh normal normal stitches.

After 12 rows you are done. Cut the thread and sew it. On the side without buttonhole, sew your button with the embroidery needle. Then you are already done!

Tip: The bracelet does not necessarily have to be 12 rows wide. Experiment with wider or narrower friendship ribbons. The buttonhole always comes between the two middle rows.
Flowery friendship ribbons
Prior knowledge:
- stitches
- Fixed stitches
- chain stitches
- rod
Material:
- Wool in 2 colors for needle size 3
- Crochet hook size 3
- embroidery needle
- wool needle
- stud
Hit 46 air meshes. Crochet 2 rows of 45 stitches each.

Between the 2nd and 3rd row comes the buttonhole. As with the first bracelet, you estimate how many solid stitches your button is wide. This time we crochet the buttonhole at the end of the row. It could just as well be in the beginning, as in bracelet 1.
Now you have to calculate shortly. From the 45 stitches, subtract the number of button widths. Here are 4 stitches. Now pull off 4 stitches again. There are 37 stitches left. Crochet 37 stitches. Then come 4 air meshes. For this, leave 4 stitches from the previous row and finish the row with 4 other fixed stitches. Now crochet a row with sturdy stitches, crocheting the 4 air stitches as solid stitches.

For the curved edge, do the following: Turn the crochet as if you were going to crochet another row. Now work 5 sticks in the 3rd stitch of the row. Release a mesh. In the next stitch comes a chain stitch. You will once again take a stitch and crochet 5 sticks in the following stitch. This goes along the whole series. If you like it, always change the color of the warp stitch.

At the bottom of the row there are 2 ways to switch to the other side. Either crochet another bow to the short end or go with Kettmaschen directly to the other long side and continued there your bows as usual. After the last bow cut the thread and sew it.

For the rose, you hit 29 air meshes. Crochet a chopsticks in the fifth-last air mesh. It follows an air mesh and another stick in the same stitch. Now release an air mesh and crochet a chopstick into the next air mesh. Make another air mesh and another stick in the same stitch. One can see that so loud little Vs arise. This scheme will continue until the end of the chain of stitches.

After the last chopsticks start the second half of the round with 3 air meshes. Crochet 5 sticks into the air mesh between the last two sticks of the previous row, so to speak into the V. This is followed by a strong stitch between the two sticks, which have no air mesh between them. That's almost between the 2 Vs. From now on, always crochet 6 sticks into the air stitches and a crochet stitch between the other two sticks.

Finally, we roll up everything and sew it together at the bottom. Below is where the aerial chain is from the beginning. These must be rolled up into a tight spiral. Always roll a small piece and then use the wool needle to pull the thread across the resulting spiral. It should be nice. Make sure that the center of the spiral does not slip inwards over time. When the whole track is rolled up, our rose is ready.

Note: These kind of friendship ribbons look pretty even without a rose!
Now sew the rose and the button on the bracelet. Ready is the first of your flowery friendship ribbons!

Shell Bracelets
Prior knowledge:
- stitches
- chain stitches
- rod
Material:
- Wool for needle size 3
- Crochet hook size 3
- stud
- embroidery needle
This band is also made fast, but still has a great effect. Start with 4 air meshes. Crochet 6 sticks in the first air mesh.

This is followed by 3 air stitches, the ends of which are fastened with a warp stitch also in the very first air stitch. Crochet 3 more pieces of air. Now turn the work over and put 6 sticks under the chain of air mesh that you had fixed in the first air mesh.

Again follow 3 air meshes. These are fastened in the same place as the sticks, ie under the chain of air stitches, with a chain stitch. Continue with 3 air stitches and do the work. Now it always goes on the same principle.

Crochet 6 sticks into the previous chain of stitches, finish the bow with 3 stitches that are fixed next to the sticks, and start the new bow with 3 stitches. Do this until your bracelet has reached the desired length.
There are several options for the closure. For example, you can just leave the start and end threads a little longer and tie the bracelet together. Alternatively, a small button fits through the semicircle that forms at the base of the 6 sticks. If you only have one larger button at hand, make a good sized loop with the end thread. Sew the button on the opposite side.

Note: Depending on the type of closure, the bracelet may need to be a little shorter or longer.
Crochet with wire
Prior knowledge:
- stitches
- strong stitches
Material:
- approx. 4 m wire with diameter 3 mm
- Crochet hook size 2.5
- beads
- Wool for the edge
To crochet with wire is indeed something unusual - and also unusual, if you previously used only wool. But also with wire you can create great friendship ribbons. They look a bit more elegant and are a real eye-catcher. Also, you are not at all hard or prickly on the wrist, as you might suspect. When selecting the wire you should make sure that it is very soft and flexible. Wire, which is used for tinkering with beads, is very suitable here.
Before you can start crocheting, you need to thread the beads onto the wire. There are 10 - 15 beads if you want to crochet about every 2nd row.

For a bracelet about 6 cm wide, hit 10 pieces of wire with the wire. Guide it over the index finger of your left hand exactly as you are used to with wool. With a spiral air duct you move on to the next row. Continue with tight stitches. Pay attention to the greatest possible uniformity. When a stitch is done, the wire stops moving.

If you want to install a bead, get it from the back of the wire. Crochet with the pearl as normal. So work row after row of sturdy stitches until the band has reached the desired length.

To make the edge a little softer and, because it looks pretty, we frame the bracelet with wool. For this you put on a short side of the 3rd stitch from the right with the wool. Crochet in each stitch and after the corner in each row a tight stitch.

When you reach the 3rd stitch on the opposite short side, cut the thread and pull it through the last stitch. Be generous with the protruding thread both at the beginning and at the end. He becomes our lock. Repeat this for the other side of the bracelet. Already you are done!