Sew purse with compartments and zipper - Free instructions

- material
- Cut and sewing instructions - purse
- card slots
- zippered compartment
- side panels
- Outside and inside
- Quick guide
For months, I fumbled around my first purse sewing attempt because of my respect for it. After the first 5 models, I have to say that it is really fun and the implementation of complicated patterns can be mastered with a little practice.
As mentioned in my first guide to a simple purse, today I show you a slightly more elaborate model with compartments and zipper. You can - especially in the first attempts - again reduce your stock of scraps.
Difficulty level 2.5 / 5
(not suitable for beginners)
Material costs 1.5 / 5
(from EUR 0, - from your rest box up to EUR 40, - from high-quality fabrics with decorative material)
Time expenditure 2/5
(with this pattern you should be able to sew your wallet within 2 hours)
material
The material selection
Non-stretchable fabrics improve the result, as they can not warp and be sewn more precisely. Thin cotton fabrics are also easier to process, especially with multiple layers of fabric. In principle, however, also stretchable materials are conceivable. Reinforced in my tutorial with ironing insert. For larger purses, of course, stronger deposits can be beneficial.
As a basis, I assume that I can stow four plastic cards of your choice. To sew begins with the compartments and inside pockets. I take it step by step and always write the respective measurements directly.
Cut and sewing instructions - purse
card slots
For the storage space for the four plastic cards we need as a basis a compartment piece of fabric with the dimensions 10 x 17.5 cm plus seam allowances of about 0.75 cm and a temple insert with the dimensions 8.5 x 17 cm.
Tip: The ironing insert should always be smaller than the actual piece of fabric, otherwise the seams become too bulging.
In addition, you will need a piece of fabric measuring 10 x 10.5 cm plus seam allowance for the individual compartments.
First, iron the insert on the fabric piece in the middle. Fold it right to right (ie with the "nice" fabric sides to each other) together, just do it with the individual subjects. The open sides are sewn together. Center the seam and gently iron the seam allowances apart without ironing the side edges.

Turn all trays, place the seam slightly higher than the middle, and iron over it. Arrange the individual compartments evenly on the compartment piece of fabric and fix them with pins or Wonderclips.
Sew the bottom compartment tight-edged. Tie in the beginning and the end. Remove the pins or Wonderclips from the bottom tray and fold down and sew the next tray. Continue until all 4 compartments are sewn to the fabric piece.

Thus, the card slots are ready for further processing.
zippered compartment
Next, prepare the zipped compartment. For this you need a zipper with a length of 8cm tooth length. The zipper itself should be slightly longer at the front and back. You may also like to use an endless zipper. In this case, however, you will need two small pieces of fabric in the zipper width of about 3 cm in length. When you've cut the zipper, flick the lighter between both ports to merge the open fibers. Place the side panels with the right side of the fabric facing down on the zipper and sew them tight.

For the coin pocket you need a piece of fabric with 15 x 12 cm plus seam allowance, once for inside and once for outside. The ironing insert should again be correspondingly smaller. Place both pieces of fabric together right to right with the zipper in between. First fix the ends with pins or Wonderclips and sew all layers together. Fold the fabrics apart and fold them left to left together. Fold the open ends of both sides up to the zipper, once up and once down.

Sew all the layers together again and turn the bag. Fold the bag so that the zipper comes up and iron it.

To connect the pockets with the stock market, you now need side panels.
side panels
For the side panels you need four pieces of fabric each with 4.25 x 1 cm plus seam allowances. Fold each fabric piece in the middle so that you halve it in length and sew the ends together. As with the individual compartments, push the seam allowance over the middle to the top and iron the fabric pieces. Sew the right side of two of the pieces, the left side of the other two. Carefully apply all pieces of fabric after cutting the corners of the seam allowances. Iron it again.

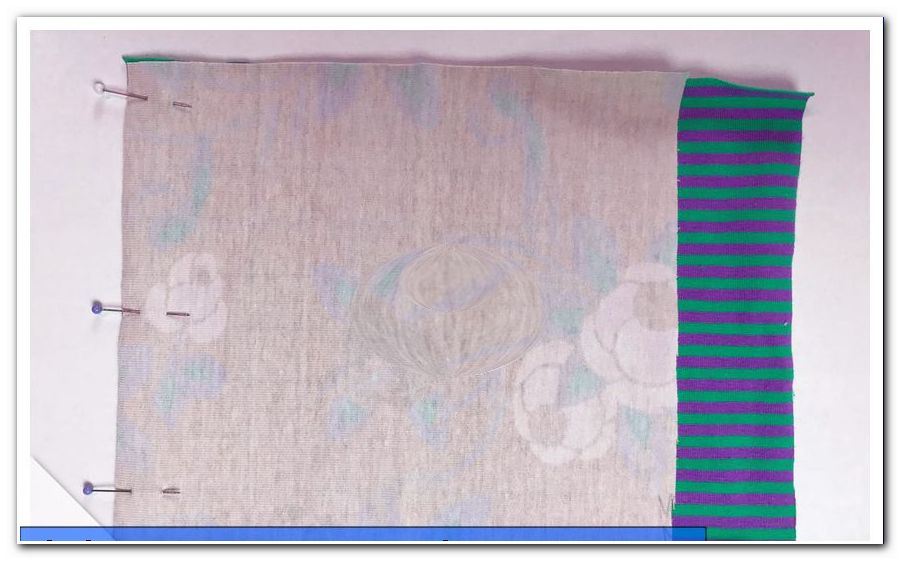
Outside and inside
For the purse itself you now need one inner and one outer part, each with the dimensions 10 x 30 cm plus seam allowances. I chose hard wearing denim on the outside. I want to make the inside of cotton woven fabric. Place the compartment with the card compartments on one end of the inner fabric about 1 cm from the edge and sew it tight. The zipper pocket is placed about 1.5 cm next to the fabric. You can now also sew the zipper pocket.

However, since the pages are harder to sew in this way, I show another variant:
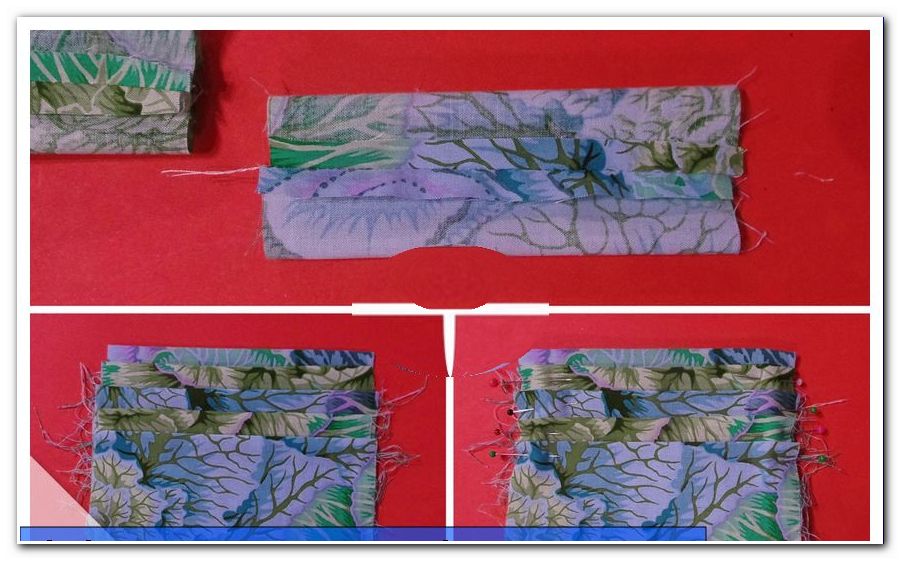
Cut open the lower edge of the zipper pocket and unfold the fabrics. Place the side fabrics on the right side at the top center at the same side and fasten them. Sew them tight-edged within the seam allowance.

Open the zipper at least to the middle! Now fold the other side over it. Sew now in U-shape within the seam allowance edged everything together. Turn the bag over and tap once again about 0.5 cm to the edge in U-shape. Put the zip pocket in the same place you put it before.

Lay the back side parts with the same edge to the inner fabric of the wallet over the card slots and stick them firmly. The front side panels fold inwards to keep them out of the way. Now place the reinforced outer fabric with the right side down on it. Keep all corners and edges firmly in place so that nothing can slip. Now sew U-shaped from one corner of the zipped compartment to the other.

Now it gets a little bit fizzy! Gently pull out the side panels a little and put it edge-to-edge on the outer fabric. Sew on it with a short edge. Put the remaining lengths of outer and inner fabric together and firmly pin both, stitch together both layers and turn the purse.

Fold the top seam allowances inwards and iron them. Then pin it down. My lock consists of KamSnap buttons. Think about where you want to mount the shutter. I mark the middle of my wallet and measure 2 cm inside. Exactly at this point I put the push button. Then I close the flap and mark the place where the push button comes to rest. At this point I attach the opposite side of the Kamsnap button.

Now you can close the top edge with the sewing machine by narrow edge quilting in U-shape. I would like to add a little extra. To do this I cut a ribbon a bit longer than my wallet is wide, merge the ends by "wagging" with the lighter, fold the ends backwards at a 90 ° angle and fix it between the two fabrics. Then I sew the U shape with a heart ornamental stitch.

And already a beautiful wallet is ready!

Look for more ideas for home-made wallets "> Wallet for beginners
Quick guide
1. Create and cut pattern
2. Cut sections by adding seam allowances
3. Cut the card slots in half, sew them together and turn them over
4. Card part as well, place the card slots on it and sew
5. Adjust zipper and possibly extend it with fabric pieces
6. Sew on the zipper
7. Prepare the side panels and sew into the zipped compartment
8. Sew on the card compartment part on the inner fabric and position the zipped compartment over it
9. Pin the side panels
10. Overlay outer fabric and sew in U-shape from bottom edge to bottom edge of zippered compartment
11. Carefully pull out the side panels and secure them to the outer fabric
12. Sew fabric layers together - the upper short edge remains open
13. Iron turns and seam allowances inwards and secure
14. Place push-button or other closure
15. Quilt the flap all around with short edges (with decorative stitch)
And done!
The twisted pirate