Knit Triangular Scarf - Free DIY Guide

- Material and preparation
- The mesh sample
- Knit the triangular piece
- Tip and declines
- crochet
- Tighten
Dreiecktücher are indispensable in fashion. They can be knitted from a variety of wools and are suitable for every season. Whether in the XXL version or in a narrow version as a scarf, with lace pattern or in different colors - they keep you warm, are decorative or practical, belong to traditional costumes and are popular in thick wool quality or as a lacquer design.
Triangle cloths can be knit lengthwise or across. If you start at the bottom of the cloth, you must periodically increase a stitch on both sides to widen the cloth to the right and left. Thus, the knitting pattern runs from bottom to top.
The cross-knit cloth is created when you start with the right or left side. Then you only take one side up or down, while the other side (upper edge of the cloth) is knitted straight without any increase. In this case, the knitted pattern then develops across, ie from left to right over the triangular scarf. Whether you start from the bottom or from the side, it depends on the pattern you want. When cross knitting you generally have less stitches on the circular needle.
Material and preparation
For the pictured triangular cloth, a mohair wool with a running length of 250m / 25g was used. The material consists of 85% mohair and has a polyester of 15%. The recommended needle size is 5-7. Especially with mohair wool, the personal taste determines the needle size. If you like it permeable, you can even use a larger needle size than indicated. If the fabric is less translucent, it needs thinner needle sizes. In principle, mohair wool must not be entangled too small-meshed, as too narrow-lying fibers are strongly stressed by friction and tend more quickly to matting. A really opaque mohair knit can therefore only be achieved if several mohair threads are knitted together.

You need this:
- 75-100 g mohair wool
- long circular needle size 6
- scissors
- sewing needle
- Crochet hook size 3
The mesh sample
To start knitting, you need a stitch sample. The total width for a triangular scarf should be just over two meters. The length is determined by your own request. Most of these values are between 50 and 70 cm. For very large cloths, it then takes about 90 cm in length.
Knitting a stitch of several rows. The specimen should reach more than ten centimeters in width and height, as it will be easier to calculate with the readings. Then count how many stitches are ten centimeters long and how many rows are ten centimeters high. Divide both numbers by ten and get the stitch and row value for one centimeter of knit.
For this triangular cloth, the stitch sample gave 16 stitches and 21 rows in an area of 10 x 10 cm. The cloth is cross-knit, so from one side to the other. For a length of about 90 cm (measured from the top edge to the top), the calculation is: 90 cm length x 1.6 mesh (because of the cross-knit shape, this length must be multiplied by the number of stitches per centimeter). The result is 144 stitches. For a desired cloth width of approx. 200 cm, the calculation is: 200 cm x 2.1 rows. Result: 420 rows.
The cloth is therefore knitted over 420 rows in total, whereby after 210 rows a number of stitches of 144 must be reached. If you divide the number of rows of 210 by the number of stitches of 144, you will get a score of 1.45. Which means that after one and a half knitted rows on one side you would need to increase one stitch at a time.
Since the increase is feasible only after completed rows, the increase is thus worked every other row. As a result, it takes a little more rows to the cloth tip, so the total width of the cloth will be slightly more than two meters. If you want to knit a cloth with a very accurate measure, you can influence the values of the stitch sample by changing to a different needle size. Please also keep in mind that just fine and very soft wool will give way after completion and washing in the dimensions and is slightly larger.
Knit the triangular piece
It is knitted smooth right, to knit in the rows on the right and in the back rows on the left.
Hit three stitches. They form the right corner of the cloth. In the back row knit the stitches on the left. Turn the work over. Take off or knit the edge stitch. It is bordered after completion of the cloth by a crocheted edge and is therefore no longer visible. From the second stitch an additional loop is knitted out for the increase. To do this, cut into the stitch as if to the right knit, pull the thread through, but do not let the stitch slide from the left needle. Cut in the same stitch with the right needle again - this time cut in as if to the right folded knit, pull the thread through and knit it off. Now lift the stitch and knit the following edge stitch. There are now four stitches on the needle.
Turn and knit all the stitches in the back row. Turn, knit edge stitch, one stitch to the right, knit out a stitch from the following stitch as described above, edge stitch.
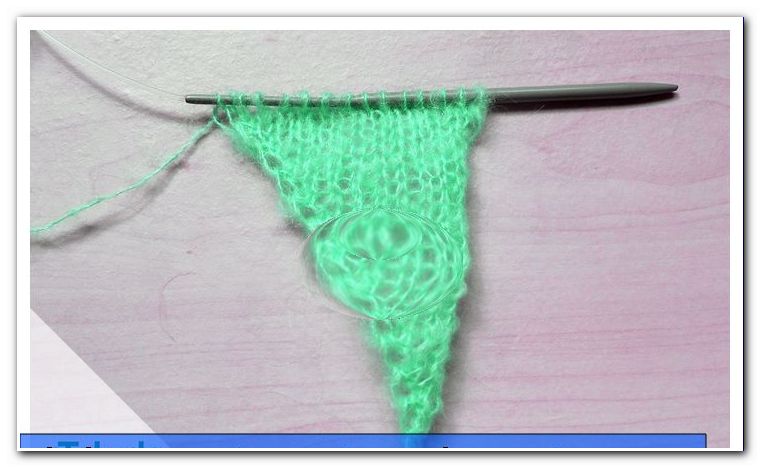
Continue in this manner and gain a stitch in every other row. From the penultimate stitch of every second row an additional stitch is worked, then the edge stitch follows and the row is finished.
Different types of waxing:
The increases for the widening of the cloth can be knit in two different ways. In the above description, the mesh size was increased by right-hand increases. There is also the possibility to increase by knitting envelopes. To do this, knit an envelope in the right row in front of the penultimate stitch. The next stitch on the right, then the edge stitch. Turn the work, take off the edge stitch or knit off to the right, knit one stitch on the left and now knit the envelope left folded. This means that with the right needle you will not pick up the front thread of the stitch, but you will catch the back thread and catch the thread there. If you knit the envelope in the normal left, you will get a hole like the hole pattern. To prevent this, the stitch is knitted (ie twisted) knitted, whereby the hole is minimized. With this knitting technique you get a visually accentuated increase edge.

Tip: When cross-knitting fabrics, the length and width of the fabric can be easily measured during knitting, as you only have the length and not the width of the fabric on the needles. With a long circular needle, you have enough room to spread the growing cloth smoothly to measure. Check the growing dimensions from time to time. Soft mohair wool does not keep to the millimeter to the calculated dimensions, therefore, regular checking is appropriate. This type of knitwear is also recommended for lace patterns, as the counting for picking up and taking down is easier if the number of stitches on the needle is clear.
Tip and declines
If you have a total of 144 stitches on the needle as a result of the increases, the point (the length of the triangular piece) is reached. Now the increases are over and the decreases for the second half are starting.

You knit again a right row, starting with the edge stitch and all other stitches are knitted smooth right. If there are still three stitches left on the left needle, the following two stitches are simply knitted together to the right. The last stitch is the edge stitch. Turn the work, knit all the stitches left to the end of the row. Turn, knit edge stitch, knit off all other stitches on the right, knit two stitches at the end of the row in front of the edge stitch on the right and repeat in every other row.

When there are only three stitches remaining on the needle, bind off loosely and the knitted cloth is ready.
crochet
All smooth right-hand knit works tend to curl up around the edges. Therefore, they must be stabilized by a crocheted edge. Start at one corner of the cloth and use a crochet hook of strength 3 to work a round of tight stitches. At the upper edge of the scarf, insert in every other stitch, at the two diagonal side panels, stitch twice in succession into each knit stitch and work a tight crochet stitch, then release a knit stitch and cut into the following stitch. Crochet the sloping edge in this rhythm. If you were to work a crochet stitch out of every stitch, too many stitches would be created and the bevel would curl up. On the other hand, if you only pierced every other stitch, the skew would contract because the crochet stitch spacing would be too narrow.

After a round of tight stitches, close with a slit stitch connecting the first and last single stitch. Now work a trim row on the top edge. With the Krebsstich the edge is crocheted in reverse. They prick the first fixed stitch of the previous row, get the thread through and crochet an air mesh. Then do not go with it to the left, but make a right into the next tight loop. You get the thread through, now have an air mesh and the continuous thread on the crochet hook, get the thread again and pull it through the two loops. Crochet one more air stitch and cut to the right into the next tight stitch. Crochet over the entire row in this way.

The oblique edges are then provided with the fringes. For a non-fringed cloth, crochet the cancer sting over all edges.

Tighten
The cloth still has no firm shape and the edges are not yet smooth. So put the cloth in lukewarm water, add a little wool detergent or baby shampoo, swirl and rinse. Let it drain a little and then tension it. For this purpose, the cloth is pinned on a smooth surface with the appropriate dimensions and now dries in this slightly stressed state. Then remove the pins and look at the edges of the cloth. By sticking with needles and the light pull on the knit, it can happen that the edges in the dry state suddenly at the places have minor arcs, in which stuck the pins. So wet the edges again, gently smooth them and let everything dry. After this treatment, the edges are perfect.
For the fringed cloth, threads are finally tied in pairs at regular intervals. To do this, use the crochet hook to drive through a tight crochet stitch of the edge, insert the thread center of the fringe into the crochet hook head and pull the thread through the sturdy loop. Thread the open ends of the thread through the loop and gently tighten.
Finally, all open thread ends, which were created by the attachment of a new ball, sewn into the crochet edge and the remains are cut clean.
Done is the dream of mohair.
The self-knitted triangular scarf can now be worn in different variants. The light wool makes it perfect as a jacket for the summer. Here are a few carrying options.