Diamond pattern knit: one and two colors - free instructions

- material
- The monochrome diamond pattern
- The bicolor diamond pattern
- Possible variations
A beautiful pattern will give your knitting a special effect. In this tutorial you will learn how to achieve one- and two-tone diamond patterns.
Only smooth left is too boring, but complicated braids do not dare to "> material
The patterns described best come into their own with a smooth yarn. The right needle size for your wool is on the banderole. To practice the pattern, it is best to use a medium thickness thread and needles of 4 or 5 gauge, as it is the easiest to knit.
You need this for the diamond pattern:
- Smooth wool in one or two colors
- Knitting needles in appropriate strength

The monochrome diamond pattern
For the monochrome pattern, suggest a number of stitches divisible by 16. Additionally you need another stitch and two edge stitches.
Calculation examples:
16 stitches + 1 stitch + 2 edge stitches = 19 stitches, work through the pattern in width once.
2 x 16 stitches + 1 stitch + 2 edge stitches = 35 stitches, you work the pattern twice in each row.
The two edge stitches, ie the first and the last stitch of each row, knit as you are used to or as suggested by the instructions for your project. The stitches in between you can work according to the illustrated knitting font or the instructions below in text form. The pattern consists of 16 rows. Repeat this again and again until your work has reached the desired size.
Tip: Make a note of which row you are knitting so that you do not lose track. Do not give up if the work is difficult at the beginning. Once you have knitted a piece and can recognize the first rhombuses, it will be easier. After some time you will understand how the pattern works and how to knit the next row.

In the picture each box represents a stitch. When it's empty, knit the stitch on the right. A cross means that the left is knitted. They start with the bottom row and work their way up. The arrows on the sides indicate which direction you need to read each row. The stitch in the leftmost column is the extra stitch. These knit only at the beginning or at the end of the row. Repeat the other 16 stitches continuously until the end of the row. The edge stitches are not shown in the knitting font.
To knit the monochrome diamond pattern:

Tip: Repeat the 16 stitches between the asterisks until the end of the row. The stitch in front of or behind knit only once. This is the extra stitch. The edge stitches are not listed separately.
1st row: * 1 stitch right, 1 stitch left, 1 stitch right, 1 stitch left, 3 stitches right, 1 stitch left, 1 stitch right, 1 stitch left, 3 stitches right, 1 stitch left, 1 stitch right, 1 Stitch left *, 1 stitch right
2nd row: 1 stitch on the right, * 1 stitch left, 1 stitch right, 3 stitches left, 1 stitch right, 1 stitch left, 1 stitch right, 1 stitch left, 1 stitch right, 3 stitches left, 1 stitch stitch right, 1 stitch Stitch left, 1 stitch right *
3rd row: * 1 stitch right, 1 stitch left, 3 stitches right, 1 stitch left, 1 stitch right, 1 stitch left, 1 stitch right, 1 stitch left, 1 stitch right, 1 stitch left, 3 stitches right, 1 Stitch left *, 1 stitch right
4th row: 1 stitch on the right, * 3 stitches on the left, 1 stitch on the right, 1 stitch on the left, 1 stitch on the right, 3 stitches on the left, 1 stitch on the right, 1 stitch on the left, 1 stitch on the right, 3 stitches on the left, 1 stitch on the right *
5th row: * 3 stitches right, 1 stitch left, 1 stitch right, 1 stitch left, 5 stitches right, 1 stitch left, 1 stitch right, 1 stitch left, 2 stitches right *, 1 stitch stitch right
6th row: 1 stitch left, * 1 stitch left, 1 stitch right, 1 stitch left, 1 stitch right, 3 stitch left, 1 stitch right, 3 stitch left, 1 stitch right, 1 stitch left, 1 stitch right, 2 Mesh left *
7th row: * 1 stitch right, 1 stitch left, 1 stitch right, 1 stitch left, 3 stitches right, 1 stitch left, 1 stitch right, 1 stitch left, 3 stitches right, 1 stitch left, 1 stitch right, 1 Stitch left *, 1 stitch right
8th row: 1 stitch on the right, * 1 stitch on the left, 1 stitch on the right, 3 stitches on the left, 1 stitch on the right, 1 stitch on the left, 1 stitch on the right, 1 stitch on the left, 1 stitch on the right, 3 stitches on the left, 1 stitch on the right, 1 Stitch left, 1 stitch right *
9th row: * 1 stitch right, 1 stitch left, 3 stitches right, 1 stitch left, 1 stitch right, 1 stitch left, 1 stitch right, 1 stitch left, 1 stitch right, 1 stitch left, 3 stitches right, 1 Stitch left *, 1 stitch right
10th row: Knit like the 8th row
11th row: Knit like the 7th row
12th row: How to knit the 6th row
13th row: Knit like the 5th row
14th row: Knit like the 4th row
15th row: Knit like the 3rd row
16th row: Knit like the 2nd row

The bicolor diamond pattern
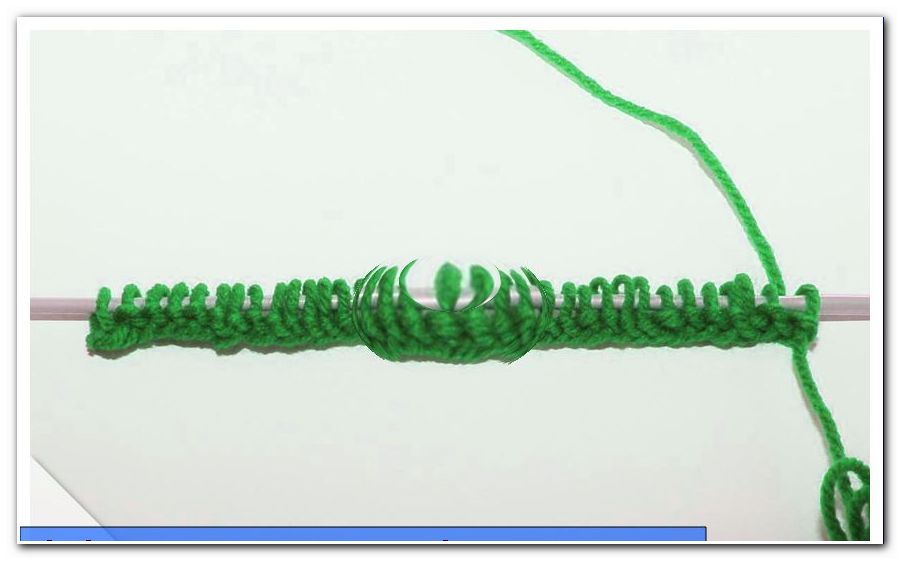
First determine which color you want to process for the background and which for the diamonds. The background color in this manual is color 1, the other color is color 2. Use color 1 for the stop, the edge stitches and for binding off. Color 2 knot at the first stitch you want to knit with. The thread that you do not need right now is on the back of the work. In the photo you can see the unused pieces of yarn. After the first turn you put the threads before work, in the next row back again. As a result, they are later seen only on the back of the piece.

Tip: Be careful not to over-tighten the entrained thread to keep the knit stretchy.
For the two-tone pattern, you'll need a divisible by eight stitch count, five extra stitches, and two edge stitches.
Calculation examples:
8 stitches + 5 stitches + 2 edge stitches = 15 stitches, knit the pattern in width once.
2 x 8 stitches + 5 stitches + 2 edge stitches = 23 stitches, you knit the pattern twice per row.
Follow the pattern for either the knitting or the description below. In all rows of odd number knit right stitches and in the other left. This will make the result smooth right. The pattern consists of eight rows. Once you knit them, start with the first one again. The edge stitches are not listed separately in both explanations. Knit the first and last stitch in each row as you learned it.

Tip: You work the knitting font from the bottom up. In which direction you have to read the respective row, the arrows on the sides show you. An empty box means that you knit the stitch in color 1. The crosses stand for color 2. Repeat the eight stitches between the vertical lines until the end of the row. The five additional stitches to the right and left of it knit only at the beginning or at the end of the row.
To knit the two-tone diamond pattern:

Tip: Knit the eight stitches between the asterisks as many times as you want to repeat the pattern in width. The stitches in front and behind you work only at the beginning or end of the row.
1st row: 2 stitches in color 2, * 3 stitches in color 2, 3 stitches in color 1, 2 stitches in color 2 *, 3 stitches in color 2
2nd row: 1 stitch in color 1, 2 stitches in color 2, * 1 stitch in color 2, 5 stitches in color 1, 2 stitches in color 2 *, 1 stitch in color 2, 1 stitch in color 1
3rd row: 2 stitches in color 1, * 1 stitch in color 2, 3 stitches in color 1, 1 stitch in color 2, 3 stitches in color 1 *, 1 stitch in color 2, 2 stitches in color 1
4th row: 3 stitches in color 1, * 2 stitches in color 1, 3 stitches in color 2, 3 stitches in color 1 *, 2 stitches in color 1
5th row: 2 stitches in color 1, * 2 stitches in color 1, 5 stitches in color 2, 1 stitch in color 1 *, 3 stitches in color 1

6th row: Knit like the 4th row
7th row: Knit like the 3rd row
8th row: Knit like the 2nd row

Possible variations
1. In addition, accentuate the diamonds on the two-tone pattern by knitting the corresponding stitches in odd rows on the left and in even rows on the right. This creates on the front plastic nodules instead of the flat V-shape. In the same way you can knit the pattern in one color only.
2. Change the size of the diamonds. This is especially easy with the two-tone pattern. With diamonds in different sizes, you can create your own pattern. Draw a knitting on checkered paper to keep track of knitting.