Dressing the chimney - making the chimney lining yourself

- planning
- implementation
To disguise a chimney-head can have several reasons: an already existing chimney is leaking and therefore threatens to spoil; a new fireplace should be prophylactically protected against moisture or you want to adapt the chimney lining to the look of the roof through a chimney.
For a savvy do-it-yourselfer the cladding of a chimney-head should not be a problem, but here is the basic requirement for work on roofs is absolute height suitability! Those who are not free from giddiness, MUST assign the contract for the chimney lining to a craftsman, otherwise thrift can be life-threatening! But even if you yourself have the necessary craftsmanship skills to perform the work, of course, the compliance with the accident prevention regulations (UVV) mandatory, ie setting up a scaffold on the house including fall protection and protection against falling objects, scaffolding on the roof or Wearing a safety belt when working on the pitched roof. Further information about this is the BG Bau.
planning
If you meet all the necessary requirements, you can go to the planning; the following points must be taken into consideration:
- How should the disguise look ">
Of course you can also wall cladding prefabricated today from the outside with clinker bricks. Then, however, a suitable cantilever plate (a plate protruding from the facade) must be planned during construction.
Anyone who decides to dispose of sheet metal can either manufacture it himself from large metal sheets (provided he has the right tools and the necessary know-how) or buy a ready-made cladding. This so-called "Stülpkopf" is delivered as a whole and simply put over the chimney - as the name implies. The advantage is a short installation time and the possibility to easily remove the cover during repair work or a new roofing. A disadvantage: the dimensions, especially the degree of sloping roof, must be exactly right, changes on site are difficult.
Tip: Make sure that the color, shape and material match the style of the house and roof!
- Which material is needed ">
- impregnated roof battens, formwork boards or OSB boards for the substructure incl. suitable fastening material (dowels, screws)
- Cornices for fiber cement boards and slate
- Fiber cement boards, slate or sheet for making the cladding
- Zinc sheet, aluminum or copper for making the transition from roofing to lining (breast, throat and side panels)
- Slate pencils or colored special nails for cement-bonded facade panels
- Chimney and the corresponding mortar
- Which tools are needed?
Depending on the material used for the cladding also some special tools are necessary:
- Slate hammer and dagger bridge for natural slate
- Cutting shears or small cut-off grinder for cement-bonded plates (colloquially often referred to as "Eternit plates")
- Cutting shears for sheet metal, bending bench and hand shears for cutting for a self-made cladding made of sheet metal
- Soldering iron and soldering material
- Trowel and joint iron
- and of course hammer, pliers, ruler, screwdriver etc.
- Will a second person be needed to help?
If a plug-in head is to be mounted, the help of several persons is necessary. Because, depending on its size - especially with multi-level and high chimneys - it may even have to be lifted onto the roof and installed using a crane. But in general, a second person can be helpful, for example, can cut the slats for the substructure on the ground, so that one is not forced to leave the roof surface for such work several times.
- What are the costs?

 Of course, the expenses to be reckoned with depend mainly on the size of the chimney and the selected material. Also, regional differences are possible - as well as between the specialist market, DIY store or Internet retailer. A price comparison can be quite worthwhile here.
The financially smallest items make the slats (about 0.40 € / lfdm) and OSB boards (about 5 € / m²) and the necessary hardware such as fasteners (dowels, screws, nails, possibly slate pins), cornices, solder, Mortar u. ä. off.
The main part is probably the required panels for the panel . Here are depending on the manufacturer, material, size and desired color large price differences available. So natural slate is slightly more expensive than art slate or fiber cement boards, larger formats compared to small cheaper.
- Fiber cement boards
- 60/30 from Eternit from approx. 5 € / piece
- 30/30 bow cut approx. 1.70 € / pcs.
- 20/20 about 0, 90 € / pcs.
- natural slate
- 0, 10 € / pcs surcharge
The prices for artificial slate roughly correspond to those of fiber cement boards.
Sheet metal for the necessary border or a complete chimney lining:
- Zinc 0.7mm 40 € / m²
- Alu 1.5 mm approx. 50 € / m²
- the price of copper is a daily price
If you have to cut the sheet, you have to pay extra.
Chimney-top 11.5 / 24 approx. 1 € / pcs.
In the decision for a Stülpkopf (from 400 €) you should of course previously obtain offers from various providers.
Also, very few DIY enthusiasts will have to have a suitable scaffold and have to commission a scaffolder with the necessary structure. There are big regional price differences here - especially when it comes to the life of the scaffold.
implementation
Once all the above points have been clarified, then it's up to the actual work - dressing up. This happens in several steps:
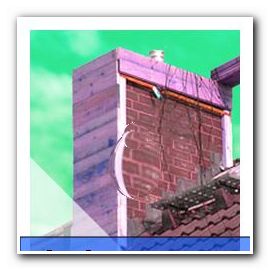
- Checking the chimney
First, the chimney is tested for its stability. Especially with older fireplaces, which were bricked up with chimney flues, it happens that the upper rows have loosened over time. If this is the case, then they must be dismantled and bricked up again to the original height. Under no circumstances should you reduce the height of the chimney head on your own to save yourself this work! The chimney could no longer properly fulfill its task (smoke extraction) and would be objected to at the next inspection by the chimney sweep.
- Attaching the substructure

 If the chimney pieces are to be clad with clinker, or if an extruded head is attached, then you can skip these steps.
First, a skeleton of roof battens is built by attaching them at the corners with dowels and stainless steel screws - if it is an older, still clinker fireplace.
Important: Always drill into the stone, not into the joint, otherwise the mortar may loosen and fall into the interior of the flue.
Chimneys consisting of chimney components must not be drilled into the stone. Here, the slats are first held with screw clamps and bolted together. Sheathing boards, or better still, waterproof OSB boards are now applied to this construction. The whole is covered with roofing felt and is now weatherproof.
- Install necessary sheets
Chest, side and throat plates are fixed to the substructure, but under the plates, are located on the front of the chimney, on the roof surface, and serve to precipitate, which runs down the chimney, to drain on the roof surface. For this purpose, the roof tiles must be removed around the fireplace.
You can make the sheets of zinc, aluminum or copper yourself - if you have the necessary tools - or buy them in specialist shops (roofing or plumbing supplies). In the meantime, complete cover plates are already available, which are simply slipped over the chimney - eliminating the otherwise necessary soldering or riveting. Here, of course, just as with a Stülpkopf, an exact oversize necessary because nothing can be changed.
Important: If you would like to use copper for this purpose or completely cover the chimney head with copper sheet, then the gutter and downpipe underneath must also be made of this material, as copper would react chemically with zinc and the draining water would destroy an underlying zinc gutter!
- The mounting of the plates
If one has opted for fiber cement slates or slate, then the color matching corner strips are attached, which are cut with hacksaw or metal shears to the appropriate length. Then finally the first plate can be attached. You start at the "chest", the front of the fireplace. Which format is used, of course, depends on the size of the fireplace and especially to the taste of the homeowner!
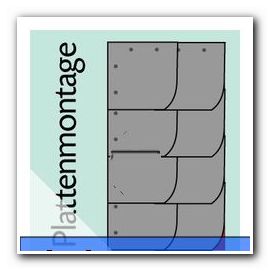 In a so-called single-fire with an external dimension (including formwork) of about 50 x 50 cm plates in the format 30/30, possibly even with a bow cut, optically no good effect; but the area of the chimney is too small. Here you should use plates in the format 60/30, which - cut to the previously calculated measure - are pushed from above into the corner strips with special pens nailed.
For larger fireplaces, on the other hand, smaller slabs, such as the 20/20 or 30/30 format with a curved cut or trimmed corners, have a loosening effect - the chimney does not look like a "block".
For cutting, a so-called cutting shears is used, alternatively, you can also cut the plates with a one-hand cutting grinder. Slate slates made of natural slate must be slammed on the bridge with a slate hammer, but this includes a lot of experience that a do-it-yourselfer usually does not possess. Therefore, the layman should resort to art shale, which can be processed like fiber cement boards.
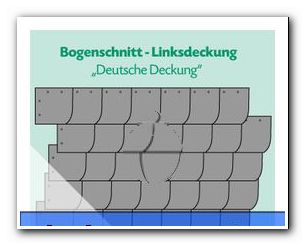 If one has the "breast verschiefert", as it is called in the roofing language, so you start with the flanks, the side panels of the fireplace. Here, the front corner of the first plate, which is mounted horizontally, as high as the upper corner point of the first breast plate - the lower slope depends on the roof pitch. An exception is the so-called "German cover" for small-format panels - here runs the upper edge of the side panels parallel to the roof surface. If breasts and flanks are disguised, at the end comes the "throat", the back of the chimney. Here one aligns with the first plate to the incoming heights of the side plates.
- Completion of the chimney lining
If all plates are attached, then the sheets must be soldered together (zinc sheet or copper) or riveted (aluminum sheet), unless an entire finished frame is used. Here great care is required, otherwise rain can penetrate the bumps. Of course, the lining of the chimney also changes its base area, the adjoining bricks or roof tiles are therefore too large and must be "cut". For this purpose again a cut-off wheel (cutting wheel for stone) is needed.
The bricks at the front are pushed under the sheet metal, side and throat tiles lie open, so that the water is led from the back, the throat, over the bent side plates on the breast plate and can run off.
If you decide to clad a chimney made of prefabricated elements with clinker, you must attach a cantilever under the roof compartments, on which the bricks (normal size 11.5 / 24 cm) are walled up. Again, a border made of sheet metal is attached, which is attached to the chimney with small stainless steel screws.
- Upper degree
The final task is to attach the top cover, which prevents the ingress of rainwater between the chimney and the cladding. It can be made from a corresponding piece of sheet metal, which is folded down at the edges and has the corresponding cutouts for the flue. Alternatively, a wreath can be made of concrete, but for its installation - depending on the size - may require several helpers.
Whether one should additionally provide his chimney with a chimney hood, about the ghosts divide. From the point of view of the chimney sweep, it will probably only be necessary in climatically particularly unfavorable locations with very heavy rainfall. A decorative element is a hood anyway.
Tips for quick readers
- Build up the scaffolding correctly
- Select desired material
- Attach substructure of roof battens and OSB panels
- Align plates and attach
- Pin plates - observe suitable format
- Solder or rivet metal sheets together
- "Cut" bricks or roof tiles
- Cut the top cover and attach / make the concrete ring
- put on a chimney hood
- Which material is needed ">

 Of course, the expenses to be reckoned with depend mainly on the size of the chimney and the selected material. Also, regional differences are possible - as well as between the specialist market, DIY store or Internet retailer. A price comparison can be quite worthwhile here.
 If the chimney pieces are to be clad with clinker, or if an extruded head is attached, then you can skip these steps.
 In a so-called single-fire with an external dimension (including formwork) of about 50 x 50 cm plates in the format 30/30, possibly even with a bow cut, optically no good effect; but the area of the chimney is too small. Here you should use plates in the format 60/30, which - cut to the previously calculated measure - are pushed from above into the corner strips with special pens nailed.
 If one has the "breast verschiefert", as it is called in the roofing language, so you start with the flanks, the side panels of the fireplace. Here, the front corner of the first plate, which is mounted horizontally, as high as the upper corner point of the first breast plate - the lower slope depends on the roof pitch. An exception is the so-called "German cover" for small-format panels - here runs the upper edge of the side panels parallel to the roof surface. If breasts and flanks are disguised, at the end comes the "throat", the back of the chimney. Here one aligns with the first plate to the incoming heights of the side plates.