Knitting Zigzag Pattern - Free Beginner's Guide

- Material and preparation
- instructions
- Horizontal zig zag pattern
- Vertical zig zag pattern
- Diagonal zig zag pattern
- Possible variations
Zig zag patterns are easy to knit and create beautiful effects. In this beginner's guide, we'll show you how to combine right and left stitching with decorative prongs.
Just knit on the right side will be boring for you, but you do not dare to use elaborate cable patterns "> Material and preparation
For the zig zag patterns in this tutorial, you only need right and left stitches. Repeat the specified steps until the end of the row. Diving in the description asterisk (*) on, only the passage between them is knitted several times. Work the stitches once before the first asterisk and then repeat the part between the symbols until just before the end of the row. Finally, knit the last stitches as indicated after the second asterisk.
Tip: For a better overview, you should note down which row of the pattern you last knitted.
Use a smooth wool with no effects to practice the patterns. It is best to use a medium thickness for 4 or 5 gauge needles. With such a yarn, knitting is easiest and you can see the individual stitches well.
You need this:
- Smooth yarn in medium thickness
- Matching knitting needles

instructions
Horizontal zig zag pattern
This pattern with horizontal spikes appears the same on the front and back. Thus, it is well suited for projects where both sides should look decorative, for example, a scarf.
For the pattern you will need a number of stitches divisible by eight plus an extra stitch. For example, strike nine, 17 or 25 stitches.
How to Knit the Horizontal Zigzag Pattern:
1st row: 1 stitch on the right, * 7 stitches on the left, 1 stitch on the right *
2nd row: 1 stitch left, * 7 stitches right, 1 stitch left *
3rd row: 2 stitches on the right, * 5 stitches on the left, 3 stitches on the right *, 5 stitches on the left, 2 stitches on the right
4th row: 2 stitches on the left, * 5 stitches on the right, 3 stitches on the left *, 5 stitches on the right, 2 stitches on the left
5th row: 3 stitches on the right, * 3 stitches on the left, 5 stitches on the right *, 3 stitches on the left, 3 stitches on the right

6th row: 3 stitches on the left, * 3 stitches on the right, 5 stitches on the left *, 3 stitches on the right, 3 stitches on the left
7th row: 4 stitches on the right, * 1 stitch on the left, 7 stitches on the right *, 1 stitch on the left, 4 stitches on the right
8th row: 4 stitches on the left, * 1 stitch on the right, 7 stitches on the left *, 1 stitch on the right, 4 stitches on the left
9th row: Like 2nd row
10th row: Like 1st row
11th row: Like 4th row
12th row: Like 3rd row
13th row: Like 6th row

14th row: Like 5th row
15th row: Like 8th row
16th row: Like 7th row
Repeat these 16 rows continuously.

On the back of the spikes are shifted from the front, but it results in the same knitting pattern.

Vertical zig zag pattern
In this variant, you knit the pips in pear, which is very plastic. You work alternately a right and a left stitch. For this pattern, suggest a number of stitches that divide by nine.
To knit the vertical zigzag pattern:
1st row: 1 stitch on the right, 1 stitch on the left, 1 stitch on the right, 1 stitch on the left, 4 stitches on the right, 1 stitch on the left
2nd row: 4 stitches left, 1 stitch right, 1 stitch left, 1 stitch right, 1 stitch left, 1 stitch right
3rd row: 1 stitch right, 1 stitch left, 1 stitch right, 1 stitch left, 1 stitch right, 1 stitch left, * 4 stitches right, 1 stitch left, 1 stitch right, 1 stitch left, 1 stitch right, 1 Mesh on the left *, 3 stitches on the right
4th row: 2 stitches on the left, * 1 stitch on the right, 1 stitch on the left, 1 stitch on the right, 1 stitch on the left, 1 stitch on the right, 4 stitches on the left *, 1 stitch on the right, 1 stitch on the left, 1 stitch on the right, 1 stitch on the left, 1 stitch on the right, 2 stitches on the left

5th row: 3 stitches right, * 1 stitch left, 1 stitch right, 1 stitch left, 1 stitch right, 1 stitch left, 4 stitch left *, 1 stitch left, 1 stitch right, 1 stitch left, 1 stitch right 1 stitch left, 1 stitch right
6th row: 1 stitch right, 1 stitch left, 1 stitch right, 1 stitch left, 1 stitch right, 4 stitches left
7th row: Like 5th row
8th row: Like 4th row

9th row: Like 3rd row
10th row: Like 2nd row
Knitting the described ten rows again and again.

On the back, the pips appear in the pearl pattern as well as on the front. The gaps are not smooth right, but filled with small nodules. This will make the pattern less stand out from the background.
Diagonal zig zag pattern
In this pattern, the narrow peaks run diagonally and are close together. On the back there is the same picture as on the front. You need a mesh number that is divisible by eight.
To knit the diagonal zig zag pattern:
1st row: 1 stitch on the right, 1 stitch on the left, 1 stitch on the right, 5 stitches on the left
2nd row: 5 stitches on the right, 1 stitch on the left, 1 stitch on the right, 1 stitch on the left
3rd row: 1 stitch on the right, 1 stitch on the left, 5 stitches on the right, 1 stitch on the left
4th row: 1 stitch on the right, 5 stitches on the left, 1 stitch on the right, 1 stitch on the left
5th row: Like 4th row

6th row: Like 3rd row
7th row: Like 2nd row
8th row: Like 1st row
9th row: 4 stitches on the left, * 1 stitch on the right, 1 stitch on the left, 1 stitch on the right, 5 stitches on the left *, 1 stitch on the right, 1 stitch on the left, 1 stitch on the right, 1 stitch on the left
10th row: 1 stitch on the right, 1 stitch on the left, 1 stitch on the right, 1 stitch on the left, * 5 stitches on the right, 1 stitch on the left, 1 stitch on the right, 1 stitch on the left *, 4 stitches on the right
11th row: 3 stitches right, 1 stitch left, 1 stitch right, 1 stitch left, * 5 stitches right, 1 stitch left, 1 stitch right, 1 stitch left *, 2 stitches right
12th row: 2 stitches on the left, 1 stitch on the right, 1 stitch on the left, 1 stitch on the right, * 5 stitches on the left, 1 stitch on the right, 1 stitch on the left, 1 stitch on the right, * 3 stitches on the left
13th row: Like 12th row

14th row: Like 11th row
15th row: Like the 10th row

16th row: Like 9th row
Repeat the described series continuously.
Possible variations
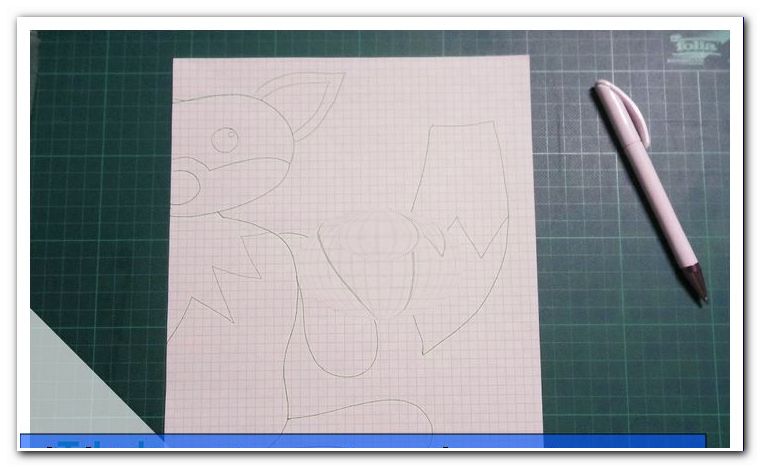
1. Zig zag patterns allow a wealth of variations. Be creative yourself and design your own pips, for example wide or narrow, high or asymmetrical. To do this, draw a pattern on a checkered paper, with each box representing a stitch. For example, mark left-hand stitches (nodules) with an x, while empty boxes for right-hand stitches (flat and v-shaped) stand.
Hint: rows with odd numbering (1st, 3rd, etc.) are called rowing, rows with odd numbers (2nd, 4th, etc.) are backordered. Lining up read on your sketch from right to left, reverse in reverse. Note that in backsheets you must swap the stitches, ie knit on the right, where a left is drawn in and vice versa.
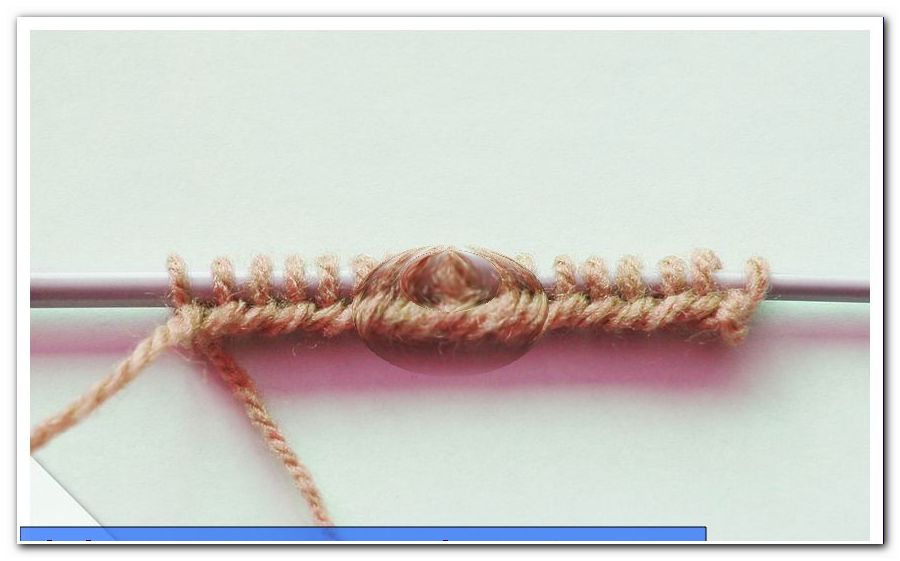
2. Refine your zig zag pattern with decorative holes. An intended hole in the fabric is created by an envelope in which you put the thread over the right needle from the front to the back. This gives an additional stitch. To keep the overall stitch count, knit two stitches together before or after each turn. To do this, stitch in both at the same time stitches and knit as one.
3. Fan smooth knit with a single horizontal or vertical Zick Zick line. This works particularly well on large areas, for example on a sweater or a bag. Alternatively, you can knit in several jagged stripes at some distance from each other.