Sewing elves | Free sewing pattern for Christmas elves

Winter is coming soon and with it come cold temperatures, but also the wonderful Christmas season! Every year I look forward to baking cookies, making a Christmas wreath and putting cute little elves on my windowsills. Since my children love these little cozy gnomes so much, I sew for my whole family every year. In this guide, we show you how to sew an elf.
The elves are particularly good in front of an icy window, on the mantelpiece or under the Christmas tree. Today I would like to show you how you can easily sew an elf out of fabric and wool scraps. If you do not have all of the fabric parts I have specified in the same color at home, you can easily use different colors. The more colorful the elf, the more beautiful.
content
- Sew the elf
- Material and preparation
- Sew legs
- Sew body
- Sew hat and braids
Sew the elf
Material and preparation
To sew the elf, you need the following materials:

- small remnants of fabric (woven cotton, felt)
- some wool or embroidery thread
- a colorful sock
- Filling material (for example polyester filling from pillows, filling wool or smaller fabric residues)
- ruler
- scissors
- pen
- sewing machine
- needle and thread
- our DIY guide
Cost of materials 1/5
Small remnants of fabric and some wool, about 1 to 2 euros.
Difficulty level 1/5
With a little patience, even beginners can sew the elf.
Time expenditure 2/5
1.5 to 2 hours
Sew legs
Step 1: First we cut the two legs for our Christmas elf. All we need is one or two old socks and a small piece of cotton.

Cut two strips measuring 15 x 8 cm .

When the sock is in front of you, you can cut the stripe in the broken fabric.

Step 2: Now place the 8 cm wide side on the cotton fabric and paint two small shoes.

Depending on your preference, the shoes can be large or small.

Cut the two pieces for the shoes out of colored cotton or felt.
Step 3: Next, place the stripes on the fabric of the shoes, right to right.

Pin the edge with clips or needles.

Stitch everything together with the straight stitch of the sewing machine.
Step 4: Now the long sides of the legs and shoes are closed.

Put everything together right to right and topstitch it with the sewing machine.

TIP: If you used an elastic fabric for the elf's legs, you can also use the zigzag stitch on your sewing machine. This prevents the fabric from warping during sewing.
After you have turned the legs through the opening on the upper edge to the right side, they are ready for use.

Sew body
Step 1: For the underside of the body, we need a fabric square with a side length of 13 cm. Draw this on a cotton or felt fabric.

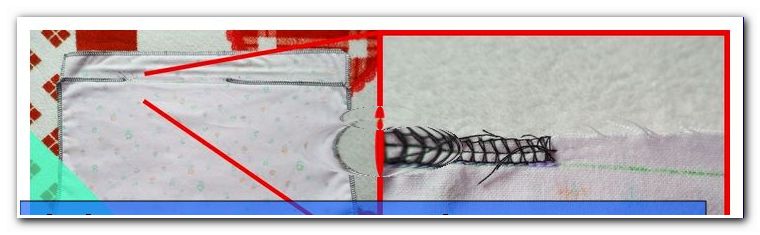
Step 2: The sides of the Christmas elf consist of triangular side parts with slightly curved lines.

To do this, paint a rectangle measuring 13 x 18 cm on the fabric.

On the longer side, connect the corner points to a curved triangle (see photo).

Now cut out the square and triangle. We use the triangle as a template for another 3 pieces of fabric of the same color.
3rd step: Another substance can be used for the nose. To do this, cut a square of fabric with a side length of 3 cm and round off the corners so that a circle is created. This is how your circular shape looks like.

Now you should have 4 x triangles, 1 x square and a small circle in a different color in front of you.

Step 4: First the triangles are sewn together into a cone. To do this, put the side edges right to right together and pin them in place.

Topstitch all four edges with the straight stitch of the sewing machine.

5th step: Now we connect the square underside of the elf with the cone. Before doing this, however, we place the two legs of our Christmas elf on the right side of the square so that the upper edges of the legs protrude slightly. Pin the legs to the square so that nothing can slip during the sewing process.
ATTENTION: The legs must be min. 1 cm from the side edges so that we don't accidentally sew the parts with the next seam. Here it is advisable to work with pins.

Step 6: Put the square and the bottom of the cone right to right together and pin it.

Now step around the square and note that a small - about 4 cm long - turning opening must be left free!

Now the elf can be turned through the opening on the right side of the fabric.

Step 7: No matter which filling material you have selected (I chose snippets of fabric), you can now start filling the elf. As soon as the gnome can stand or sit up by itself, there is enough filling material in the body.
Step 8: Now close the turning opening of the elf with the so-called mattress or ladder stitch.
To do this, prick the surface on one side, change sides and prick the fabric on the other side. Leave a gap of approx. 2 - 3 mm and prick the top again. So continue until you arrive at the end of the opening.

Now the opening should close when you lightly pull on the sewing thread. Sew the thread and cut it.

Step 9: We also use a needle and thread for the nose. Make every 2-3 mm stitches in the fabric until you have sewn once around the circle.

Put some polyester filling in the middle of the circle and pull lightly on the thread. The nose should now contract nicely.

TIP: Of course, other materials can be used instead of the polyester filling. If you prefer a flat nose, you can also put a small button in the middle of the fabric circle.

This is what your sewing result looks like!
Step 10: Now sew the nose in the middle of the Christmas elf with a needle and thread.
Sew hat and braids
Step 1: Small braids are placed under the elf's cap, which will later hang down on his face on the left and right. Use your wool or embroidery thread and braid two - about 8 cm long - braids.

Step 2: For the hat, measure a straight line with a length of 18 cm on the hat fabric.

From this straight line make another line of 25 cm upwards at a 90 degree angle and connect the two open points with a slightly curved line (see photo).

TIP: It is important that the cap on the back of the elf is a little lower. You can shape the hat according to your wishes, but the head circumference is always approx. 36 cm.
Step 3: After you have cut out the triangle, place it on the fabric again in a mirror-inverted manner and cut out another triangle of the same type.
Step 4: Now we put the two longer sides of the triangles together, right to right, and topstitch them with the sewing machine.

The bottom of the hat should still be open. This is what your gnome hat looks like!

Step 5: Next, we place the braids on the left side of the hat at the head opening and pin them. Also fold the edge of the hat slightly inwards so that a nice hem is created.

Step about 5 mm from the edge around the hat again so that the braids are sewn inside.

Your gnome with its hat and braid is now sewn ready! Design your elf as you wish.

Now put the hat on the elf's head and pull it briefly over his nose.
Voilà - Our Christmas elf is ready and can take a seat at the window ledge, fireplace or in the children's room. I hope you enjoy sewing !