Connecting the change-over switch - Instructions for clamping

- Structure and instructions for installation
- a) switch
- b) Safety rules
- c) Connect the changeover switch
- d) Correspondingly connected changeover switches
- e) changeover with more than two switching points
Toggle switches belong to the category of toggle switches, in which the rocker can be brought into two positions. They provide the ability to turn on and off lamps and possibly other power consumers from two different locations independently. Preferably, in rooms with two doors, but also in floorboards, bedrooms or children's change switch are mainly used.
Structure and instructions for installation
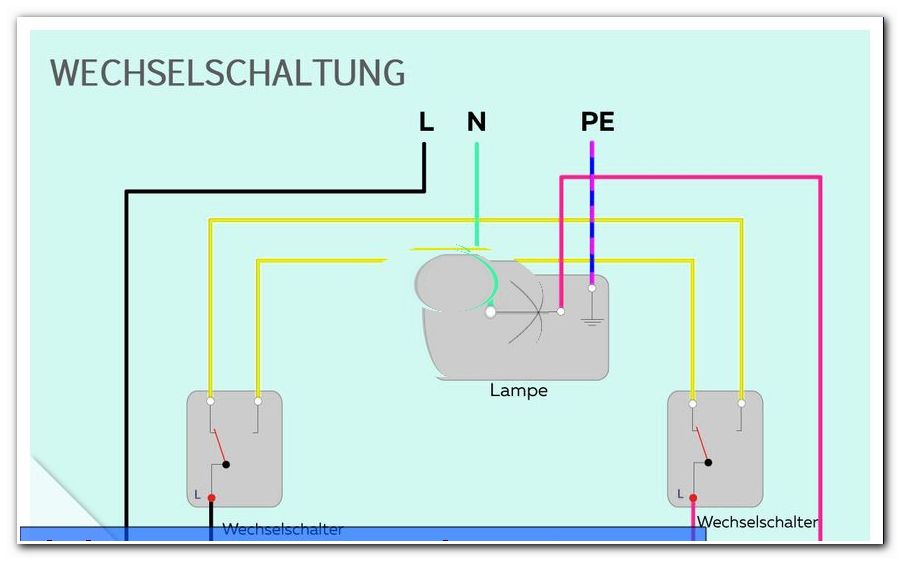
Changeover switches are today the most installed switches that the market offers. They combine the function of a conventional on / off switching, which is operated at only one switching point, with the function of a circuit with multiple switching points. Accordingly, a changeover switch can also be used instead of an ordinary on / off switch. The basis of a changeover circuit is the connection of two changeover switches by two parallel lines. With each of the two switches you can switch between the lines or change. Depending on the position of the individual rocker switches, the current then flows through connection 1 or connection 2.
a) switch
... for surface or flush mounting
Before purchasing the switches, it should first be considered in which environment the toggle circuit is set up. If the cables are already laid under plaster, flush-mounted switches, which smoothly integrate into the wall surface without a large overhang, are suitable. A distinction is made in this variant between a flush-mounted dry room switch, short UPTR and a flush-mounted wet room switch, short UPFR. For hollow wall boxes, from which screws protrude on the left and on the right, the switch construction has arcuate recesses which are guided over and then screwed tight. Otherwise, the switch construction for attachment in the box left and right each have a Spreizklemme through which, initially loosely attached, a slotted screw is performed. If the two slotted screws are screwed in, the spreaders clamp laterally in the box.

The alternative to flush-mounted switches are surface-mounted switches, which are predominantly used when the complete installation in already finished rooms is carried out later. These switches are already completely housed in a plastic housing and are mounted with screws through holes provided on the wall. Also in this variant, a distinction is made between a surface-mounted dry room switch, abbreviated APTR, and a surface-mounted wet room switch, APFR for short. Here, a dry room switch is only slightly smaller than a wet room switch. However, the latter is built much more stable. Assuming that surface-mounted switches are more vulnerable than the flush-mounted versions, they can, for. B. be hit quickly from shocks, so it makes sense to install even in dry rooms, the more resistant wet room switch.
b) Safety rules
Before starting work, it is essential to observe five safety rules.
1. Unlock
For safety reasons, all poles must first be disconnected from live parts when working on electrical equipment of 50 V AC or more. This also affects changeover switches. This is done by z. B. pulls connections, operated main switch or fuses removed. If an independent activation is not possible, the confirmation of the responsible authority must first be awaited about the activation.
2. Secure against restart
So that the voltage is not accidentally switched on again during work on a changeover circuit, eg. For example, by mistake by visitors or family members, it is important to reliably prevent. Possible, for example, would be the temporary securing of the control cabinet or fuse box by a lock. It would also be possible to mask the circuit breaker with foil or to use locking elements for the fuses taken out.
3. Determine absence of voltage
To determine the absence of voltage, a corresponding test device in two-pole design is required. Such devices show the measurement result either by means of a measurement display, by light-emitting diodes or by a flashing glow lamp. The voltage tester must correspond to the respective rated voltage. To be on the safe side, the device should first be checked for functionality at a definitely live point. If you want to make sure after work that the device has not suffered a defect during the test, a follow-up inspection is also recommended.
4. Grounding and shorting
After determining the absence of voltage, it should be ensured that during the installation of the changeover switch, z. B. by an erroneous switching on, the lines do not suddenly charge and lead to dangerous surges. For this purpose, earthing and conductors are connected to each other with short-circuit proof materials or devices.
5. Cover adjacent, live parts.
Not always is it so easy to avoid an impermissible approach to other nearby equipment one hundred percent. Emerging damages or injuries after accidental touches can be prevented by solid insulating covers. In question are spouts that match the cross-section of the exposed wires or normal insulating tape.
c) Connect the changeover switch
Setting up an AC circuit is basically not difficult. You just have to know how it works.
The following tools or materials are required for assembly:
- Combination pliers or stripping pliers
- Screwdrivers for slot and Phillips screws
- Device for voltage testing, which corresponds to the rated output of the system
- 2 Surface-mounted or surface-mounted 2-way switches Distribution boxes, if not already installed
- 5-core cable, if not already installed
- 3-core cable, if not already installed
- cable clamps
Prerequisite for the connection cabling of the change-over switch in the flush-mounted installation is that the junction boxes and the sockets for the switches are already finished in the wall. For surface mounting, it is advantageous to lay the cables before connecting them to the change-over switch. You will need 5-wire cables between the sub-distribution board and the first change-over switch, as well as between the two changeover switches and a 3-core cable from the second changeover switch to the lamp. A simple schematic diagram of the inside of the single-input, two-output change-over switch can be found on most of the products on the back.
Whereas older changeover switches used screw terminals to connect the cable cores, plug-in terminals are provided at the same place today. These have a tab on which one presses to open or close the clamp of the retaining clip. Thus, the respective cable core can be easily attached or withdrawn. Before connecting the wires, the insulation at the wire ends must be removed beforehand by approx. 10 mm.
Then only the black wire of the supply cable is connected to the changeover switch 1. The correct terminal is marked L or P. The four other wires are not needed at this point. However, it is recommended not to cut off the blue and yellow-green wires of the supply cable, but to connect them with plug-in terminals. So they can be used later, if you want to connect, for example, an outlet later. Next, both changeover switches are connected to each other with the gray and brown wires, which are also called corresponding cable wires. The terminals required for this are usually marked with an arrow or with the letter K. Each of the two wires is connected to the terminals with the same marking. Now only the black wire of the connection to the lamp at the terminal L of the changeover switch 2 is missing and the simplest kind of changeover circuit is already finished. Since both changeover switches each have black, blue and green-yellow wires, additional sockets can easily be connected here.
d) Correspondingly connected changeover switches
The operating principle of the two corresponding wires between the two changeover switches is relatively straightforward. You make the connection of changeover switch 1, which is supplied at its junction L of the black wire of the supply line, with changeover switch 2 ago. This in turn serves from its junction L through the blue wire of the 3-wire cable the point of consumption. Active is always just one of the two connections. Decisive for the current flow is the position of both switch rockers, each of which is directed to one of the two corresponding wires. If both rockers indicate the same connection, the lamp at the point of consumption provides light. If both rockers do not show the same connection, the current can not flow to the consumer. Overall, four different combinations of the two switch positions are possible, two of which are active and the other two do not conduct electricity. It follows that each operation of one of the two changeover switches the light on or off.

e) changeover with more than two switching points
If more than two places are required, of which the light is to be switched on or off, you need in addition to the two toggle switches from the third switching point so-called cross switch. A cross-over switch is a toggle switch, the rocker can be brought into two positions as in the change-over switch. It is installed between two changeover switches. To connect a total of four terminals are provided. Of these, two corresponding wires make the connection to changeover switch 1 and two further corresponding wires connect to changeover switch 2. The terminals of the cross switch are marked with two input arrows and two output arrows.

The cross-circuit is in principle only the extension of a changeover circuit. Accordingly, cross switches can only be installed in conjunction with changeover switches. The connection of the cross switch with the changeover switches is relatively simple and clearly corresponds to the logic of a normal changeover circuit. First, the gray and brown wires of changeover switch 1 are connected to the terminals on the crossover switch, which are marked with the incoming arrows. Next, the gray and brown wires of changeover switch 2 are connected to the terminals with the outgoing arrows. To install more than three switching points, you can integrate further cross switches, which must also be installed in the row between the toggle switches.
An even more detailed description of the cross circuit can be found in this manual: Crossover