Making rubber stamps yourself - video tutorial

- What is sponge rubber "> Craft sponge rubber stamp
- Application of the stamp
- Costs and time
- Instructional Video
A stamp is a very useful tool to decorate and personalize a variety of items - such as letters and postcards or t-shirts and fabric shopping bags. Make your own personal stamp yourself: With foam rubber and various auxiliary materials, this funny venture succeeds quickly and reliably. We explain to you in words and pictures what you really need and how you have to proceed exactly!
Of course, there are countless stamps to buy in the trade with varied motifs that are sometimes cheaper, sometimes more expensive to have. In general, however, it is cheaper and above all more individual to produce the desired stamp itself. Let your imagination run wild: from your initials to the imaginary mythical creature, you will enjoy absolute freedom in the creative design of your stamps. But what does such a homemade stamp actually consist of? Sponge rubber is the most important material. It costs very little - so you can buy a pack of ten colored bows for four to five euros. In addition, you usually only need wooden blocks, paper, a pencil, glue, scissors and maybe a craft knife. Below we will guide you step by step to your personal stamp made of foam rubber, give you many practical tips on the application and provide you all sorts of information worth knowing about the crafting!
Tip: In addition to our written comments, we provide you with a video that illustrates the individual steps and makes it even easier to do the tinkering. So be sure to come in!
What is sponge rubber?
Before we devote ourselves entirely to the practice, you should still learn what you have to do with crafting. Foamed rubber is a largely closed-cell and elastic foam, which belongs to the so-called pore rubbers. The material is made of chloroprene, natural rubber, acrylonitrile butadiene rubber or a comparable synthetic rubber - always with the addition of propellant gases.

The finished sponge rubber is used in a variety of ways: for example, it is used as a sealing material in the form of square profiles, round cords or sheets. In addition, it is often used as insulating clothing material in diving suits. The rings in the ring tennis are also made of sponge rubber. And we want to use the foam, which makes an excellent figure as a craft tool, now for our great stamp.
Craft sponge rubber stamp
Tinker made of sponge rubber is not only recommended for teenagers and adults. Even smaller kids can participate in the action. However, they should receive help from older supervisors, as bonding is a health risk. The youngest, after all, tend to explore everything with their mouths - which could be fatal with toxic glue. However, it is easily possible that the little girls and boys sketch the motifs that should decorate the stamp at the end.
For example, organize a family gathering during the Advent season to make stamps for the Christmas cards. Anyone who works as a teacher or teacher in a primary school can also do such a craft lesson with his class. Ultimately, the possibilities are limitless, because one thing is for sure: creating stamps made of foam rubber is a joy and leads to something that remains, allowing a variety of deployment options.
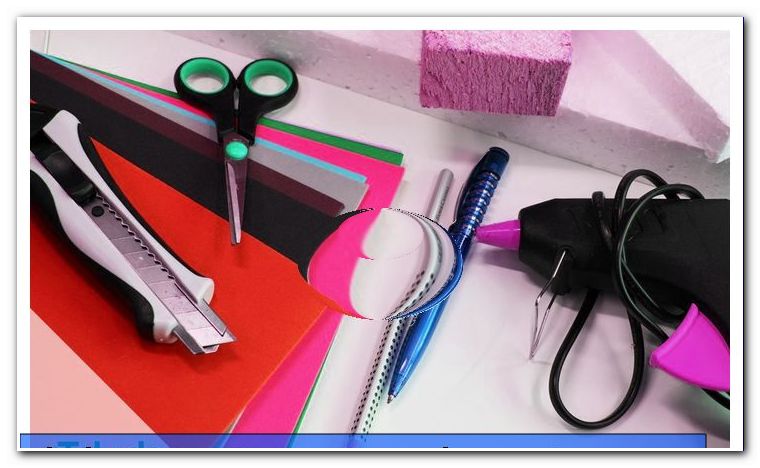
What you need for crafting a stamp from foam rubber:
- foam rubber
- Wooden blocks or wooden strips (or another smooth surface on which you can fix your motif stably, possibly polystyrene)
- paper
- pencil
- scissors
- Cutter knife (optional)
- double sided tape or liquid glue
How to proceed when making a rubber sponge stamp:
Step 1: Consider a motive for your stamp.
Step 2: Pick up a piece of paper and paint the imaginary motif in the desired size on the same.
Tip: Of course, the motif may not be larger than the wooden block on which you will stick the sponge later.
3rd step: Cut out the motive with scissors. It serves as a template in the episode.

Step 4: Place the cut template on the sponge and trace the lines with a pencil. Now the motif is on the foam.
Tip: If you do not want to draw your motif yourself, you can also use a cookie tin or similar. These simply push powerfully into the sponge rubber and press out the motif.
Step 5: Cut out the motif from the sponge rubber.

Tip: For very small areas that require very delicate work, it is best to use a craft knife. With this, difficult parts can be cut out accurately.
Step 6: Grab the wooden block and stick the motive made of sponge rubber on it. You can either use double-sided adhesive tape or liquid glue.

Tips: When working with liquid glue, make sure there is enough adhesive around the edges of the gum motif. In addition, you should press the edges particularly strong. Otherwise, it may happen that the stamp later peels off and brings a blurred result on the target object. Of course you should also press firmly on the rubber if you use double-sided adhesive tape. For very small motives you can also use wine corks as a replacement for wooden blocks.
Hard to believe, but that's it. Your rubber stamp is ready!
Application of the stamp
Depending on whether you want to use your new stamp for letters and postcards or if you instead want to print fabric articles such as T-shirts and bags, you need different aids:
a) Foam stamp stamps for postcards and postcards: Small models can be used with ordinary stamp pads. For larger versions, water or poster colors are possible. Simply brush the motif in your desired color and stamp on it. Work as quickly as possible so that the paint does not dry on the rubber.

Tip: Of course you can also apply several colors at the same time. It is especially nice to mix several colors on a palette and to dip the stamp into this mix in order to then immortalize it on the target object. This creates a wonderfully colorful, organic effect.
b) Foam Rubber Stamps for T-shirts and Cloth Bags: To print T-shirts, bags or other fabric items with the foam rubber stamp, you should purchase fabric paints and bristle brushes. In addition, you need a piece of cardboard.
The procedure in detail:
Step 1: Slide the cardboard between the two layers of the T-shirt or cloth bag before lospinselling. This will prevent the paint from transferring to the other side of the fabric.
Step 2: Then paint your foam rubber motif with a small wide bristle brush and your favorite fabric paint. Pay attention to a uniform distribution of the color, especially in the edge area.
Step 3: Stamp the subject on the fabric. Place the stamp on the desired position and press it firmly.
Step 4: Take the stamp from the fabric.
Step 5: Repeat steps 3 and 4 until your intended final motif is visible.
Step 6: Let the paint dry.
Step 7: Fix the motif in accordance with the instructions for use of the used fabric paint. Done - your individually printed fabric is ready!

Costs and time
- A pack of foam rubber with ten bows in different colors costs - as already mentioned - about four to five euros.
- Wooden blocks are often used as wood waste in the hardware store, so you will not have to invest much or nothing at all.
- For a set of six fabric paints of 20 milliliters you pay on average between ten and 15 euros. A similar cost applies to poster colors and an ink pad set with multiple colors. Put five to ten euros for a simple box of watercolors.
- A set with bristle brushes costs - depending on the size - between two and ten euros.
- The other materials (paper, scissors, craft knife, cardboard, tape and liquid adhesive) you probably have in stock at home, so there are usually no additional costs.
The total cost is about ten to 30 euros for a variety of stamps made of sponge rubber and their repeated uses. To make a stamp from foam rubber you need only a little time. For a single copy, ten to fifteen minutes is quite realistic. Of course, the application takes a little longer in the case of printing on fabric.

You do not need a lot of time or countless materials to make a stamp from sponge rubber. In fact, the wonderful decorative element is made with a minimum of tools and relatively quickly. Also special knowledge and special skills are not required. So that means everyone can take on this task and make a stamp from sponge rubber. The finished utensil can be used for the decoration of letters and postcards as well as for fabric items such as T-shirts and bags. We hope you enjoy creative work and design of the target objects!
Instructional Video
Tips for quick readers:
- Create stamps made of sponge rubber quickly and cheaply
- Suitable for letters, postcards and fabric utensils
- Think over the subject and paint on paper
- Cut out the motif and use it as a template
- Place the stencil on the foam rubber and trace the lines
- Cut the motif out of the sponge rubber
- Scissors are sufficient for coarse parts, and tender areas can be cut out with a cutter knife
- Glue foam rubber motive on wooden blocks
- Use double-sided adhesive tape or liquid adhesive for bonding
- Stamp pad is sufficient for small stamps for letters and postcards
- Paint larger stamps for letters and postcards with poster or watercolors
- Paint stamps for fabric objects (T-shirts, bags, etc.) with fabric paints
- Apply poster, water and fabric paints to the stamp with a bristle brush
- Press stamp firmly and evenly
- For fabric let it dry and fix it according to the instructions