Paint stones - 5 beautiful designs and templates

- collect stones
- Clean stones
- Paint stones with acrylic paint
- Instructions: paint mandalas on stones
- Other motives and ideas
- Monster Stones with Wiggle Eyes
- Masking for exact lines
- letter tiles
- Sprinkle stones
This crafting idea will inspire you - self-collected stones that you can find everywhere, can be perfectly painted and converted into decorative elements. Create colorful and beautiful stone paintings for just any occasion as a gift or as a special decoration idea for the home. We show you which color you should use when painting stones and provide the necessary inspiration. Have fun collecting and painting!
Painting stones is not that complicated - just let your creativity run wild. The results will surprise you. Mandalas, animals, faces or geometric patterns - everything looks good on a stone. Depending on the occasion or device, you can color the motif of the stone.
collect stones
Before painting, you must first get the right stones. These can be big, small, round, flat stones - just as you like. That's up to you.

Why not combine this crafting idea with a walk in the forest, through the city or even better to the beach or the riverbank. There you can find smooth washed stones through water. These stones have a nice surface and are perfect for painting. Keep your eyes well open, you will find one or two stones along the way. Every stone can make something special - you'll see.
Your children will also enjoy this tinkering and at the same time learn to appreciate nature.
Clean stones
Before you can start painting, the stones must be cleaned. However, you do not need a primer. With soap and water you can rinse the stones. After drying it starts already.
Paint stones with acrylic paint
Different colors are suitable for painting stones: acrylic lacquer, for example, makes the stones shine, normal acrylic or Plaka paint is available in almost all colors and can be mixed well.

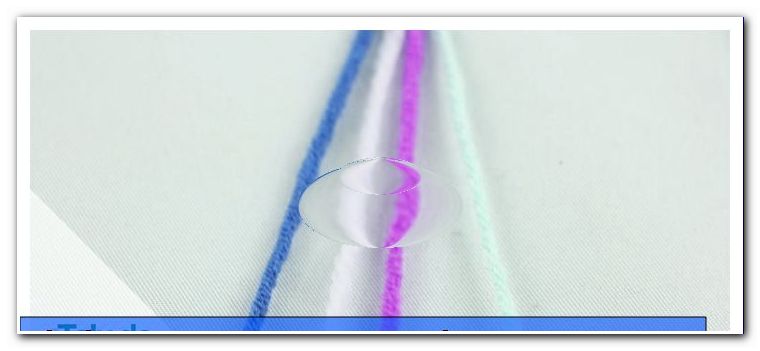
What you need to look for is the right consistency of color. Of course, you can also paint the stones with very liquid paint or soak in them, but for filigree lines on the stone is a good color consistency of advantage.
Test the consistency on a piece of paper. Drop a small drop of paint on the sheet, forming a uniform point that does not run, the consistency is perfect.
Instructions: paint mandalas on stones
A mandala is a geometric pattern that is mostly square or circular. In Hinduism and Buddhism, these colorful graphs have a religious meaning. In fashion and art, they are often used for decoration and as style elements. Mandalas look beautiful on stones as well. However, this way of painting stones is a bit more difficult and requires a little patience. With a little practice and the right instructions, but it works the first time.

A round, even and flat stone is best for painting a mandala. The smaller the stone, the more difficult it is to paint filigree lines with a brush. Therefore, you should look a little bit longer for a suitable stone before you start painting.
Step 1: First clean the stone with water and some soap. After it has dried completely, painting can start.
Step 2: Now the stone needs a base. These paint best in black - which gives the mandala 3-dimensionality. Draw a black circle starting from the middle of the stone. The circle should not occupy the entire surface of the stone, but leave a small edge - about half of the radius. Let the paint dry.

Step 3: Now paint with white paint a small circle as the center of the mandala directly in the middle of the stone. Circle this circle with more, but smaller points. To do this, just poke the stone with the tip of the brush so that it does not get too big.

Tip: With a thin and pointed wooden skewer, small points can also be brought to the stone well.
Step 4: Now another color comes into play. This will ultimately be in various nuances main focus of the pattern. We chose a soft turquoise.

For the color shades, you now mix five different, lighter shades from the base color, the turquoise. Just mix a bit more white. Then you have a color palette with six shades of turquoise, which are getting brighter. You do not need much of these colors.
The circles and points of the mandala become darker and darker from the center to the outside.
Step 5: Now paint a second row of dots always off-set to the white dots from the first row. These points will be slightly larger than those in the first row. Take the brightest turquoise tone.

Step 6: The third row of points is now the second brightest turquoise tone. Also arrange these in offset to the row in front and slightly larger.

Step 7: Now continue with the rows, sizes and colors of the dots until you have to paint over the black base with the outermost and darkest points. The last row crosses the black area about halfway through the points.

Step 8: Now add small dots between each of the circles with white acrylic paint. The white dots in the last row are supplemented with two smaller dots to the outside. These act like rays that make the mandala shine.

Step 9: The Mandala is done! The painted stone can now be varnished with clear lacquer - this is how the paint stays in contact with water and the mandala shines.
Other motives and ideas
Monster Stones with Wiggle Eyes
These funny stones do not need much - a poisonous color like this yellow-green or even black, clear coat, shaky eyes from the craft shop and hot glue.

First paint the stones with the base color. For brighter shades, you will need to apply several layers to completely cover the stone. Let the stone dry long enough.
Now paint a crooked mouth with scary teeth on the lower half of the stone - think about where to place your eyes and mouth best.
If this color is also dry, the stone can be painted. The rising vapors can quickly enter the respiratory tract, so you should apply the clearcoat outdoors when possible. Let the paint dry well.
Finally, stick one or two eyes, one big and one small, just over the mouth. Done are the monster stones! Your children will be thrilled!
Masking for exact lines

With the help of a painter's crepe, the collected stones can be masked off - this is how you get straight colored edges. Create with these surfaces noble design stones or stones in colors of country flags. Of course, every single color has to be painted and dried before you can continue to tap.

letter tiles
Or you can paint letters on stones and then use them to write messages or names. Simply write a random letter on each stone and place it in the middle of the table, for example, or use it as a name badge.

Sprinkle stones
This variant is quite fast to implement and you do not need filigree brushstrokes. Spray the stones completely with varnish in various colors.

Gold and silver paint turn the stones into real pieces of jewelery that you can then individually or grouped drape in a bowl or plant. As a sparkling lucky charm such a stone is also ideally suited.

Spray the stones, preferably outdoors, with a distance of 20 - 30 cm, until the entire surface shines in gold and silver. Use cardboard or newspaper as background.
With these simple means - with stones and paint - wonderful lucky charms and gifts can be created. Let your creativity run wild while painting the stones.