Make a hobby - DIY instructions in 9 steps

- Steckenpferdchen 1 - for novice craftsmen
- Hobbyhorse 2 - for sewing enthusiasts
Making a hobby easy: With our comprehensive instructions and tips, you can bring the once so popular children's toys to life. In a high-tech world, it is a valuable event for kids to act with a natural element that stimulates the imagination and physical activity - in fact, they can sometimes even participate in the creation of the horses themselves. Bring your child a piece of tradition - give him a homemade hobby!
A cute hobbyhorse is available in the shop from about ten euros to buy. Well, please, why then create one yourself "> Steckenpferdchen 1 - for beginners
With our first hobby horse, you do not have to sew or perform sophisticated wood carvings. The result can still be seen.
List of materials: 
- a men's sock (about size 42, for example in gray)
- a stick (about 1 meter long)
- fiberfill
- a cardboard roll (for the ears)
- Paint (for example in white) and brush (to paint the ears)
- Wool (for fixing the sock on the hive and for the horse's teeth, for example in brown)
- Felt (in 5 different colors, for example brown, pink and blue for the bridle and white and black for the horse's eyes)
- String (as a reins, for example in beige)
- Pencil, ruler and compass
- Scissors, adhesive and insulating tape
How to proceed:
Step 1: Pick up the sock and fill it with cotton wool. Do not be too frugal, let the sock get really bulging.
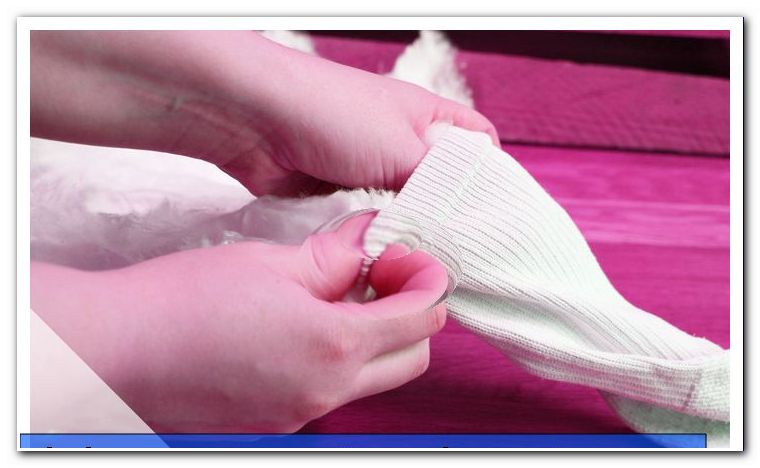
Step 2: Grab the stick and put it deep into the sock. Then tie the sock end to the stick - use wool for this. The last piece of wool is glued to the floor with insulating tape. Again, do not be frugal, your horse should finally hold.
1 of 4


Step 3: Next is the horse's ears. Grab a cardboard roll - the remnants of toilet paper are absolutely sufficient. Halve the paperboard on its long side. Then draw an ear on one half. Then lay the two halves of the cardboard on top of each other and cut along your mark - you already have two ear shapes. To make them even prettier, paint the two ears with brush and paint. Let it dry. Now glue or sew the cardboard ears to the former sock heel.
1 of 4


Step 4: Cut three approximately 1.5 cm wide felt strips - for example in brown - for the bridle. As far as the length is concerned, you should be careful - it depends on the size of your sock.

Tip: Draw the strips on the felt - with pencil and ruler.
Step 5: Glue the first strip around the ears. The other two strips are glued around the head, so it looks like a bridle.
1 of 2

Tip: If the stripes are too short, simply add a piece of felt. However, it is advisable to first cut the strips a bit longer so that they can be shortened if necessary. This will give you a much nicer result.


Step 6: Now conjure out of two felt colors, such as white and black, the eyes. Take the compass in hand, draw on the white felt two slightly larger (about 1 cm in diameter) and on the black felt two smaller circles (about 0.8 cm in diameter) before and cut them out. Glue the black on the white felt circles and the packages as an eye on the sock.
Step 7: It's time for the mane! Cut out a variety of wool threads and bundle them together. Stick the top ends between the ears. In contrast, the rest of the woolen threads may or should fall freely - so you obtain a bushy hair on your horse.
1 of 2

Step 8: Finally, complete the bridle with reins. Glue the two ends of a cord about 1 m long on both sides in the lower part of the bridle.
1 of 3


Cost: low
Effort: low
Difficulty: simple
Step 9: Once again, attach two felt circles over the ends of the string - this time, take the remaining colors, such as pink and blue. The procedure is the same as for the eyes. Ready is your horse!
Hobbyhorse 2 - for sewing enthusiasts
The following instructions are for women and men, girls and boys who like to sew. Great are the differences to the first hobby not - but still available. Her sewn horse receives, among other things, tighter ears, a higher quality bridle and even nostrils. Here we go!
List of materials:
- a men's sock (about size 42)
- a half broomstick
- fiberfill
- Wool (for the mane)
- 2 cardboard strips (each about 24 x 5 cm)
- 2 different fabrics (for the ears)
- Felt (for the eyes)
- 2 buttons (for the eyes)
- Suture tape or thick cord (for the bridle)
- sewing thread
- Sewing needle, embroidery needle
- sewing machine
- scissors
- cutter
How to proceed:
Step 1: Pick up two different materials for the ears and cut them twice in horse-ear shape, so that you then have four pieces of fabric. The front and back of the ears look the same. That is, you choose at both ears the same combination of selected fabrics and sew them together - leaving the bottom sides open. Then stuff your ears with cotton wool.
Step 2: Grab two cardboard strips and wool to make the mane. Depending on the thickness of the wool, wind it around the cardboard four to six times. In any case, so that the now woolen strip appears thick enough for a mane. Then sew a side with the wool thread. This prevents the wool from falling apart again during subsequent cutting.
Step 3: Using the cutter, cut one side between the cardboard strips. Then sew again with the sewing machine over the side already sewn in step 2. This provides even more stability. Now you have created a pretty horse mane.
Step 4: Fill the sock in half with cotton wool.
Step 5: Sew on the mane and ears.
Step 6: Embroider the nostrils with a wool thread.
Step 7: Sew the two buttons on two felt circles and these in turn on the sock. This will create the eyes of the horse.
Step 8: Push the broomstick deep into the sock and stuff the horse's head. Tie the end of the sock with a wool thread.
9th step: Finally, sew a seam tape or a thick cord as a bridle. Finished!
Cost: medium
Effort: medium
Difficulty: simple
Tips for quick readers:
Horse 1:
- Fill the sock with cotton wool and push in the stick
- Fix the floor with wool and insulating tape
- Make and glue ears with cardboard, brush and paint
- Make a bridle with felt and glue it on as well
- Make mane with wool threads and fasten
Horse 2:
- Cut fabric tubes, sew and fill with cotton wool
- Mane with cardboard and wool tinker
- Half fill the sock with cotton wool
- Sew on mane, ears, nostrils and eyes
- Push broomstick into sock and stuff sock
- Tie sock end with wool thread and attach bridle