Knit socks with circular needle: free DIY instructions

Knit socks is a popular project for both beginners and advanced users. In this guide, we will show you one of two basic methods of knitting socks, namely knitting socks with a circular needle. Ultimately, the decision between double-pointed needles and circular knitting needles is a matter of taste. But the circular knitting needle offers a pleasant way of working, especially for beginners or very small socks.
The needles may seem unwieldy to some at first. With a large total number of stitches and short needles, you run the risk of losing a few stitches. If you want to knit small socks, for example for small children, the usual 15 cm long needles are always in the way. Here knitting socks with the circular knitting needle is a practical alternative. The cord prevents the loss of individual stitches. With a long cord, you also have ample scope to divide the stitches into units that are easy to machine. Give it a try!
content
- Knit socks with circular needles
- The cuff
- The shaft
- The heel
- The foot
- The summit
Knit socks with circular needles
Material:
- Sockenwolle
- suitable circular knitting needle (at least 60 cm long)
- wool needle

If you are knitting children's socks, you can get there well with a 60 cm circular knitting needle. It is also sufficient for smaller adult sizes. It is more comfortable with 80 cm or more. If you want to knit socks that are size 42 or more, a circular knitting needle of at least 80 cm is absolutely recommended. The size of the needle depends on whether you are working with 4-, 6- or 8-thread sock wool.
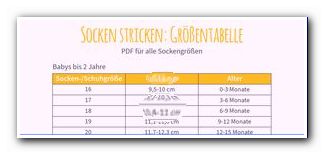
We knit our socks with a 6-thread sock wool and a circular needle of size 3.5 and 60 cm in length. For a size 40 we cast on 52 stitches. You can find more information on the number of stitches required depending on the size and length of your wool in our sock table. For knitting socks with the circular knitting needle, you can use the information from there 1: 1.
In our Talu.de sock table you will find information on the different sock and shoe sizes, their foot length and age. Our tables show sizes for babies, children, women and men.
Talu size chart Knit socks sizes for socks
Prior knowledge:
- right stitches
- purl stitches
- Knit stitches twisted together
- Knit stitches together
- Knit stitches together
The cuff
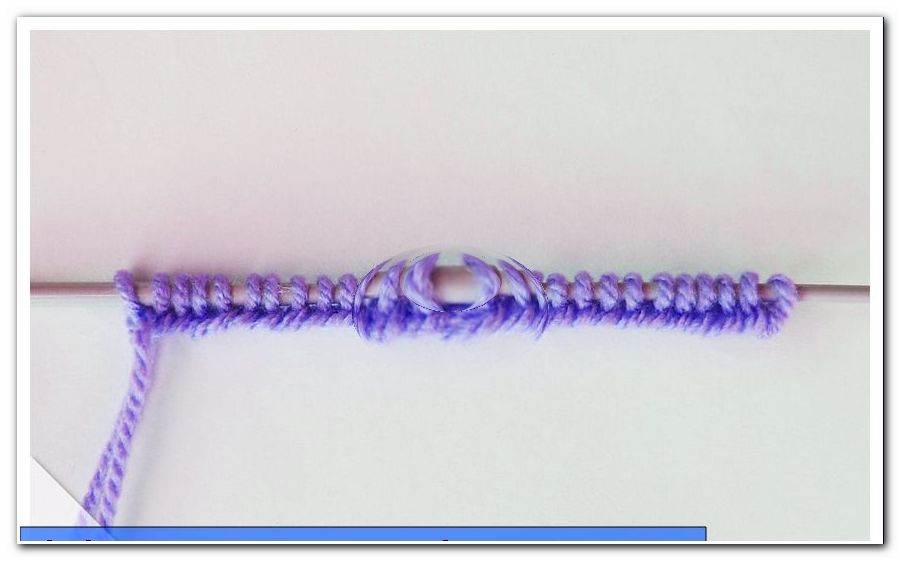
Cast on the specified number of stitches over both needles of the circular knitting needle.

So the cuff is nice and loose. Pull out one of the two needles. Slide half of the stitches onto the left needle to knit. The remaining stitches rest on the rope. Pull a piece of the rope out between the two stitch blocks so that the two rows of stitches can lie comfortably one behind the other.

A piece of rope should still protrude so that you can move the right needle freely. In the following photo of the foot section you can clearly see the work arrangement.

Now work the round pattern in the round with 2 left - 2 right.

The cuff can be between 2 and 5 cm high, as you wish.

The shaft
If you are knitting socks with the circular knitting needle for the first time, you can of course do without any pattern. Colorful sock wool already makes for pretty socks. Alternatively, we present a small combination of right and left stitches that you can use to easily give your sock shaft a 3-D structure.
Knit a few rounds after the cuff. Then start with the right-left pattern as you can see in the sketch. The white boxes stand for right stitches, the blue boxes for left stitches. The sketch refers to half of the stitches for a size 40 with a total of 52 stitches per round.

Repeat the same procedure for the other half of the stitches. If you knit with fewer or more stitches, you can shorten or lengthen the stripes accordingly.

You continue the pattern over a large part of the shaft. The last rounds before the heel are worked again on the right side.

For information on the optimal shaft height, please refer to the corresponding sock table . When this height is reached, start with the heel.
The heel
We knit a classic heel with a cap and gusset. A boomerang heel is of course also possible when knitting socks with circular knitting needles . First lay half of the stitches on the rope. From now on you only knit in rows over the other half of the stitches. We opted for a reinforced heel with a patent pattern . You can also knit the heel smoothly on the right. Nevertheless, lift off the first stitch in a row on the left.
The patent sample consists of 2 rows:
From the right side: lift off 1st stitch on left, knit 2nd stitch on right, alternate between left and right knit - the last stitch in the row is always knitted on right.
Back row: Lift off 1st stitch on left, knit all remaining stitches on left.
You can also find the optimal number of rows for your sock wool and size in relevant sock tables, which are designed for knitting with heel caps.

As a rule of thumb, knit a number of rows for the heel that is half your total stitch count minus 2. In our case, half of the total number of stitches is 26. If we subtract 2, we get 24 rows for the heel.

When the required number of rows has been knitted, divide the stitches into 3 parts of approximately the same size. Place markers in the appropriate positions on the last back row. If the number of stitches cannot be divided evenly by 3, choose fewer stitches in the middle and more stitches on the sides. Our 26 stitches can be divided into 9 - 8 - 9 stitches, for example.
In the first row from the right side, raise the first stitch on the left. Knit the remaining stitches up to the 2nd mark on the right. Remove the mark. Knit the two stitches twisted together after the marking. Knit another stitch on the right. Then apply the work.
The back row also begins by lifting the first stitch on the left. Knit the remaining stitches up to the 1st mark on the left. Remove the mark. Knit the two stitches together after the mark on the left. Knit another stitch and turn work.
In this way, you continue to knit your back and forth rows until you have reached the outermost stitch. You no longer need the markings, since you can see a clear gap between the stitches on both sides of the corresponding position.

Knit the stitch before and after this gap. This is followed by another stitch on the right or left before you turn the work. Apart from the first stitch (lift off on the left!), Your last row should only consist of single right stitches. The curve around the heel is now clearly visible.

The last thing to do is to re-establish a connection between the heel stitches and the stitches that have been set aside. To do this, continue working immediately after the last row of heels. Start by picking up a new stitch from each row of the heel on the right edge of the heel. Always bring the thread for a new stitch through the inner link of the edge stitch of a row onto the right knitting needle. At the transition between the heel and the stitches that have been set aside, there may be 2 new stitches so that there is no hole here.

Make a mark in front of the stitches that have been set aside. Then continue knitting stitches over the stitches that have been set aside and place a second marker at the end. Then pick up the new stitches from the left side of the heel . Now you have a whole round of stitches on your circular knitting needle.

The foot
By adding new stitches, your total number of stitches is now significantly larger than on the shaft. At the beginning of the foot, it is important to remove the excess stitches evenly. This part of the sock is also called "spickle". However, first knit 2 full rounds over all stitches.
The decreases are based on the markings that you made between the new stitches and the stitches that were previously closed. The first mark marks the transition to the heel, while the second mark marks the transition to the back of the foot.
In each round, 2 x 2 stitches are now knitted together as follows:
Knit a stitch after the first mark. Knit the next two stitches together on the right. Then continue knitting right stitches until you reach the third to last stitch before the 2nd mark. Knit the third and penultimate stitches together before the mark on the right.

Continue decreasing every round of stitches according to the pattern described until you have your original number of stitches on the circular needle - in our case 52.

From then on, knit rounds as normal until the desired length is reached. The optimal foot length for your size can also be found in the sock table.

The summit
When knitting socks with the circular knitting needle, you can choose between different variants for the lace. At this point we describe the procedure for a classic band tip . For the tapering of the sock at the top, stitches have to be removed. To do this, knit the 2nd and 3rd stitch together in each decrease round after the two markings, twisted together on the right.

In front of the two markings, knit the third and second to last stitch together. Initially, acceptance rounds alternate with normal rounds .

In the sock table you will find information on how often you should lose weight for your size "every 3rd round", "every 2nd round" and "every round". “1 x in every 3rd round” means that you knit 2 rounds without decreases after the first decrease round. “3 times in every second round” means, for example, that you work 3 times alternately with a decrease round and a normal round. At the end decrease every round until there are only 8 stitches left.

Cut the thread generously and take it into a wool needle . Pass the thread round all 8 stitches.

Now you can pull out the circular knitting needle and tighten the thread . The rest of the hole closes.

Pull the thread on the inside of the sock and overcast it there. Your project knitting socks with the circular knitting needle has been successfully completed!