Crochet Schnuffeltuch - DIY Instructions for a Knuddeltuch

- Crochet the Schnuffeltuch
- Material and preparation
- Basics
- Crochet the Schnuffeltuch | puss
- The head
- Crochet the Schnuffeltuch
- Crochet the Schnuffeltuch | dog
- The dog's head
- Crochet the blanket
Crochet a comforter or a gauze scarf, these are the best companions for the little baby. Her first tangible toy to love. Mommies, omis and dear friends are asked here to pamper the little Wonneproppen with such a Schnuffeltuch.
Crocheting a quilted blanket is more than just making a toy. This first püppi for the baby gives him peace and security, it quickly becomes a comforter and best friend. Especially when falling asleep, it can be a great sleep aid. The Schnuffeltuch is always at hand and is usually close to the child's head.
The baby picks up the smell and will always reach for it, smell it or even suckle. For many children, such a comforter is the first confidant outside the parents. And later, when the little ones get bigger, the cuddly cloth becomes a constant companion, often even to kindergarten.
Crochet the Schnuffeltuch
Crochet a quilted cloth as a gift
Crochet a comforter is a wonderful gift for the baby. As a handcraft it is not only unique, it will remain unforgotten. Such darlings are not just carelessly put aside and forgotten. You are loved for a lifetime.
However, it is important to crochet with the Schnuffeltuch that you process the right yarn and stuff the head with a filling material, which is not only very soft, but also withstands the washing machine . Even if the little child will resist washing, sometimes it just has to be.
Schnuffeltuch or Knuddeltuch - we show you how to do it. You do not have to be a pro for crocheting our Schnuffeltuch. Once again, we have selected a guide with which you can crochet two different gossamer towels. A little kitty and a colorful dog. Both animal heads have the same structure, only the ears differ. And it was important to us that you can easily rework both towels without much crochet knowledge.

Material and preparation
When using the material you should definitely use a yarn that is especially suitable for babies . Since the little children take everything in their mouth, it is important that the yarn is free of pollutants. And, it should be cuddly soft and durable. So a yarn that meets the highest standards. Baby Smiles Cotton by Schachenmayr is an example of such a high-quality yarn to crochet a duvet.
As filler we also recommend a pollutant-free material. Holy filler is specifically designed for baby toys and therefore an example of what you can do with a baby blanket. It should definitely be washable and tumble dry at 60 degrees .
The heads of both Schnuffeltücher are worked with a crochet hook the strength of 2.5 mm. To make the cloths very soft, we have crocheted them with a needle size of 3 mm.
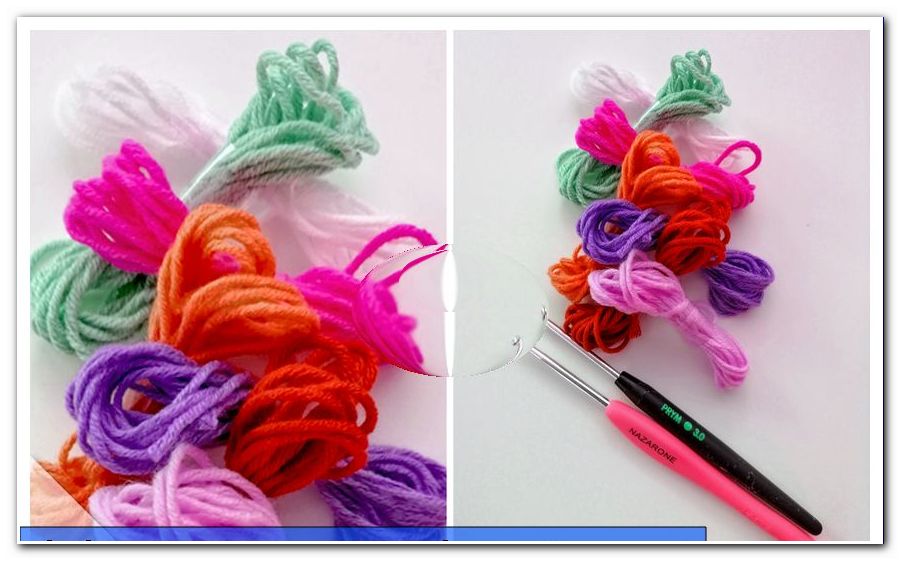
For a crochet doily you need the following material:
- maximum 100 grams of yarn in different colors
- Crochet hook 2.5 mm
- Crochet hook 3.0 mm
- scissors
- Needle for sewing
Basics
Crochet basic pattern
Both heads are worked with fixed stitches. Each crochet piece is started with a thread ring. You can find the thread ring in "Learn crochet (thread ring)" under "Thread ring - this is how you crochet a magic ring". Also fixed mesh, half and whole chopsticks are explained in our column "crochet learning" with pictures exactly.
Losing weight in rounds
When crocheting two stitches, always use only the front stitches of both stitches, then stitch both stitches together.
Crochet the Schnuffeltuch | puss
We start with the cuddly cloth "Kitty".
The kitty consists of 6 individual particles:
- 1 head
- 2 ears
- 2 arms
- 1 cloth

All parts are crocheted in the same system. Every single part starts with a thread ring and everything is worked in rounds. We worked the head with white yarn.
The head
The head is crocheted as a small ball.
- thread ring
1 round:
- 6 fixed stitches in the thread ring work.
2nd round:
- double each stitch = 12 stitches

3rd round:
- double every 2nd stitch = 18 stitches
- Crochet 1 tight stitch
- Crochet 2 sts in a loop of the preliminary round
4th round:
- double every 3rd stitch = 24 stitches
5th round:
- double every 4th stitch = 30 stitches
6th round:
- double every 5th stitch = 36 stitches
7th round:
- double every 6 stitch = 42 stitches
8th round:
- double every 7th stitch = 48 stitches

9th round - 15th round:
- Crochet normally, without increase
16th round:
- the weight loss starts
- Crochet 6 stitches
- Crochet every 7th and 8th stitch in the preliminary round

17th round:
- 5 fixed stitches work
- Crochet every 6th and 7th stitch together
18th round:
- Crochet 4 strong stitches
- Crochet every 5th and 6th stitch together
19th round:
- 3 fixed stitches work
- Crochet every 4th and 5th stitch together
20th round:
- stuff the head with stuffing cotton
- Crochet 2 stitches
- crochet every 3rd and 4th stitch together

21st round:
- Crochet 1 tight stitch
- Crochet every 2nd and 3rd stitch together
22nd round:
Crochet two stitches together until the head is closed. Crochet the last stitch as a warp stitch. Cut the thread and pull it through the loop.

The ears
- thread ring
1 round:
- 6 fixed stitches in the thread ring work
2nd round:
- double all stitches = 12 stitches
3rd round:
- double every 2nd stitch = 18 stitches
4th round:
Crochet without increase. Crochet the last stitch with a slit stitch. Cut the thread and pull it through the loop. The ears are not stuffed, just sewn together.

Tip: When changing colors, simply crochet the initial threads on the back. You can not see that and you can spare yourself the long sewing. It is sufficient if then only 1-2 stitches, if need be sewn.
The poor
The arms are also worked in rounds and start with a thread ring. We worked with two colors.
- start with pink, crochet hook 2.5 mm
- thread ring
1 round:
- 6 strong stitches in the thread ring
2nd round:
- double all stitches
3rd round:
- every other stitch doubles = 18 stitches
4th round - 7th round:
- crochet only sturdy stitches
- from the 7th round - 21st round continue to work with white yarn.
Crochet a warp stitch, cut the thread and pull through. The arms are stuffed with stuffing and sewn flat at the end. Crochet the second arm in exactly the same way.

Crochet the Schnuffeltuch
Crochet the cuddle cloth or the duvet with a colorful shell pattern. Each round gets its own color. Anyone who has ever crocheted Granny Squares knows the system of this work.
The crochet work begins in the middle of the Schnuffeltuches with a thread ring, from which then the four corners of the cloth are worked out. If the first two rounds are still round, the corners start in the third round. And with them the cloth enlarges from round to round.

- thread ring
to work in the thread ring:
- Crochet 3 loops of air - these replace the 1st stick
- 1 air mesh to it
- Repeat 6 times
- 1 stick
- 1 air mesh
The round ends with an air mesh and a chain stitch in the third air mesh from the beginning. The circle now has 8 sticks and 8 bows

1st bow:
- Work 1 sliver in the first sheet
- 3 air meshes - for the first stick
- Crochet 6 sticks in the bow.
2nd bow:
- 1 solid stitch work
3rd bow:
- Crochet 7 sticks
4th bow:
- 1 fixed loop
5th bow:
- 7 sticks
6th bow:
- 1 fixed loop
7. bow:
- 7 sticks
8. bow:
- 1 fixed loop
The round ends with a tight stitch in the 3rd air mesh of the 1st bow. The round is over.

We change the color and continue working with green yarn. You can do it, but you do not have to. When changing, cut off the thread, pull through the stitch and continue to crochet with a new color.
From this round begins the actual pattern, it consists of:
- 1 bow round and
- 1 round of mussels
The next round begins between two shells, right where a crochet was crocheted. In this round, the four corners are crocheted out.
- the bow round
1st corner:
- 3 air meshes - replace the first chopsticks
- + 1 air mesh
- 1 stick
- 3 air meshes
- 1 stick
- 1 air mesh
- 1 stick
- 5 air meshes - these bridge the shell of the preliminary round.

2nd corner:
Back in the middle of two shells, just in the place of the fixed mesh from the preliminary round.
- 1 stick
- 1 air mesh
- 1 stick
- 3 air meshes
- 1 stick
- 1 air mesh
- 1 stick
- 5 air stitches over the shell from the preliminary round.
- 2 corners have now been created.

The 3rd and 4th corner:
- as crochet as the 2nd corner

The round ends with 1 sliver in the third preliminary air mesh of the preliminary round. In the following first sheet work a warp stitch. This will get you in a new round.

- the mussel round
1st corner:
- 3 air meshes - as a substitute for 1 stick
- Crochet 6 more sticks into this bow

- 1 fixed stitch - work in the second or middle bow
- Crochet 7 sticks into the third bow

- Crochet a single crochet into the 4th stick of the shell from the preliminary round - the chain of hoops will be crocheted

2nd corner, 3rd corner and 4th corner: are worked the same way as the 1st corner

The round ends with a chain stitch in the third air mesh from the first shell. We change color again and continue working with white yarn Cut the thread and pull it through the chain stitch. Now crochet 1 round of bow and 1 round of shell in the same color.

In the next round of bows, the bows for the shells of the next round will be laid.
You crochet on all sides always:
- 1 stick
- 1 air mesh
- 1 stick
- 5 air meshes
Crochet the corners of the bow rounds like this:
- 1 stick
- 1 air mesh
- 1 stick
- 3 air meshes
- 1 stick
- 1 air mesh
- 1 stick
- 5 air meshes

The pages get 1 arc more each round.

You now have all the items ready . Sew all the pieces together, the kitty's first comforter is ready.

Crochet the Schnuffeltuch | dog
The colorful dog

The dog is basically the same as the cat. We just crocheted another stuffed towel.
The dog's head

The head of this colorful dog is crocheted much like the cat's head. He starts with a string and until the 8th round, he is also worked. The round now has 54 stitches.

9th round to 22nd round:
Continue to crochet normally. There are no increases. The head now has an elongated shape.

Round 23:
- now the weight loss starts
- 7 fixed stitches
- Crochet the 8th and 9th stitch together
24th round:
- 6 fixed stitches
- Crochet the 7th and 8th stitches together
25th round:
- 5 strong stitches
- Crochet 6th and 7th stitch together
26th round:
- 4 fixed stitches
- Crochet the 5th and 6th stitch together
27th round:
- 3 fixed stitches
- Crochet 4th and 5th stitch together
28th round:
- 2 strong stitches
- Crochet the 3rd and 4th stitch together
29th round:
- 1 fixed loop
- Crochet the 2nd and 3rd stitch together
30th round:
Crochet two stitches together until the round is closed. Finish with a chain stitch. Cut the thread and pull it through the loop.

The snout
- thread ring
1st to 6th round are crocheted exactly like the head. The round now counts 36 stitches.
7th round - 13th round:
Crochet all rounds without increase.

Dark nose
- thread ring
1 round:
- 3 strong stitches in the thread ring
2nd round:
- double all stitches
3rd round:
- double every 2 sts, finish the round with a chain stitch
Cut the thread and pull it through the loop.
Crochet the eye
For the eye, simply crochet a round circle. He starts with the thread ring. In the thread ring work 6 fixed stitches. Then widen the stitches to the circle like the head or the ears. So often in the rounds, until 36 stitches are reached in the circle.

The floppy ears
- thread ring
1 round:
- Crochet 6 stitches in the thread ring
2nd round:
- double all stitches
3rd round:
- double every 2 stitches
4th round:
- double every 3rd stitch
5th round:
- double every 4th stitch
6th round:
- double every 5th stitch

7th round:
- Crochet without increase
8th round:
- work without increase
9th round:
- Crochet the 1st and 2nd, and the 4th stitch
- 14 fixed stitches
- Crochet 15th and 16th stitch together
- Crochet the 17th and 18th stitches together
- 13 strong stitches - 32 stitches
10th round:
- Crochet the 1st and 2nd stitch together
- and crochet 4th stitch together
- 12 strong stitches
- Crochet 13th and 14th stitch together
- Crochet 15th and 16th stitch together
- 12 strong stitches
11th round:
- Crochet the 1st and 2nd stitch together
- Crochet 3rd and 4th stitch together
- 10 fixed stitches
- the 11th and 12th and the 13th and 14th stitch together
- 10 fixed stitches
12th round:
- Crochet 1st, 2nd, 3rd, and 4th stitch together
- 8 fixed stitches work
- 9th and 10th as well
- Crochet 11th and 12th stitch together
13th round:
- Crochet 1st and 2nd stitch, 3rd and 4th stitch together
- 6 fixed stitches
- Crochet 7th, 8th, 9th and 10th stitch together
- 6 fixed stitches
14th round:
- Crochet 1st and 2nd stitch together
- 6 fixed stitches
- Crochet 7th and 8th stitch together
- 6 fixed stitches

15th - 25th round:
- Crochet tight stitches without removing
26th round:
- 5 strong stitches
- Crochet 1st and 2nd stitch together
- 5 strong stitches
- Crochet 6th and 7th stitch together
Two paws for the colorful dog
His paws will be as colorful as the dog is. Start with a strong color.
- thread ring
1 round:
- 6 strong stitches in the thread ring
2nd round:
- double every 2 stitches
3rd round - 25th round:
- crocheting straight up

Now sew the individual parts together . It is best to first pin all parts with pins so that you can place the individual particles perfectly.

Crochet the blanket
To make the lid soft and cuddly, we worked with a needle size of 3.5 mm.
1st row:
- Cast on 52 air meshes + 2 riser meshes
- work 1 half stick in the 3rd air mesh
- in each bubble 1 half sticks
2nd row: = back row
- 1 climbing air mesh
- Crochet the whole series of fixed loops
3rd row: = new color
- 1 stick
- 1 air machine
- Skip 1 stitch
- 1 stick
- 1 air mesh
- Skip 1 stitch
- Crochet the entire row
- at the end two spiral air meshes
4th row: = new color
- in the first space 1 deeper stinged rod - that is, it is stung into the fixed mesh of the underlying row
- Work 1 tight loop in the chopsticks of the preliminary round
- the whole series work in this order
So it is always stabbed a chop deeper.

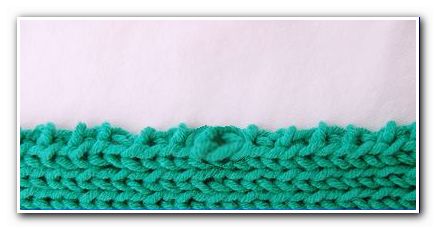
We have crocheted the Schnuffeltuch 28 cm wide and 28 cm high . Of course you can determine the size of the small cloth yourself. After the cloth is crocheted, the threads are all sewn, the whole thing is still crocheted with a clean edge .
To do this, crochet around the velvet cloth:
- the 1st row of fixed stitches
- the 2nd row half sticks

Now all you have to do is sew your head to the cloth. You can decide for yourself whether you sew it on a corner or in the middle of the lace.