Cut sweet cherry - instructions and tips
- The right cutting time
- plant section
- Educational cut at the sweet cherry
- Conservation cut at the sweet cherry
- Rejuvenation cut at the sweet cherry
When cutting the cherry tree, of course, it depends on whether it is a sweet or sour cherry. In addition, the tree shape is crucial. As with other fruit trees, the growth is also characterized by parenting. You divorce to produce fruit wood. Over the years, a rejuvenation cut may become necessary. It is clear that not every cherry tree is cut the same.
Sweet cherries characterize a garden picture by their distinctive shape, their lush crowns, even if they are rather loosely structured. It is important that a lot of light gets into the treetop and that all cherries get enough sun to mature their aromatic fruits. But the most ideal cut of a cherry tree does not work if the tree does not have a good foundation. The location and more importantly, the planting substrate must fit. At a young age, it should be cut regularly until the scaffolding is built. Later, only little has to be done.
The right cutting time
Many fruit trees are cut in winter. This is the wrong time for the sweet cherry. The educational cut is done in the spring. It lasts about 6 to 8 years. If the cherry has to be rejuvenated afterwards, it is done in the summer.
Cut to form fruit wood
The sweet cherry blooms on two-year shoots, so these must be promoted. Annual long shoots remain without flowers, only those under 10 cm in length show flower buds at the base. The special thing about the sweet cherry is that its fruit wood is so long-lived. Even short shoots bloom reliably over years. This makes the trees one of the only fruit trees that produce shoots that are several years old, that are barely growing but still reliably produce flower buds. The expert calls these shoots as Buketttriebe. It is important, after the construction section is through, to perform the conservation cut only sparingly.
plant section
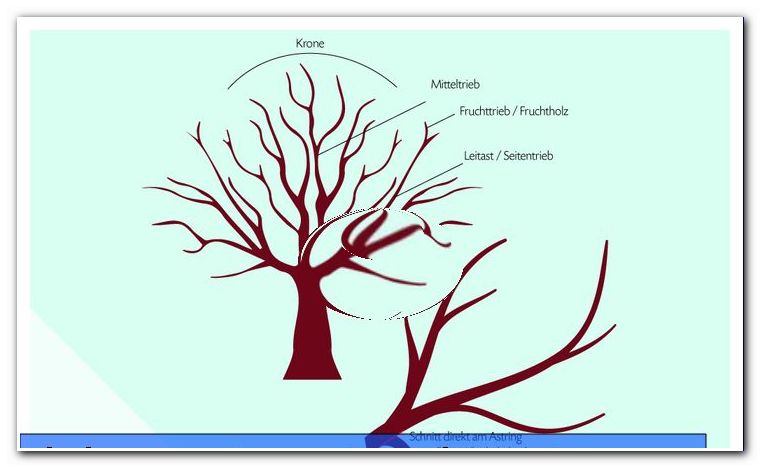
 When buying the sweet cherry tree, make sure that the tree has a straight trunk and five to six year old shoots. From such a tree can form a good round crown. Immediately after planting, four scaffolding drives are defined. The vertical central drive is the first, in addition to three further side shoots, which ideally branch off at an angle of about 60 degrees from the central drive. All other shoots are completely removed, directly on the trunk. The remaining side shoots should be shortened by one third. It is important that the topmost bud points outward on every shoot. Only then will the extension of the drive be carried out to the outside and not into the interior of the crown next year. The center drive is also shortened, so strong that between him and the side shoots an angle of 90 to 120 degrees arises. Especially this promotes a uniform development of all scaffolding drives.
- Only the center drive and three strong side shoots stop, all others are removed on the trunk
- Shorten side shoots by one third
- The topmost bud must always point outwards
- Shorten center drive
- The angle between tip center drive and end side shoots - 90 to 120 degrees. The center drive is the angular point.
Educational cut at the sweet cherry
As with most fruit tree species, the framework of the sweet cherry is constructed with one center and three side frame spurs. It starts in the year after planting. Annual shoots have grown and, in addition, rivals have formed below the interfaces. In early spring, numerous shoots are now removed, all inward and vertical growing shoots and the competition drives the framework drive extension. (Usually two new shoots grow on the cut surface of the past year, one outwards and one more inwards.) The growing inward must be removed. Absolutely must be removed so-called slot drives, so very steeply growing scaffold drives whose angle at the base can not be changed.
All scaffolding drives must again be shortened by one third, starting from the new addition. Side scaffolding drives are shortened at a height, with the last eye must face outward again. The main drive is shortened again, in the same angle. Here, however, it is important that the topmost bud of this central drive points in the opposite direction this time than in the previous year. That's the only way the middle stays straight. Should one of the tower drives be significantly weaker than the others, it is necessary to shorten all scaffold drives by half.
After six years, the extensions of the scaffold drives will not be further reduced.
- Cut out internally and vertically growing shoots
- Remove competitive drives of the scaffold extension
- Let flat-growing side shoots stand
- Shorten all scaffold drives by 1/3
- If one of these shoots is significantly weaker than the others, shorten all shoots by half
- The last eye has to point outwards
- Shorten the main drive at a 90 to 120 degree angle
- His last eye must point in the opposite direction as last year
Conservation cut at the sweet cherry
A conservation cut is only necessary once every three to four years when the cherry tree is fully grown. It is cut in the summer and, just like the apple tree, only more restrained. The best time is around the harvest time. The sweet cherry has the advantage that it does not grow so fast, so it does not have to be cut so much. All too steep and competing scaffold spits need to get out of the crown. This can therefore seem a little "empty". It is important that she is relaxed the following summer and the light and enough air can reach the inside of the tree. Only then will the fruit wood in the interior of the crown remain vital and the tree productive. If it happens that initially flat growing fruit shoots, strengthen with time and suddenly grow steeply, you have to remove these too.
Typical of the sweet cherry is that it usually drives out in whorls. In the process, four to seven lateral shoots develop directly below the sprout of the tip bud, usually at the same height. It is important to slim the tip. All but two or three of these shoots are removed.
- Cut out all too steep scaffold drives
- Remove all competition drives
- Initially flat growing fruit shoots, which then grow steeply growing upwards
- When whisking sprouts - cut off all but two or three
Rejuvenation cut at the sweet cherry
Older cherry trees can reach stately proportions. Often they just get too big and have to be reduced a bit. However, often overhanging scaffolding and fruit shoots are formed. The rejuvenation cut is also made similar to the apple tree. It is cut in the summer. After the beginning of September you should not reach for the scissors. Overhanging scaffold drives are diverted to further inward standing drives. Even old brooms are cut like that. The new shoot tips must be streamlined.
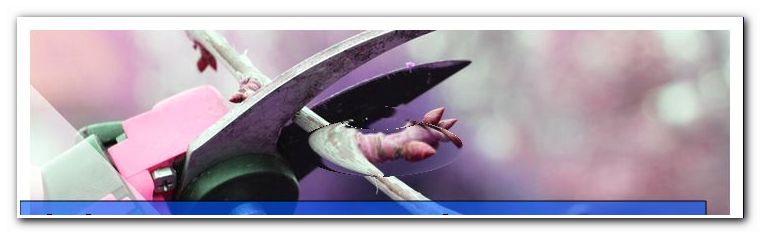
Important in cutting is to avoid big wounds. The disadvantage of the cherry tree is that they often dry up deeply and form a rubber-like mass. That makes the wounds heal very badly. So if a big branch needs to be removed, it is ideal to divert it to a side branch close to the frame. Thus, no wound is created on the frame drive itself. However, should no young shoot be present, let it stand for about 10 to 20 cm long pin.
For old and slightly chopped cherry trees, the crown sometimes has to be recreated. All competition drives of the scaffold drives are to be removed. Only four shoots stop, otherwise not enough light gets into the interior of the crown. Do not let it stand, even if it's hard. All steeply growing shoots must be completely cut out. They form a competition to the middle drive. The tips of the scaffolding drives must be streamlined. To overhanging brooms divert to a more inward, steeper standing young shoot. Through him, the growth direction of the scaffold drive should be continued harmoniously. Remove all inward growing and too steep shoots in the crown.
Even very strong fruit shoots must be cut out. Standing young shoots that grow directly from the scaffolding. Too long fruit shoots divert to more inward standing. They must point outwards and upwards and possess flower buds. In the case of very old trees it is not uncommon for one third of the complete crown to be gone. It is important to avoid too large interfaces. They should not be larger than half the diameter of the remaining branch. For extremely unkempt and over-aged cherry trees, it makes sense to carry out the rejuvenation cut in stages, ie spread over several years. First, it is gentler and secondly, growth is not so strongly stimulated.
After a year, you have to cut more vigorously. Steep drives are to be removed directly at the interface. Flat shoots, on the other hand, are left. If young shoots have formed on the stud, the dry part of the billet must be removed until new rubbing. If necessary, scaffolding and fruit drive tips should be slimmed down. If old-growth fruit shoots are still recognizable, they have to be redirected to a more inward standing young shoot. After a successful rejuvenation cut should then be regularly cut every three to four years.
Tips for quick readers:
- Create scaffolding again
- Remove all competition drives of the scaffold drives
- Only four shoots stop
- Cut out all steep shoots that are growing upwards
- Tips of the scaffold shoots slim down
- Remove all inward growing and too steep shoots
- Remove very strong fruit shoots
- Too long fruit shoots divert to more inward standing
- For strong cutting measures spread over a few years
- In the next year remove half to two thirds of the young shoots
- Cut out all inward and steeply growing shoots
- When growth has calmed down, perform maintenance cuts every two to three years
If you would like to know more about the different cuts and growths of the cherry tree and if you want to find out what to look out for when cutting the cherry tree, the cherry trellis or the cherry tree, click here:
- Cherry tree cut: Cut spindle tree
- Cut cherry tree to trellis fruit
- Cutting the cherry stalk - tips and hints