Build your own doll bed - Instructions and PDF for a doll cradle
Every child will enjoy hand-made or built things. Whether for the doll or the teddy bear, a doll's bed is a downright safe thing, because the well-known role playing with the favorite companion is part of the repertoire of every child. We will show you how you can easily build and design your own doll bed in easy-to-understand steps.
Whether man or woman, for many people one of the dearest memories from early childhood is playing with their own doll or their own teddy bear. In addition to feeding, dressing and playing, putting to bed is an elementary part of most of these role-playing games. What would be more suitable than a doll bed ">
content
- Material and preparation
- The wood
- The tools
- Build your own doll bed | manual
- Step 1 - cutting
- Step 2 - mark
- Step 3 - elaborating "end faces" C
- Step 4 - assembly
- Step 5 - painting
- Step 6 - rework
Material and preparation
The preparations
Before we start building our doll's bed ourselves, some preparation is required. In the first place is an idea of what exactly we want to build.
The goal of our efforts is a doll bed for a doll about 30 centimeters in size . To keep the effort manageable for the first time, it has closed side parts, as well as a closed head and foot section. Depending on whether a doll cradle or a fixed bed is to be created, we will put it solidly on the floor, or make it similar to a rocking chair . In contrast, we want to do without elaborate hangers etc.
The wood
Of course, different woods can be used for the construction of the bed. But if you don't already have material at home, we recommend normal glued spruce wood, as is available in every hardware store in different standard dimensions. The advantages of this type of wood in the construction and use of the doll's cradle are obvious.
Benefits:
- glued from individual pieces, therefore particularly low warpage
- very long-fibred as softwood, therefore very resilient
- easy to process due to its low hardness
- easy to paint, and (if desired) can also be used without surface treatment
- common material thicknesses of 18 millimeters can be easily glued and screwed
- very inexpensive
With the following standard boards with a thickness of 18 mm, all parts required for the doll's bed can be obtained with little effort and without too much waste.
- 2 pieces of glued wood board 18 x 200 x 800 mm
- 1 piece of glued wood board 18 x 250 x 800 mm
The tools
In order for the work to be successful, not many tools and other aids are required, but it is not entirely possible without equipment.
- Pencil and ruler
- Set square or angle
- Compass with extension, alternatively string and thumbtack
- Saw, as a hand saw or (if available anyway) table saw
- for doll's cradle: jigsaw
- Squared timber approx. 60 to 100 mm high as a guide timber when sawing
- 120 grit sandpaper
- Brush or foam roller
- Residual wood as a base when painting
- 2 mounting clamps with an opening dimension of at least 45 centimeters
- Optional: cordless screwdriver with bit attachment suitable for selected screws, countersinks and wood drills 3 millimeters in diameter
Other materials
Finally, in addition to wood and tools, some other materials are required to successfully complete the preparations. These can be used, but both screws and paint are to be regarded as optional, so that the work is successful even without them.
- “Express” wood glue with high initial tack, ideally as a non-dripping or running gel
- Countersunk wood screws - 4 x 50 mm
- Water-based wood paint in the desired color
- Cover caps for screw heads, color according to color wood color
- 4 decorative saws l with semicircular heads, diameter at least 5 millimeters
ATTENTION: When choosing the color, it should be noted that the doll bed will be used by children later. It is therefore ideal to use so-called “drooling paint”, that is to say color whose harmlessness if swallowed etc. has been tested and certified. When playing, it is always to be expected that some paint will chip off and get into the mouth by the children via fingers, dolls or other objects!
Build your own doll bed | manual
The implementation
After all preparations have been completed, we start working on the implementation. We will help you step by step with the creation and also support you with some helpful sketches.
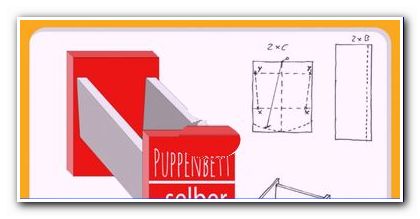
Free download build your own doll bed Doll cradle template PDF
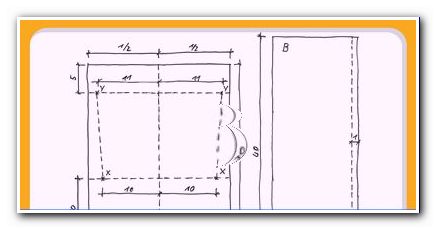
Step 1 - cutting
First of all, the necessary pieces for the further processing are to be produced from the acquired wooden boards. To do this, cut the boards as follows.
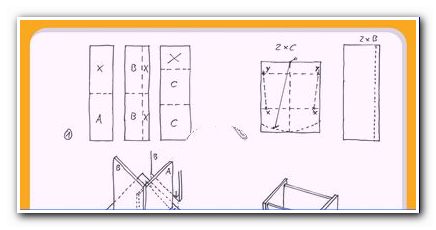
- 1 board 200 x 800 mm: division in the middle, gives component A "floor" 200 x 400 mm and a remnant of the same size
- 1 board 200 x 800 mm: cut to a width of 150 mm and division in the middle, results in 2 components B "sides" 150 x 400 mm and a remaining piece 50 x 400 mm
- 1 board 250 x 800 mm: subdivision of the length into two pieces of 300 mm each, results in 2 components C "end faces" 250 x 300 mm and a remaining piece 200 x 250 mm
The cutting works as follows:
- Mark the planned cuts with a pencil and ruler, ensure right angles with an angle measure or triangle
- Place the guide wood next to the saw line
- Place the hand saw on the wooden edge and guide it along the guide wood for a vertical cut
- Slightly “break” all edges of the re-used pieces with sandpaper, ie sand them lightly - removes wood splinters and prevents the edges from tearing out as they run
- not only break the longitudinal edges of component B "sides", but round them out completely
TIP: Sawing works particularly well if you work with both hands. The “preferred” hand, ie the right hand for right-handed people, guides the saw. The left hand holds the guide wood and presses it from above onto the wood to be sawn. The weight of the upper body can be used for better fixation by leaning lightly on the hand with the guide wood.
NOTE: The cuts described can also be created quickly and easily with a table saw. The manufacturer's safety instructions should be followed. A hand-held circular saw makes little sense due to the small dimensions of the individual parts and should be avoided for safety reasons.
Step 2 - mark
After all pieces have been brought into their basic form, all assembly and processing lines required for further processing are drawn.
Components B "sides" (per component):
- 1 line parallel to a long side, distance 1 centimeter - results in the “bottom” line A
Components C "end faces" (identical for both components):
- Dividing 25 cm edges in the middle and connecting them with a line results in a vertical center line for further markings
- parallel lines to the 25 cm edges, distances 5 cm (top) and 10 cm (bottom)
- Mark the above line on the underside from the center line on both sides after 10 cm from the center, mark "X" - between points "X", add line "floor" A
- Mark the above line from the center line on both sides after 11 cm from the center, mark "Y"
- connect points "X" and "Y" on the same half of the face - results in line "side" B
TIP: The thinner the lines are drawn, the easier they disappear when painting the surfaces later, or when sanding an untreated desired surface for the doll's bed. If you press too hard, the pencil leaves a clear indentation in the soft wood and the doll bed itself is made unnecessarily difficult!
Step 3 - elaborating "end faces" C
If you would like to build a doll's bed yourself, the "end faces" - components C can be used without further processing. If, on the other hand, a doll cradle is to be created, further steps are necessary. Of course, a purely visual reworking of the end faces can also be carried out on a doll's bed in order to make the design more individual, lighter and more pleasing.
- Pierce with a compass at the starting point of the midline top and place a coal lead at the starting point of the midline bottom
- Create a flat circle segment on both sides up to the side edge
- Saw out the circular arc with a jigsaw
- Break edges with sandpaper
- OPTIONAL: Round off and rework the tops for a more pleasing appearance in your own way
TIP: If there is no sufficiently large circle, a string can be provided with a loop and this can be attached to the puncture point with the push pin. The pencil is then wrapped with the cord at the appropriate distance and can be guided in a circle in the desired arc.
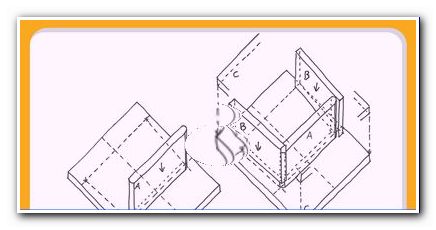
Step 4 - assembly
Now all individual parts are prepared so that they can be put together.
- Place a component "end faces" C flat on the table, marked attachment lines visible upwards
- Coat component "floor" A on one end with wood glue, apply to attachment line XX and press briefly and firmly, placing the component in the middle of the line (alignment with lateral line protrusions)
- Check the right angle between components C and A using a triangle or angle
- Coat the long sides of component A "floor" and one end face of component B "sides" with wood glue
- Align “sides” B on attachment line XY to component C, as well as press line “A” on the bottom of component A and press it down, insert component B “sides” on line XY
- Apply glue to the open end faces and align and press on the second component C "end faces" using the lines drawn
- After waiting for the glue to fully bond, set up the fully assembled doll's bed and place the assembly clamps approximately in the middle of the end faces from both sides and carefully tension each other, checking the alignment of components A and B and readjusting if necessary
NOTE: Instead of rounding off the longitudinal edges of the side parts, they can also be created flat at a later angle between components A and B. However, due to the high risk of errors and unsightly joints due to inaccurate work, these instructions follow the path of a rounded component, so that a clearly defined and deliberately created joint is created between the floor and side parts.
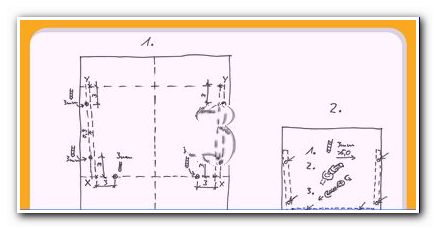
Step 4b - Optional screw connection
For a simple doll's cradle, gluing the components is always sufficient. If you want to be on the safe side, you can also screw the end faces to the sides and bottom. This is particularly easy if you do this.
BEFORE assembly:
- Draw a further line at a distance of 9 mm on components C "end faces" parallel to the alignment line for the side parts (XY)
- Mark two points on line XX and on new auxiliary lines parallel to XY symmetrically to the center line of the components, each 3 centimeters from points X and Y.
- Drill through the marked points with a 3 mm wooden drill, countersink the holes on the outside (back of the marked lines!) with a countersink so that heads of the procured screws disappear into them
AFTER assembly:
- Drill with a wood drill through existing holes in components C "end faces" from the outside into components A "bottom" and B "sides", total drilling depth at least 5 cm
- Screw the wood screws with the appropriate bit and cordless screwdriver into the prepared holes, limiting the tightening torque to prevent the wood from tearing
Step 5 - painting
After the doll's cradle has been assembled, the color scheme begins. It is true that the individual components can usually be painted more easily because they are easier to assemble. However, the subsequent painting has the great advantage that unpainted wood is put together better by the glue and the assembly and auxiliary lines simply disappear under the paint after assembly.
- Set up the doll's bed and paint all accessible surfaces evenly, applying paint to avoid dripping noses around open longitudinal edges
- Process joint areas and corners with a brush, paint surfaces with foam roller for a more even result
- after drying, turn the doll's cradle and work on unpainted surfaces in the same way
- After drying again, lightly sand all painted surfaces with sandpaper, thereby eliminating fibers that have been set up during painting and a smoother surface
- apply the second color as the first order
- If necessary (for example pencil lines that are too thick), possibly create a third color application
ATTENTION: The use of paints including the cleaning and disposal of tools and residues must always be carried out according to the manufacturer!
Step 6 - rework
The plan to build a doll's cradle or a doll's bed is almost complete and the good piece is almost ready. Only a few steps are required before you can turn to the equipment with mattress, pillow and blanket.
- OPTIONAL: When the screw connection has been created, close the screw heads with cover caps
- With a rounded base for doll's cradle: press in a round-head decorative nail as the stop or limiter of the rocking on the very outside at the "weighing edge", i.e. underside of the front
TIP: In the case of particularly large or heavy dolls, the cradle can tend to tilt to the side when rocking strongly. Then, by moving the decorative nails inwards, the lateral tipping can be restricted more and a complete overturning of the doll's cradle can be prevented.