Sewing the bag - Instructions for DIY sleeping bag / baby sleeping bag

- material selection
- amount of material
- Sewing pattern for baby sleeping bag
- Sew the bag
- cuffs
- Variations - baby sleeping bag
Whether summer or winter - with a baby sleeping bag your child always has enough space to kick without covering himself. If your children have outgrown the babyhood, but you still feel like sewing a bag, just give in to your wish and give your own creation to a friendly baby mother. She will thank you! Here we show you how to sew a bag yourself.
Difficulty level 2/5
(suitable for beginners)
Material costs 1.5 / 5
(depending on the fabric selection between € 0, - from the remaining utilization and € 20, -)
Time expenditure 2/5
(including sewing pattern about 1.5h)
material selection
When it comes to topics as important as the sleep of our little ones, you do not just want to play it safe when choosing your bed and mattress. Unfortunately, bedding and sleeping bags are often not in the desired design and just, if you have already sewn some for the nursery itself, you will wish that these textiles fit the rest of the equipment and visually fit nicely.
For example, substances that are offered with the ÖKOTEX100 or GOTS certificates are completely harmless. Whether you opt for woven fabrics, ie simple, non-stretchy cotton fabrics, or jersey, sweat, fleece, Niki or plush, of course, depends on several variables. Basically, this cut is suitable for all types of fabrics. If your baby is still very small and was born in the summer, you will tend to have a nice, soft, thin cotton fabric. That this is not stretchy, is secondary in this case, since the very small babies do not move as much as the larger. For the transitional period, fabrics such as jersey - also in combination with thin fleece or Niki - are ideal. For the cold season is also a thicker "stuffing" with plush Wintersweat possible. This of course more supportive in the outdoor area (for example in the stroller), in the nursery, it is rarely so cold that such thick fabrics are necessary.
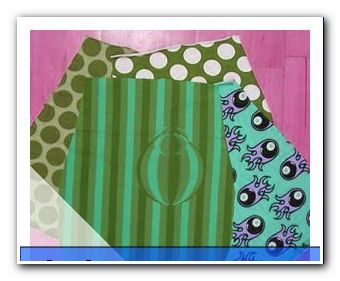
I chose four different jersey fabrics. As the bag becomes a reversible baby sleeping bag, I can decide each time through the different designs, which material is to be seen outside / above. Of course, also inside and outside part can be sewn from the same fabric, just like the entire baby sleeping bag can be sewn exclusively from a fabric.
amount of material
The minimum size of the individual pieces of fabric should be 25 cm in width at the top and 35 cm at the bottom, and 40 cm in the length. For this purpose, a seam allowance of about 1 cm is added. For the cuff you need about 35 cm in width, but later it will be calculated exactly. The height depends on how high it should be at the end. I like to have high cuffs, which I can also fold up or back in case of need, so the bag grows over some clothes sizes and can be used longer. If you want to have a cuff of 10 cm, you must measure a height of 20 cm plus seam allowances. In my case, the height including seam allowance is 35 cm.
 Sewing pattern for baby sleeping bag
 Sewing pattern for baby sleeping bag
 Depending on your taste, a bag can have many different shapes. From square over cloud shape to the classic drop shape (without apex), which I will introduce today. As a pattern, it is best to take a newspaper or piece of paper that is 35cm wide and 40cm high and fold it once in width, so it is 17.5cm wide and 40cm high. At the top, mark a point 12.5 cm from the fold and draw a teardrop shape towards the full width and slightly rounded down from there. If the "bottom" of your drop becomes straight rather than round, this facilitates the later hidden seam, which must be applied by hand. For this reason, my drop is slightly flattened. Cut out your drop and create two pieces of fabric for inside and outside plus about 1cm seam allowance.
Tip: To save time (if you work with cotton fabric or jersey - ie with thinner fabrics), you can also put all four fabric layers on top of each other, pin the pattern with pins through all four fabrics and cut all at the same time.
Sew the bag
First, place the fabric pieces of the outer fabric right to the right (ie the "nice" sides to each other) and put them firmly. Now sew along the side, around the curve around and on the other side up again with about 1 cm distance to the edge along with a simple straight stitch. The upper straight line remains open.

Now you put the fabric parts of the inner fabric right to right (ie the "nice" sides to each other) and sew them as well. However, at the bottom you save a turning opening of about 10cm (marked with pins here). Of course, no sutures at the suture opening are sutured (sew back and forth 2-3 times).

cuffs
Now measure the top opening of one of its two "sacks" from seam to seam.
 Multiply this number first by 2, then by 0.7 and add 1 cm seam allowance to the finish, and you already have your cuff width. The cuff fabric is first halved in width (the "stripes" in the fabric run from top to bottom, it is sewn laterally) and quilted with a simple straight stitch.

Fold the seam allowances apart and lay the fabric so that the seam allowances are at the top. Then fold the cuff fabric up so that the edges line up. Secure the two layers with the seam allowances with a pin.

Now fold down the top layer and put it over all three other layers, so that it comes to the bottom. The "nice" side of your cuff fabric is now outside. Now lay the cuff so that the needle comes to rest on one side, smooth the fabric and also mark the opposite side with a needle. Now lay the cuff fabric so that both needles overlap each other and also mark the outside edges with pins. Thus, the cuff is "quartered" by the pins.

Turn the sack with the reversing hole so that the "nice" side comes to rest and put it in the second sack.

Mark the sides (seams) and the front and back center on both layers of fabric - just like on the cuff, experienced seamstresses can also mark only one of the two sacks. The cuff is now placed between the two bags and pinned. In doing so, you have to do something the cuff. That's not easy the first time, but you'll probably get it out quickly. It's best to attach the cuff seam to one side seam of the bags, then you can use the sleeping bag at the front and back without bothering you.

Now stitch all four layers of fabric (once inside and outside fabric and twice cuff fabric) with about 1 cm seam allowance with a simple straight stitch all around and sew at the beginning and end.
 If you are sewing a cuff for the first time, here are a few small additional information: Start at a side seam and sew the beginning. Lower the needle into the fabric and lower the presser foot. Now take the spot with the next pin in your left hand and gently pull on the fabric until the cuff is the same length as the other two fabrics and no wrinkles are visible. Now align the edges flush with your right hand and continue sewing slowly while holding the tension with the same strength in your left hand. Sew until the pin is on the presser foot and remove it. Now proceed with the other "quarters" as well, until you are back at the beginning.
Now pull out the inner bag and turn the entire workpiece through the turning opening.

Sew the turn-around opening with a ladder seam as follows:
Simply thread a thread (not double) and knot the end. Then at the end of the machine seam, put the first stitch on the seam opening in front of you at the very left and sew / knot it as close as possible.

Then turn the pillow so that the thread is on the side to your right. Then put the thread over the opening (ie towards you) and pierce exactly at the crease just before the thread into the fabric and come out with the needle just behind the thread again.

Now put the thread over the other side (away from you) and so on. In between, of course, you always pull with feeling on the thread, so that the two substances meet each other exactly. The shorter the individual stitches, the less visible is the seam at the end. Then sew another 1-2 times and cut the thread as short as possible.

Tip: If the cut thread is too long and sticks out noticeably, push the end with the needle into the seam.
Now put the inner bag in the outer bag.
And finished is the self-sewn backpack for the baby!

Of course, our doll is 40 cm smaller than a newborn, also the cuff is folded (so folded down and thus halved). This backpack can be used from birth. By the wide cuff, which can be folded up or down, he also grows with. Please pay attention to the increasing size of your baby that freedom of movement is not restricted. If the sleeping bag is too small, just sew a new one that is wider and longer. Corresponding size specifications are easy to find on the internet. Have fun with your new favorite piece!
Variations - baby sleeping bag
Apart from the different forms of the poppy mentioned above, you can naturally personalize them as you like. Not only the fabric and pattern selection, a beautiful embroidery or an application - but also patchwork is of course possible again. The best way to prepare the fabrics before sewing the items together. Brands and sizes can be placed in any seam, always between the right (ie the "beautiful") fabric sides must be so that you are then clearly visible from the outside.
Quick guide for a baby sleeping bag:
1. Make a cut (same for the inner and outer sack), put on the cuff fabric
2. Crop with seam allowances
3. Sew up the outer bag (avoid opening at the top)
4. Sew inner bag with 10cm turning opening at the bottom
5. Calculate cuffs and crop, create side seam
6. Attach cuffs and sacks markings in the quarter (side seams, centers)
7. Turn the inner bag and place it in the outer bag, insert cuffs in between
8. Connect all fabrics to the markings
9. Sew and sew at the top
10. Pull out the inner bag, turn it, close the turning opening (with ladder seam manually)
11. Insert the inner bag into the outer bag - that's it!
The twisted pirate