Crochet fruit - Instructions for banana, strawberry and Co.

- Size of fruits
- Material and preparation
- Previous knowledge
- Crochet fruit
- Crochet strawberry
- Crochet banana
- Crochet grapes
- Crochet the apple
- Crochet pear
Who does not love them, the decorative fruit bowl whose fruits never spoil and always look fresh ">
Fruit crochet is not only omis and dear aunts left, who would like to equip the shop of the small children. Crocheted fruit today also adorns the fruit bowl in the modern home. For crochet fans there is no stopping to decorate the home with beautiful crochet work.
We chose a crochet technique for fruit crochet, which is easy to work on for crochet beginners. Except air meshes, strong stitches, warp stitches and the thread ring, you need no special knowledge. If you still need a small crochet pattern, use our "Learn Crochet" category. Here we describe the individual stitches step by step. Also, the thread ring is pictorially illustrated.
Size of fruits
Our fruit basket consists of a pear, an apple, a banana, blue grapes, strawberries and an orange. You determine the size of the fruit in our "fruit crochet" yourself. You do not have to change the pattern's counting technique, just the wool thickness is enough to change the size of the fruit.
The thicker the yarn and the needle, the larger the crocheted fruit becomes. For example, if you want big apples, you should work with a thicker yarn. However, if you love small strawberries, then choose a thin yarn. That is, your yarn size and the strength of the crochet hook will determine how big your fruit will be.
Material and preparation
Basically, crocheting is the same with fruit, the beauty of handcrafting is always in the eye of the beholder. This also applies to the material that is processed for this purpose. We made it easy this time and rummaged in the cotton yarn leftovers box and also found suitable yarns.
However, if you need to buy crochet material for your basket of fruit, we recommend that you crochet the fruit with cotton yarn. Cotton is a smooth yarn that creates a clear and even mesh pattern. Cotton yarn is also available in different yarn counts. We have crocheted to fruit only cotton yarn processed. In the color scheme we have oriented ourselves to the original fruits. But that does not mean you can not experiment with colors. Nice is what pleases.

The yarn and needle size for the individual types of fruit can always be found directly in the instructions.
Fülllmaterial
As filler material you can use synthetic filling wool or filling wool made from pure sheep's wool. We used synthetic fillers for crocheting the fruit.
Previous knowledge
Thread ring:
Each fruit starts with a string of thread. A guide to the thread ring can be found here. If you can not handle this type of string ring, then crochet an air mesh ring:
- 4 air meshes
- close a circle with a chain stitch
- Crochet the indicated fixed stitches on this circle of air, which are crocheted into the thread ring according to instructions
Stitches: Crochet all fruits on fruit only with crochet.
Air stitches and Knittmaschen: These two stitches occur only very occasionally in the leaves and stems.
Removal of fixed stitches:
When removing fixed stitches, crochet a stitch from two stitches.
- into the first stitch
- Get the work thread and put it on the needle
- in the second stitch
- Get work routine
- There are now 3 loops on the needle
- Get work thread and pull through all 3 loops
Tip: If you start with a thread ring, pull the first tight loop a little longer. If the first tight knit is too tight and crocheted too short, she will be overlooked in the first round.
Crochet fruit
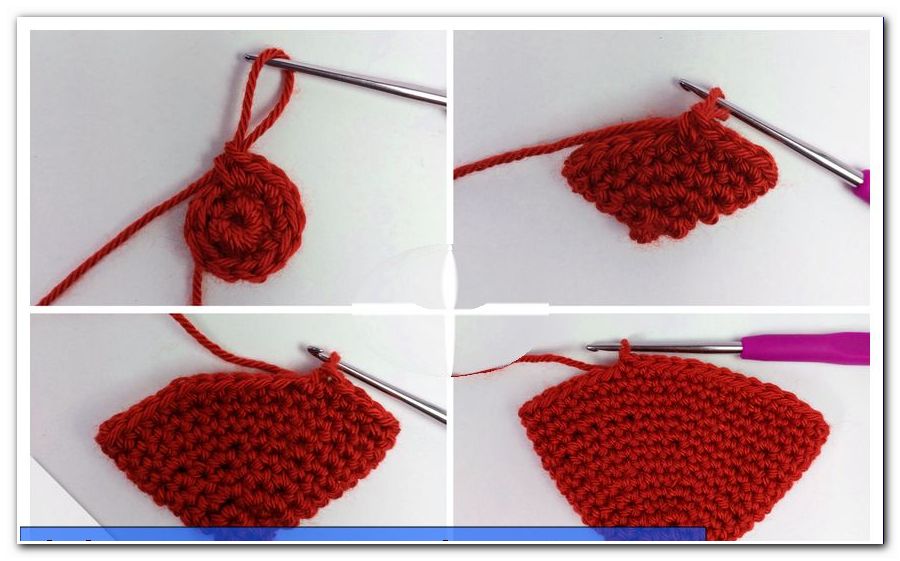
Crochet strawberry
We crocheted the strawberries of "fruit crochet" with a thin cotton yarn and a crochet hook of thickness 2.5 mm.
1st round: 6 strong stitches in the thread ring or in the closed loop of airmesh.
2nd round: 1 stitch = 6 stitches in each stitch.
Tip: If you crochet the initial thread after the first round, you will not have to sew it.
3rd round: Crochet 2 stitches in each stitch = 12 stitches.
4th round: double every 2nd stitch = 18 stitches.
5th round: 1 stitch = 18 stitches in each stitch.
Round 6: Double every 3rd stitch = 24 stitches.
Round 7: Crochet 1 stitch in each stitch = 24 stitches.
Round 8: Double every 4th stitch = 30 stitches.
Round 9: The entire round of fixed stitches work.
Round 10: Double every 5th stitch = 36 stitches.
Round 11: Double every 6 stitches = 42 stitches.
12th - 13th and 14th rounds: 1 stitch = 42 stitches in each stitch.
decreasing rounds
Round 15: Crochet each 6th and 7th stitch = 36 stitches.
Round 16: Crochet each 5th and 6th stitch = 30 stitches.
17th round: Crochet each 4th and 5th stitch = 24 stitches.
Round 18: Crochet each 3rd and 4th stitch together = 18 stitches.

You should now stuff the strawberry with stuffing cotton.
19th round: Crochet every 2nd and 3rd stitch together = 12 stitches. If necessary, top up the filling wadding.
From Round 20: Until the hole closes, crochet each 1st and 2nd stitch together.
Sew the threads.
Crochet a strawberry leaf
The strawberry now gets a green cap. The leaf is crocheted separately and then sewn onto the strawberry. It should have the same yarn size as the strawberry. Also this cap starts with a thread ring.
1st round: Crochet 6 tight stitches in the thread ring.
2nd round: Crochet 1 stitch in each stitch.
3rd round: Crochet 2 sts in each stitch.
4th round: Crochet 2 stitches in every 2nd stitch.
5th round: Crochet 2 sts in every 3rd stitch.
Round 6: Crochet 2 sts in every 4th stitch. Finish this round with a slit stitch to the next stitch.

Now the pointed leaves are crocheted.
- Crochet 5 stitches on the warp stitch
- Put 1 sliver in the second air ma from above
- crochet 1 sturdy stitch from the top in the third round of air
- in the 4th Luftma work half a stick
- Crochet a whole stick into the 5th Airmail
- close this sheet with a slit stitch in the previous slit stitch

Work the next two stitches with Kettmaschen forward. The next sheet begins. This leaf is crocheted a little bit longer. It does not stop with a chopstick, it comes to a double stick. Work on the chain stitch 6 air meshes. The 2nd to 5th air mesh just like the sheet before work. Kettmasche - fixed mesh - half chopsticks - chopsticks. In the 6th Air Mesh work a double rod. Then close again with a chain stitch.

Crochet these two sheets in a change complete the circle. Sew on the threads and sew the cap onto the strawberry with just a few stitches. Now you can still crochet a stalk. We have worked this stalk with a double airmesh stopper. But you can also crochet a small chain of air and stabilize it in the back row with fixed stitches.

Crochet banana
We crocheted the banana so that the fruit and banana peel are two separate bodies. We think that looks original. The banana was crocheted with a needle size of 3.5 mm. For the yarn color, we opted for a bright yellow. For the banana itself, we did not take any detail photos from the beginning. Simply because the course of the banana peel is exactly the same. And here you can follow the course pictorially.
1st round: Work 6 fixed loops in the thread ring.
2nd round: Crochet 1 stitch in each stitch.
3rd round: Work 2 stitches in each stitch = 12 stitches.
4th round: 1 stitch = 12 stitches in each stitch.
5th round: In every 2nd stitch 1 strong stitch = 18 stitches.
From the 6th round: Crochet only fixed loops in rounds. There are no increases anymore.
We worked this way up to a total length of 15.5 centimeters. Now you should stuff the banana with stuffing. In order for the filling to reach the bottom of the banana, you can use the handle of a round cooking spoon.
For the weight loss rounds, crochet like this:
Until the circle is closed, always "crochet 2 solid loops and 2 loops together"
work alternately. Before the circle closes completely, you should still fill the banana completely.

Sew the threads.
So crochet the banana peel
We gave the banana skin a little more weight and worked it with a needle size of 4.0 mm. For the yarn color, we opted for a darker yellow.
1st round: We crocheted this round in brown. Work in the thread ring 6 fixed stitches. Now you can change to the color you intended for the banana skin.
2nd round: 1 tight stitch in each stitch.
3rd round: 2 strong stitches in each stitch.
4th round: 1 tight stitch in each stitch.
5th round: 2 tight stitches in each stitch.
Round 6: 1 stitch in each stitch.

Test if your banana fits in the banana skin.
From the 7th round: Crochet 1 stitch in each stitch = 18 stitches.
Decide for yourself how high you want to work your shell. We crocheted 11 centimeters high, then started with the hanging shells. Our banana counts 18 stitches per round. With three leaves, each leaf gets 6 stitches.
Start with the first bowl by:
- 6 fixed stitches work
- Turn to work
- They crochet in rows. In other words, you are working a back row and a back row.
- Each row has 6 stitches.
- Crochet 1 riser air stitch to turn.

We worked 11 rows back and forth.
It starts the round with the decrease.
- 2 stitches on the right
- Crochet 2 stitches together
- 2 stitches on the right
- Rising air mesh - turn work
- 2 stitches on the right
- Crochet 2 stitches together
- 1 stitch on the right
- Rising air mesh - turn work
- 1 stitch on the right
- Crochet 2 stitches together
- 1 stitch on the right
- Rising air mesh - turn work
Crochet the 3 remaining stitches together.
Crochet 1 mesh and the slope of the shell downwards with a tight stitch. When you are back at the shell circle, crochet 6 stitches again and work the second hanging shell as well as the first one. Also the 3rd hanging shell is crocheted in the same technique. In the end, each banana leaf has a crocheted side. You now have to crochet the second side separately.

Sewing threads, put the banana in the shell, your banana is done.

Crochet grapes
For the grapes, we have again processed a thinner yarn and crocheted with a needle size 3.
1st round: Work 6 fixed loops in a thread ring.
2nd round: 2 strong stitches in each stitch = 12 stitches.
3rd round: Crochet 2 stitches in each 2nd stitch = 18 stitches.
4th - 7th round: crochet only fixed stitches, without increase
Stuff the grape with stuffing wool
Round 8: Work 1 stitch, then crochet 2 stitches = 12 stitches.
Round 9: Crochet 2 stitches = 6 stitches.
Round 10: Combine the remaining 6 stitches with Kettmaschen.

Then sew the threads.
Crochet as many small fruits as you would like for an umbel. Our grapes at "Crochet fruit" counts 11 fruits.
For the stem, we have worked a double chain of airmesh. However, you can also crochet a stiffer umbrella stem.
To do this, work with a thin yarn and a fine crochet hook:
- thread ring
- 4 strong stitches in the thread ring
- Double all stitches = 8 stitches
Crochet these stitches in turns as high as you need for the length of your bow. Crochet 2 stitches for the lace. Then cut the thread and sew. Crochet each of the small fruits with 3 to 4 air meshes on the dandelion stems.

Already the crocheted grapes are ready!

Crochet the apple

Here you will find our detailed crochet pattern for the Amigurumi apple. The orange is crocheted the same way: Crochet the apple
Crochet pear

Or how about a pear "> Pear crochet