Sew Monster - Instructions for a cuddly monster

- preparation
- patterns
- Sew monsters
Today I would like to show you how you can sew a cute cuddly monster as a gift for your little ones or as an accessory for Halloween with the help of our enclosed pattern. We make the mouth with a zipper, which - depending on your preference - can be left open or closed.
The fabric selection is up to you today. So old scraps - from jeans to jersey - in different colors can be used as desired. Just make sure to put the right needle in the sewing machine. Due to the many layers of fabric it can break easily.
For the eyes I like to use wooden buttons, but it can also be small white circles with black dots attached or other matching applications, such as sequins or beads.
preparation
You need this:
- Two pieces of fabric remnants or a double-sided fleece fabric
- as needed, a third fabric for the inside of the mouth
- zipper
- two buttons
- needle and thread
- fabric scissors
- pen
- our pattern
- some stuffing or an old pillow
Difficulty level 2/5
Sewing on the zipper and sewing on the arms and ears requires some practice
Cost of materials 1/5
approx. 1-5 EUR depending on the fabric leftovers
Time expenditure 2/5
about 2 h

patterns
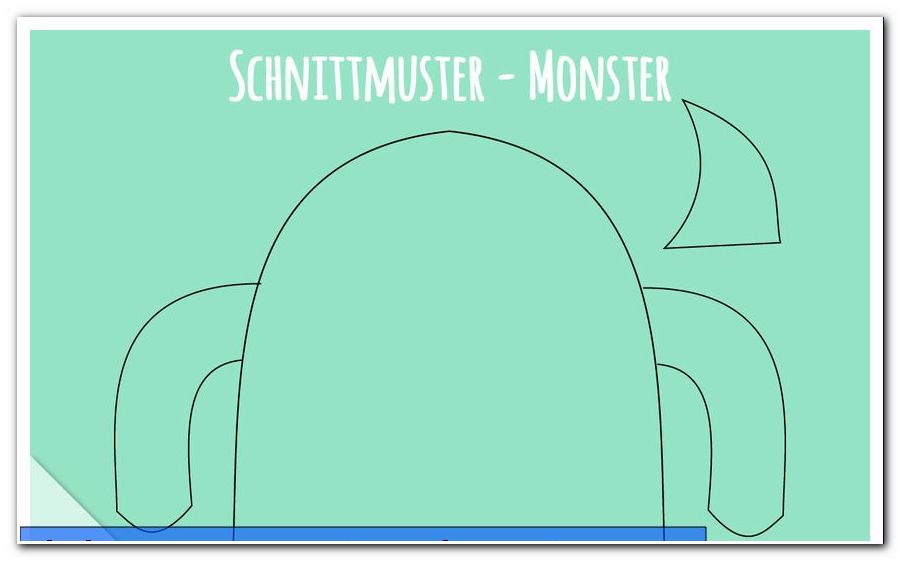
Step 1: Print the enclosed pattern on A4 paper, making sure the print size is set to 100%.

Click here: To download the pattern
ATTENTION: Our pattern does not include seam allowance!
Step 2: Cut out the pattern with scissors (the arms are separated) and place the template on the desired fabric. Now draw the outlines of the pattern at a distance of 1 cm (seam allowance!) And cut out the fabric.

3rd step: Repeat step 2 for the front, but add approx. 2 cm at the bottom of the cuddly monster. The front zipper is split once in the middle and therefore needs a little more length to be no shorter than the back after sewing.
4th step: Since we sew a zipper as a mouth, we need a light jersey fabric behind the front, so that the filling cotton at the end can not come out. Also mark this fabric according to the pattern (+1 cm) and cut out.
Step 5: Now the arms and ears of our monster are missing. These are placed once on the left and once on the right, so that we can sew them together later.
Now there should be 3 x body parts in different colors and 2 x front and back of the arms and ears. When all parts have been cut, continue to the sewing machine!
Sew monsters
Step 1: First, the front of our cuddly monster is cut just below the middle.
Here, the zipper is attached and stapled right to right on the upper side of the front.

Step 2: If present, attach the zipper puller to your machine and sew close to the points on the fastener. If the zipper gets in your way, turn the needle into the fabric, lift the presser foot and slide backwards with the zipper so that you can continue to sew without hindrance.
Step 3: Now we do the same for the lower part of the front side and sew the zipper tight-edged here as well.

4th step: The front is almost finished! So that the mouth has a homogeneous background, we now attach the light jersey fabric left to right (!) On the front, so that the beautiful side will be seen later.
5th step: Now stitch all four sides with the straight stitch with a short edge.

Step 6: Now it's time to sew on the buttons or eyes of our sweet monster. This happens through the opening in the zipper. First put the buttons on the fabric at the desired place and then sew them together with a few stitches.
Step 7: Next you put fabrics of arms and horns right to right on each other. In my case, I would like to sew a croissant with the fleece side and one with the jersey side outside. I do the same for the two arms.
Step 8: Sew the horns and arms together with the straight stitch, but save out the side that will later be attached to the body. Then turn all parts to the right side.

Tip: The four parts can be stuffed with cotton wool at will, should the fabric be too thin and not stand by itself.
Step 9: Our cuddly monster is now sewn together: We put the front and back together right to right and put horns and arms on the inside (!) Accordingly.
Tip: Make sure the images on the angle of the arms to properly attach to the inside!

Step 10: Now you can sew around the body. However, we leave at the bottom of an approximately 8 cm long turning opening.

Step 11: After sewing, turn the monster outward. Our little friend can now be stuffed with stuffing.
Tip: To turn the horns and arms nicely on the right side, you can help with a pen or screwdriver.
If you do not have cotton wool at home, you can of course also use scraps of fabric or the inside of an old pillow.

Step 12: Finally close the turn-around opening with the so-called mattress stitch. In doing so, stick out from the inside to the outside, approx. 5 mm further from the top into the same fabric and on the opposite side from below. Repeat this until the hole is closed. If you pull the thread slightly at the end, the seam should become invisible and disappear nicely in the fabric.

That's it - I wish you a lot of fun sewing monster ????


