Giveaway for the children's birthday - 5 beautiful ideas

- Dog with thank you letter
- Butterfly with lollipop
- Colorful paper cups
- Felt bag
- Handkerchief with good gifts
For a fun birthday party, the celebrated birthday child can look forward to many nice presents and a great party with his best friends and girlfriends. But what speaks against it, to thank for the fun day with small contributions to the young guests ">
Anyone who seeks the term "giveaway" in the dictionary, will be unsuccessful, because the word there simply does not appear - even though what is behind the term, in the past few years gradually to a fixed and very popular part of the children's birthday culture has blossomed. But what exactly is it about the so-called contributors? The answer: Little things that are presented to the guests of the birthday party - as a reminder of the day. Although such mini-gifts can be bought in the shops, but it is much more personal and creative to make the gifts yourself. We provide you with various ideas (each with detailed and illustrated instructions and divided into two large blocks - the animal cool and the other variants), which you can produce quickly and inexpensively on your own.
We would like to give you a hint in advance: All instructions refer to the production of an object. Create as many as children want to appear on their offspring's birthday. Also adjust the purchases of the required craft materials to the required number.
Dog with thank you letter
You need this:
- a sheet of square paper (colorful or monochrome)
- black felt-tip pen
- scissors
- Craft glue or hot glue
- big button
- stationery
- pen
How to proceed:
Step 1: Fold the brown, square folder into a triangle.
Step 2: Lay the two-ply triangle with the tip down in front of you.

Step 3: Fold down the two upper corners (left and right) so that the puppy's ears emerge.
Tip: Use a pair of scissors to round off the earlobes.
Step 4: Take the lower triangular tip of the leaflet between your thumb and forefinger and bend it upwards. Caution: Do not fold but fold up in a bow. Then glue the tip with craft glue or hot glue.

Tip: Orient yourself to our pictures. By doing this step, you should get a bow that leaves room for a rolled-up letter.
Step 5: Now stick the button as a nose on the top.
Step 6: Then paint the dog's eyes and eyelashes with the black felt-tip pen, as well as the mouth and small dots next to it.
Step 7: On pretty stationery you write a few words of thanks to the respective child with a ballpoint pen - eg: "Dear Alexander! Thank you for spending this special day with us. "
Step 8: Roll the letter paper together.
Step 9: Insert the rolled-up paper into the sheet that the dog's snout reveals. Finished!

Butterfly with lollipop
You need this:
- stable cardboard
- Stoffreste
- Fineliners
- pencil
- small wiggle eyes
- Lollipop
- scissors
- Cuttermesser
- craft glue
- our craft template
How to proceed:
Step 1: Print our crafting template (butterfly wings) on paper and cut them out with scissors.
Click here: To download the craft template
Step 2: Transfer the stencil to colored cardboard (eg in pink, blue or green) in pencil.
Step 3: Carefully cut out the butterfly wings with scissors.
Step 4: Fold the wings once in the middle (from left to right) and then unfold them slightly apart.
Step 5: Pick up the craft knife and cut in the middle between the two wings across two slits a few millimeters wide (at a distance of about two to three centimeters).
Step 6: Fold the area between the two slots slightly upwards, creating a small arch through which you can push through something.

Step 7: Use a pair of scissors to cut a few beautiful decorative elements out of a piece of cloth that matches the craft board - such as hearts, stars or flowers.
Tip: To get as large as possible and shaped elements, you can of course first with paper, pencil and scissors create appropriate stencils, which then transferred to the fabric remnant and cut.
Step 8: Glue the decorative elements in response to the butterfly wings - depending on where there is still room.
Step 9: Glue the mini-Wiggle eyes with craft glue on the Lolli.
Step 10: Put the Lollipop in the bow and the sugar-sweet donation is ready!

Tip: Write the words of thanks on the butterfly with noble Fineliner - eg along the edge or in the two wing halves.
Colorful paper cups
You need this:
- colorful paper cup
- Craft paper in different colors
- black felt-tip pen
- Wackelaugen
- scissors
- craft glue
- filling material
- Acrylic paint and brush
How to proceed:
1st step: elephant, monkey, mouse, dog or cat "> 
Step 2: Cut out the elements with scissors.
Step 3: Now the paper cups are painted in the special color of the animal. The elephant is gray, the lion light brown and the zebra of course black and white striped.

Tip: If it should be a little faster, you can also spray the paper cups with colored lacquer or stick on them with colorful paper.
Step 4: Glue the parts to the paper cup - of course at an adequate place, so that a harmonious overall picture is created.

Step 5: Use black felt-tip pen to paint the pupils' eyes and if necessary nostrils and mouth on the respective face element or cup. It looks especially funny, if you stick on shaky eyes.
Step 6: Fill the cup with a few sweets or other trifles. Finished!

Felt bag

You need this:
- felt
- Gift ribbon made of fabric
- thick needle
- nice thread
- scissors
- Cuttermesser
- filling material
How to proceed:
Step 1: Cut a piece of felt with scissors to the desired size - eg 20 x 20 cm.
Tip: To draw correctly, simply use pencil and ruler.
Step 2: Fold the bottom edge up a little - like making an envelope. Make sure there is still enough space in the upper area to be able to fold this piece down as a closure.

Tip: If you use felt, you do not have to hem the fabric.
Step 3: Now sew the sides of the bag together. So first the left and then the right - or vice versa. To do this, use a thick needle and a nice, stylish thread.

Step 4: Now fold down the still untouched upper area.
Step 5: Pick up the craft knife and cut a slot in the middle of the seal area. This should be so big that you can easily pull the gift ribbon through.
Step 6: Fill the bag with a sweet gift, such as a small piece of chocolate.
Step 7: Thread a very long piece of gift ribbon (made of fabric) through the slot and weave it several times around the small felt bag.
Step 8: Carefully pull the end of the strap through the previous strap parts, so that the closure of the felt bag holds well. Finished!

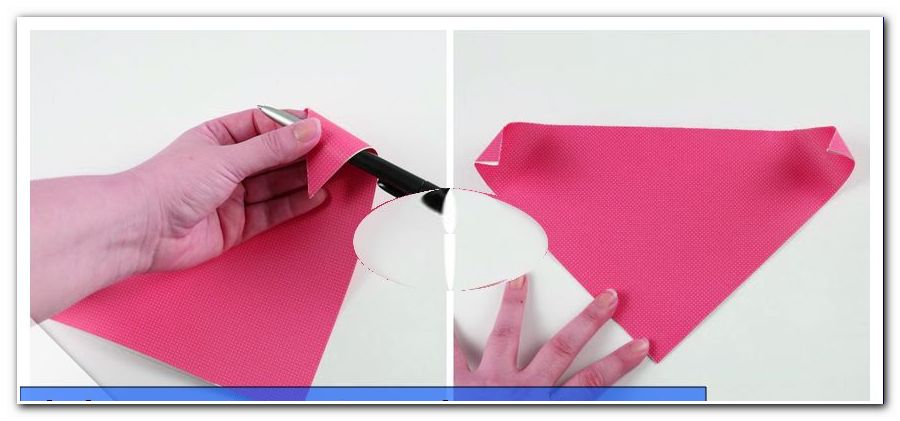
Handkerchief with good gifts
You need this:
- pretty handkerchief or napkin
- filling material
- Curling
- scissors
How to proceed:
Step 1: Pick up a pretty handkerchief or napkin and put it on the table in front of you.
Step 2: Fill the cloth with one or the other good gift - such as gummy bears and other little sweets.
Step 3: Use the pair of scissors to cut off a sufficiently long piece of the curling ribbon.
Step 4: Fold the edges of the handkerchief up and a little bit together.
Step 5: Tie the curled ribbon piece prepared in Step 3 around the folded tissue and knot it (just above the candy). Finished!

General information about the ideas
All of our ideas presented in this DIY guide can be modified and customized as desired. In any case, you will need only a few (and cost-effective) materials for the implementation, some of which you probably already have in stock at home. For the various recommendations, you never have to spend more than a maximum of 20 to 30 euros (all materials, fillings and children to be gifted included). Furthermore, all donations are made in no time. Even if you want to prepare ten or more of them, the "work" is done in an hour or two. The more helpers you support, the faster you're done. So, put all your family members, who enjoy crafting, into your little project - especially the birthday boy, who looks forward to seeing his friends and girlfriends and wants to give them a sweet present.
Special tip: It would also be an idea not to tinker with the little gifts beforehand, but simply to get the necessary materials and have the children make the creations directly at the party. Especially with fun things like the catapult that would offer.