Knit cap - free knitting instructions for beginners

- Material and preparation
- How to knit a women's hat
- Stop and cuffs
- Knit moss pattern
- Quick start Guide
- Knit men's hat
- Stroke and cuff pattern
- Knit hood
- Knit cap tip
- Quick start Guide
- variation
As the days get shorter and temperatures drop, the highest railroad is to knit new outfits for the cold season. Of course, this also includes warm hats, preferably several, suitable for every look and every occasion.
We have chosen two caps for you, which can be knitted quickly and very easily. Especially for beginners, both models are suitable, you have to bring this experience. It is enough if you can knit right and left stitches, the rest we show you step by step.
Material and preparation
When choosing your wool, place great emphasis on good quality. Choose soft wool that is durable at the same time. Because a cap gets wet quickly in the winter with snow and rain, it would be a pity, she would not survive this unscathed.
We have selected a noble merino wool for our caps. The wool is equipped with "superwash", so it can also be easily washed in the washing machine.

Tip: Make sure when buying that superwash is on the yarn banderole.
Merino wool is softer and finer than normal new wool and is particularly kind to the skin. That said, merino wool does not scratch, but feels very cuddly. For caps and scarves therefore particularly well suited.
You need this for a cap:
- 100 grams of merino wool
- a circular needle
- a coniferous game
- a darning needle for sewing
Of course, the choice of knitting needles depends on the wool size you choose. The exact needle size can always be found on the banderole imprint.
Tip: If you knit very loosely, you should take a half size smaller than stated. But if you knit more tightly, you may choose a thicker needle, so a half number stronger.
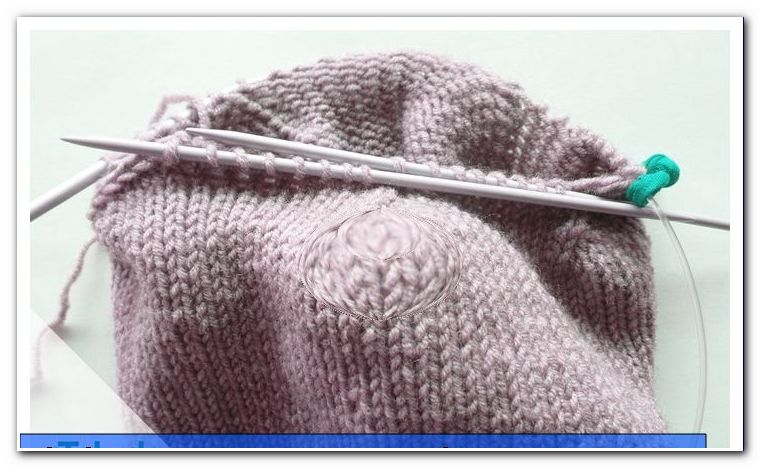
How to knit a women's hat
Our model was knitted for a head circumference of 58 cm. The cap sits loosely and is not too tight on the head.

The cuffs are knit in the rib pattern 2 stitches on the right, 2 stitches left on the change. Since knitting is done in a circle, the stitches automatically appear right to right and left to left.
Tip: For the crease pattern 2 stitches on the right, 2 stitches on the left, the stitching must be divisible by 4. This is the only way to ensure that when you knit the round, the round appears to be correct. After the last left stitches, it will automatically continue with right stitches.
The cap itself is knitted in pear pattern. This is a very simple structure pattern that does not require special knowledge.
The pear pattern goes over four rounds:
1st round: 1 stitch on the right, 1 stitch on the left
2nd round: 1 stitch on the right, 1 stitch on the left
3rd round: 1 stitch left, 1 stitch right
4th round: 1 stitch left, 1 stitch right
These four rounds are constantly repeated in the pear pattern.
For the attack we used a circular needle of the strength No. 5, so that the attack is a bit looser, the cap should not sit too tight on the edge, but be well stretchy. The first row of knitting is then knitted with a needle size 4 needle.
Stop and cuffs
Hit 96 stitches on the circular needles.

1. Continue knitting from this row on the needle game.
2. Knit 24 stitches on the first needle, 2 stitches on the right, 2 stitches on the left.
3. On the second, third and fourth needle also knit 24 stitches per needle and alternately two 2 stitches on the right, 2 stitches on the left.
4. When you have distributed all 96 stitches on these four needles, the first needle and the fourth needle are closed in one turn. This creates a closed circle.

5. To do this, simply knit the first four stitches from the first needle onto the fourth needle. That means you knit a total of 28 stitches on the fourth needle.
6. On the next first needle you now have only 20 stitches left.
7. Now knit 2 stitches on the right, 2 stitches on the left.
8. After about 4 - 6 turns, you can put the 4 stitches from the fourth needle back onto the 1st needle. The advantage of this knitting technique is simply that the transition appears almost invisible when closing the round.
9. Knit the cuff up to a height of four centimeters.

The cuff is ready.
So that the cap gets a loose swing, we have in the last cuff row 12 stitches increased.
It works like this:
Knit 8 stitches and knit two stitches out of every 8 stitches.
To do this, take the cross thread that lies between the stitches on your left needle and knit this thread as the right stitch.
So that no hole is created, do not stab this stitch from the front, but from behind.
That is, the stitch taken from the transverse thread is knitted entangled.
Knit 8 sts in Rib, pick up 1 st, knit 8 sts, pick up 1 st, until you have 12 stitches at the end of the row.

After this last row of the cuff pattern starts the pear pattern.
Knit moss pattern
For the first 2 rounds, always knit 1 stitch on the right and 1 stitch on the left alternating.
For the next 2 rounds, swap the stitches and start with 1 stitch left, then 1 stitch right, always alternating.
Tip: If you think you can no longer see the initial stitch of the 1st row of the pearl pattern, place a marker in front of the first stitch. Such markers can be found in any craft store, but you can also easily make it yourself from a different colored yarn. He always wanders when knitting from the left needle to the right one. It continues to knit quite normally.
In a pear pattern, knit the hat up to a total height of about 22 centimeters.

Now cut off the thread generously, thread it into a darning needle and pass this needle through the thread through all the knitting stitches. So in the end all stitches are on the thread.
Now pull the thread together, so close your cap.
Sew the thread in the inner part of the cap well.

Sew on the initial thread - your hat is ready.
Quick start Guide
1. Cast on 96 stitches
2. Knit 2 sts in the rib pattern and 2 stitches 4 cm high
3. Increase 12 stitches in the last round of the cuff
4. Knit in a pear pattern to a total height of 22 cm
5. Put all the stitches on the working thread and tighten them tightly
6. Sew on the threads
Knit men's hat
For the men's cap we have knitted a thicker merino wool. 100% merino and superwash. The wool is slightly stronger than that of the ladies cap and is knitted with a needle size no.

She is worked for a head circumference of 58-60 centimeters. In this men's hat, we knitted until acceptance at the top with a short circular needle. Only with the decrease the Nadelspiel is used.
Tip: Always measure the head circumference before knitting. Accordingly, you should then apply more or less stitches. The knitting work will be perfect if you knit a stitch so that you can calculate the exact number of stitches.
In this cap, another variation of the cuff pattern is knitted, for the cap itself only worked smooth right. The cap end is removed and not just all the stitches are pulled together.
Stroke and cuff pattern
The cuff pattern is again composed of right and left stitches, but in the following order:
2 stitches on the left, 1 stitch on the right, 1 stitch on the left, 1 stitch on the right.
Tip: For this cuff pattern, the fence must be divisible by 5.
The hood itself is knitted only with right stitches.
On a circular needle, 85 stitches are struck.
Knit 4 centimeters high in cuffed pattern.

Knit hood
Now knit the hood with right stitches. There is no need to increase stitches, as in men's cap is more likely to be on the head. At a total height of about 16 centimeters, the decrease in the peak begins.

We then switched from the circular needle to a double needle play. Simply because there are fewer and fewer stitches due to the decrease and the rope of the circular needles becomes too long for that.
Knit cap tip
1. We have taken 5 stitches in our hat every round.
2. That is: Knit 15 stitches on the right and knit the 16th and 17th stitches together
3. In the next row knit every 15th and 16th stitch.
4. Knit one row at a time on every 14th and 15th stitch.
5. Knit together the 13th and 14th stitches.
 6. In this system, 5 stitches are taken each round until there are only 10 stitches left on all needles.
7. These 10 stitches are threaded onto the work thread using a darning needle and tightened tightly.
8. Sew the beginning and end thread on the left side of the hat.

Finished is the men's hat!
Quick start Guide
1. Cast on 85 stitches
2. Knit 4 cm high in the cuff pattern
3. Knit the hood only with right stitches, up to a total height of 16 cm
4. For removal, knit evenly in each row 5 times 2 stitches together
5. Lay the last 10 stitches on the work thread and tighten firmly.
After these two options, you can knit all caps. For all ages.

variation
We have another example of a hat that worked the same way as the ladies' hat, but with a completely different yarn and structure pattern.
This structure pattern is also very easy to rework for beginners:
The cuff was worked in cuffs 1 stitch on the right, 1 stitch on the left.
Structural pattern for the hood:

1st round: all stitches right
2nd round: all stitches left
3rd round: 1 stitch on the right, 1 stitch on the left
4th round: 1 stitch on the right, 1 stitch on the left
Then the first round of this pattern starts again.
Have fun reworking.