Knitting left stitches - instructions

- material
- Knit left stitches
- Knit left stitched knit stitches
- Knit Kraus on the right
- Left stitches alternating
- stripe pattern
- seed stitch
- Combined stripes
- cube pattern
- surface pattern
What was there first - the right or left stitch ">
Left-hand stitches, in combination with right-hand stitches, create texture patterns, are indispensable for cuffs, and form the side ends of all cable pattern strips. They stand out in the stitch pattern through a horizontal thread look and form a stitched left knitted mesh structure with depth. If you knit smooth right, you automatically get a left stitch on the back of the knit. Take a look at how to knit left stitches yourself.
material
You need this:
- Wool for exercise
- corresponding circular needle or needle game in matching size
scissors

Knit left stitches
Make a few stitches on the needle and knit a row of right stitches. The work is then turned.
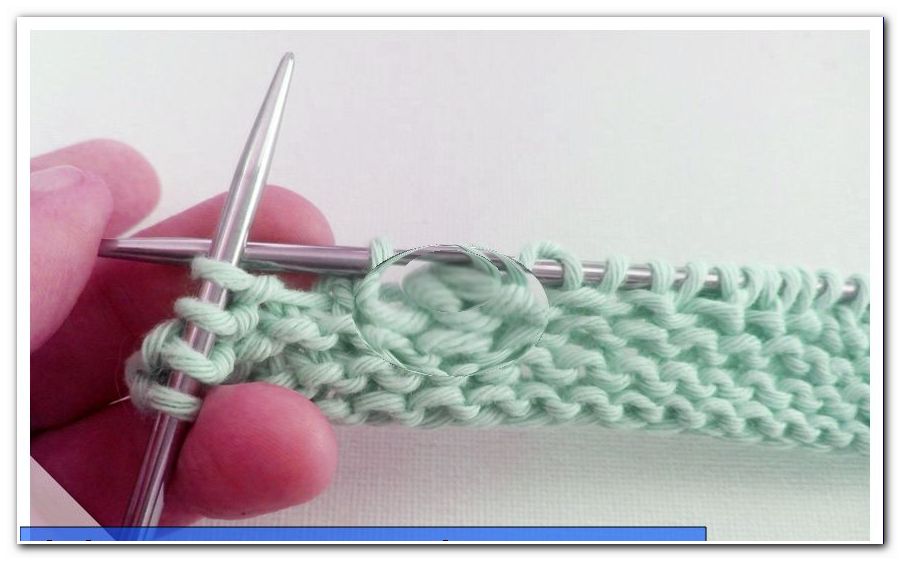
Now lift off the first stitch (edge stitch) as for left knitting. The thread comes in front of the right needle.
Then take the second stitch coming from the right.

Get the thread with the needle. Then pull it through the loop.

Slide the stitch from the left needle. This way, you will knit to the end of the row.

Knit left stitched knit stitches
Entangled Knitting means that the stitch is knitted twisted. This technique is used when the piece of knitting needs to be firm. In increments and decreases is prevented by entangled knitting the formation of holes and structural patterns obtained in this way a special touch.
Knit some stitches again and knit a row of right stitches. Turn the work over. The edge stitch is lifted off again by coming into the stitch from the right and then lifting it from the right needle.
The thread comes before the right needle again. Now insert the right needle behind the first stitch of the left needle.
They orient themselves on the rear mesh member and then pierce this part of the mesh coming from the back left.
Get the thread and pull it through the loop.
Slip the stitch from the left needle - the stitched knit stitch is done.

Knit Kraus on the right
In a frizzy right-hand knit, only left-hand stitches are visible on the front and back. This pattern image is created when the back and the back rows are always knit in the same way. It does not matter if only right or left-hand stitches are used in each row. Both variants result in the same stitch pattern. If you knit in every back and forth row only on the left, you get the same stitch pattern as on the knitted piece on the right.
Left stitches alternating
1/1 rib knit
If a right and a left stitch alternate with each other, the 1/1 rib pattern is used. After knitting in the first row, knit one stitch on the right and one stitch on the left. Apply the work.
In the back row all knits are knitted as they appear. A right-hand stitch is now worked on the right, a left-hand stitch on the left.

2/2 rib knit
In this variation, two stitches are knitted on the right and two stitches on the left. Make a few stitches and knit the first row alternately two stitches on the left, then two stitches on the right. Turn the work over.
Again, knit off all the stitches as they look.

This 2/2 rib knit variant is most often used as a cuff version. But even complete sweaters, arm warmers, scarves, caps or loops get with this pattern a tremendous elasticity and apply directly to the body proportions.
Rib knit with crossed stitches
A firmer cuff variation is created when working with interlaced stitches. To do this, start with a right stitch and knit the second stitch left crossed. Again one stitch on the right, one on the left and work to the end of the row.
Turn the work over. In the back row knit the stitches as they appear or you will work all right stitches crossed right here.

stripe pattern
Horizontal stripes with left stitches:
Smooth right knit fabric can be livelier and visually appealing with a few left stitches. There are no limits to the imagination.
Narrow stripes
Narrow stripes are created by a series of left stitches within a smooth right knit. Knit back a few stitches and knit a few rows. The work points to you with the right side.
Now knit a complete row of left stitches.
Turn the work and knit another piece on the right (back row, right row, back row, left stitch).

Wider stripes
In the same way, wider stripes are created. Here you not only knit a number of left stitches, but work as many rows of left stitches as you like. You can vary the strip spacing by a different number of rows in smooth right knitting.

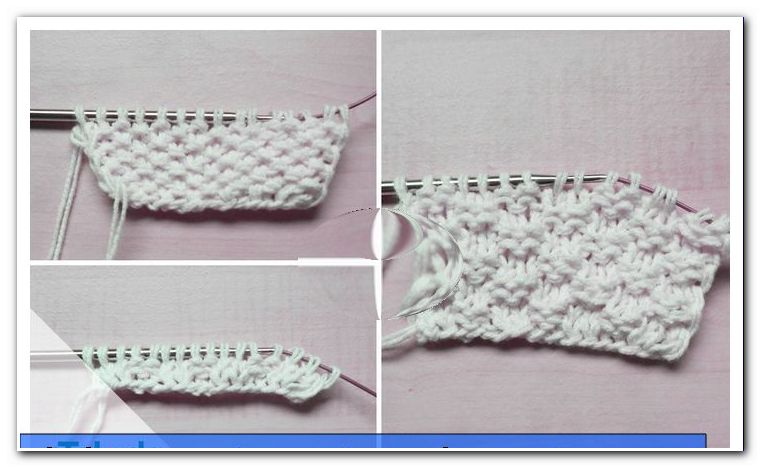
seed stitch
The small as well as the big pear pattern are created by the regular combination of right and left stitches. For the small pear pattern, knit one stitch on the right and one on the left in the first row. After turning, all stitches are knit opposite to their appearance. That means - a right-looking stitch is knitted on the left, a left stitch is knitted on the right. Each further row is worked in the same way, the new stitch is always knit in the opposite way as it appears. This knit pattern creates the same pattern on the front and back.
The big pear pattern is created by knitting two stitches on the right and two stitches on the left in the first row. In the back row all knits are knitted as they appear.
In the third row is changed. Two left-hand stitches are knitted on two stitches on the right. Two stitches appear on the left two stitches. Work to the end of the row, turn and knit all the stitches in the back row as they appear. Continue working in this change.
Combined stripes
Interesting patterns arise when vertical stripes are "filled" with left stitches or combined with left-knitted pattern stripes. Here are a few examples:
Knit the first row on the right. In the second row knit three right and three left stitches alternately. In the third row work only right stitches. Work the fourth row again like the second row - three stitches on the right and three stitches left on the left.

If left-hand stitches are integrated into smooth right-hand stripes, the result is the following stitch pattern.
Work four stitches on the right and two stitches on the left in the first row. Turn the work and knit all the stitches as they appear. Turn back and knit all the stitches as they appear.
After several rows, left stitches are worked into the smooth, right-hand knitted strips. To do this, lift off the edge stitch and knit the first stitch on the right. Now follow two left stitches and another stitch on the right. The first strip is ready.
Knit two stitches on the left and the second right one just like the first one. One stitch on the right, two stitches on the left, one stitch on the right. Continue in this way until the end of the series.

In the back row knit all the stitches as they appear. Then knit again a row four stitches on the right and two stitches on the left. The following rows again all stitches work as they appear.

cube pattern
Knitted stitches on the right and left allow decorative cube patterns to work as well. You can design the width and height according to your taste.

Refined variations arise when the individual boxes are not only worked in a knitting style, but varied.

surface pattern
Offset, sloping or installed at irregular intervals - with left stitches your pattern ideas are endless. They can be used in complex patterns or as stripes, spikes, diagonal rows or boxes - the combination possibilities are inexhaustible. And anyone who wants to dare to do something special tries to knit letters and numbers.