Sewing welt pocket - Instructions for a flap pocket

- Material and preparation
- Sewing instructions - Sew on the welt pocket
- Quick guide - flap pocket
Basically, the welt pocket is a single-sided piped pocket whose piping is to be wider than 2 cm. It is also referred to as an inserted flap pocket. How to sew a one-sided piping bag, I have already described in my tutorial on the one-sided piping bag in 2 variants.
Today I would like to focus on the welt pocket, also known as flap pocket, in a special variant that is occasionally used in the magazine "Ottobre", for which I could find now but no detailed instructions, which is also suitable for beginners. Here, a rectangular recess is already specified in the outer fabric of the front part in the pattern and in the appropriate size a bar is attached.
Classically, the pocket bag is sewn from upper and lining fabric. However, this is a special variant in which only one layer of outer fabric is processed and the lining material is thus not needed.
Difficulty level 2.5 / 5
(with this manual and a little patience but also suitable for beginners)
Material costs 1/5
(no additional costs - usually results from the pattern)
Time required 2.5 / 5
(variable depending on exercise and substance type)
Material and preparation
material selection
As is often the case, the material selection here already results from the pattern and the fabric used for it. When I sew for children - as so often after the cuts from the magazine "Ottobre" - I like it particularly well when the strips of the flap pocket stand out in color. For beginners it is suitable material from the same type of fabric. In principle, however, almost every substance can be processed. The rule is: not too thick, otherwise the bar wears unsightly.
Also with this type of bag I reinforce the intervention site and the piping strip with ironing fleece.

Amount of material and the pattern
Normally, the amount of material is already apparent from the pattern. However, if you want to incorporate the welt pocket into another piece of clothing, you should stick to the corresponding proportions. If other pockets are planned in the pattern, this gives a good indication of the length of engagement and the size of the pocket bag. I sew in this guide two welt pockets for a children's jacket, so they are also kept a little smaller. Think of the appropriate seam allowances and work as accurately as possible to get a nice result.
Tip: The ironing fleece should reinforce heavily used areas, so that the fabric does not wear out. In this case I used white ironing fleece. It should not be a volume fleece, because the pocket engagement otherwise does not fit nicely.
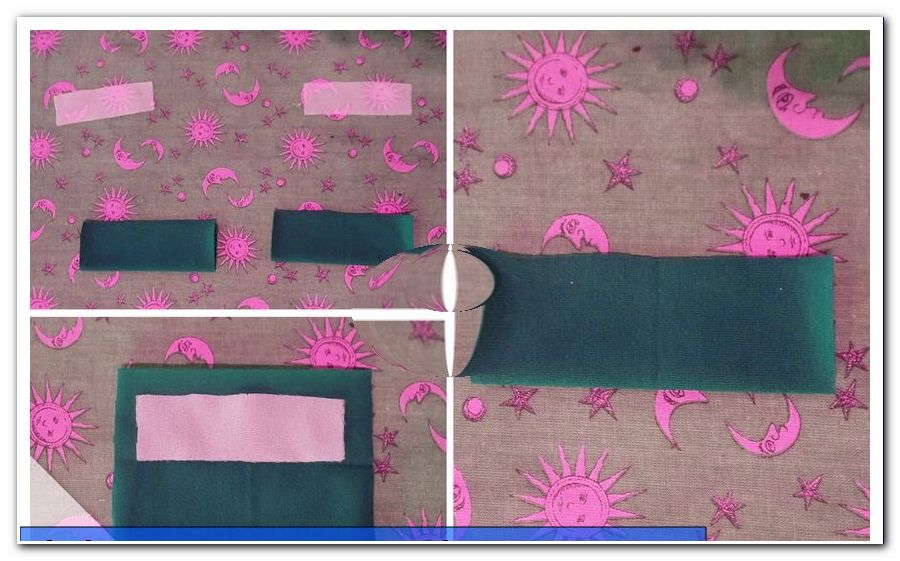
After cutting, including all seam allowances and the marking of all important markings, I halve my two piping or strips (one bag is required for each bag, I would like to use two in my kids jacket) and iron briefly to get a nice fold. Then I open the bars and put the insert (ironing fleece) in the bow within the seam allowances, fold them back together and iron the fleece according to the manufacturer's instructions.

Also, the outer fabric of my jacket front part of the intervention is reinforced. The seam allowance is left out. If, as I usually do, you do not completely transfer the cut to the fabric (that is, the seam allowance is not delimited by an auxiliary line), you can simply mark the key vertices of your cut with pins to lay the fleece. Then iron the insole.

Sewing instructions - Sew on the welt pocket
For more stability, now quilt on the bow side (ie not on the open side), each short-edged. You can easily use a simple straight stitch. This fabric should not remain stretchy. Now stick your strip to the right side of the fabric. The open edge should be in the direction from which you want to put your hand later. First of all, mark the center of the material on the outer fabric and on the groin, put them together and put the groin on the outer fabric right here and in each case further out on the right and left with three pins.

Now turn the outer fabric to the left and insert a pin into the corner points, so that these points become visible from the right side of the fabric. Turn right again and place the two outer pins so they protrude from the fabric through your checkpoint (the corners on the back).

Now sew exactly from one vertex to the other with the appropriate seam allowance. Lock start and end of the seams. Turn left again. In the corners, cut the outer fabric exactly to the end of the seam. Be careful not to cut the groin.

Flip the bar up. Fold the seam allowances on the right and left inwards between the outer fabric and the groin.

Tip: For exact corners, I like to put on a Geodreieck and fold the fabric according to the 90 ° angle. You can do this right on the ironing board and iron the desired edge.

Stick the side parts to the strip on both sides so that nothing can slip. Alternatively, you can also attach Wondertape between the seam allowances.

Now it gets a bit fickle, but with practice and patience you get the hang of it quickly: I carefully remove the pins on one side, fold the outer fabric towards the strip and sew all three layers together exactly in the bow. The same applies of course to the other side. I check if all angles are exact. Then I shorten and sew the seam allowances. I summarize all three layers of fabric together.

Now only the pocket bag is missing. For this, I also mark the corner points for the pocket engagement on the bag fabric and attach them exactly with pins. In addition, I also mark the corner points of the outer seam allowances, so in total four points, which I can now place on the front of the outer fabric.

Since it should be visible on the front, I first pin it to myself and attach it by hand with a yarn in contrasting color. Then I turn to the right and sew the bag with a decorative stitch of the normal sewing machine or a cover stitch on the Coverlock. In doing so, I make sure that the seam allowance on the left side of the fabric disappears completely under the seam. Finally, I sew together the front and rear of the side seams together.

And already the welt pocket is ready!
A few seams later, the whole jacket is finished and because it was so nice, I made two different models.

And now: enjoy sewing and designing!
The instructions for a one-sided, or a double piped bag we have here for you:
- One-sided piped pocket
- Double piped pocket
Quick guide - flap pocket
- Determine the length of the insert and the pocket size (and shape) or remove it from the SM
- Fold strips lengthwise, iron, reinforce with bow insert in bow
- Stitch nose edge with a narrow edging
- Insert the open edge in the middle of the pocket and also secure the sides
- Mark corners and sew and lock all three fabric layers together
- Cut the outer fabric in the corners exactly to the seam end
- Fold in the seam allowances, place the angles nicely, iron
- if desired: honeycomb tapes, otherwise fix with pins
- Fold outer fabric towards bar and sew in crease.
- Shorten and trim seam allowances
- Place the bag on the bag, pin it down and staple it by hand
- Sew pocket bag with decorative or cross stitch seam so that the seam allowance is sewn inside
- And done!
The twisted pirate


