Tinker Small Mini School Bag - DIY Guide

- Mini school bag tinker with craft template
- Crafting instructions for triangular sugar bag
In August and September comes the time of the beginning of school. Whether first graders, vocational students or students, all these little ones and big ones start a new phase of life during this time. The perfect gift, which should not be missing, is the sugar bag. Here we have described two craft instructions for you in detail, with which you can make yourself a mini school bag. The instructions are including pictures and a craft template for the bag shape.
At the beginning of school, at the beginning of a new stage of education or for professional changes, sugar packets are perfect gifts and decorative elements. Often, the small bags are also suitable as elements of a table decoration, which is why you also like to be able to turn something smaller. Of course you can also fill and give away these school bags. But you should then place large gifts in a large bag of sugar.
Mini school bag tinker with craft template
In this guide we show you how to make a classic sugar bag. The small school bags are closed with crepe at the end and are therefore perfect as a gift.
You need:
- Working creatively
- construction paper
- crepe paper
- Scissors, glue and pen
- Gift ribbon and decoration material
- possible filling
Step 1: At the beginning you need our crafting template for the round shape of a school bag. These print and cut once.
 Click here: To download the craft template
Step 2: Place the original on a large enough piece of construction paper and surround it with a pen. Cut the shape out of the construction paper.
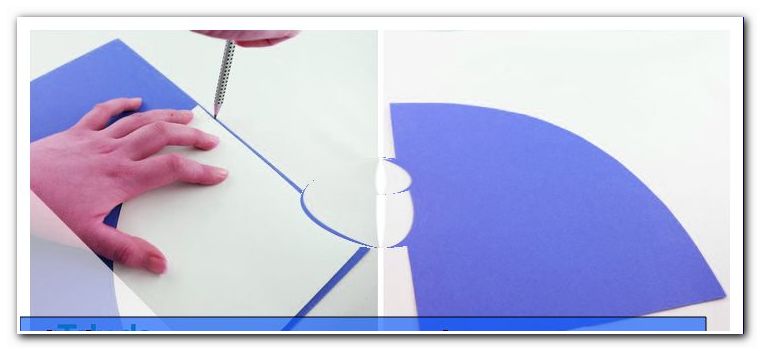
Step 3: Now make a bag out of the construction paper. The ends should overlap slightly. Glue the sugar bag together with enough glue.

Step 4: Now pick up the crepe paper. Cut a piece about 30 cm x 30 cm from the crepe paper. Coat the edge of the school bag 1 cm wide with glue. There is now all around the crepe paper attached.

Step 5: The mini sugar bag is now ready and can be filled. If you only want to use them as decoration, you only need to close them with a gift ribbon.
Step 6: If you want, you can decorate or decorate the school bag now. Glittering stones, stickers or washi-tape will serve you well.

Crafting instructions for triangular sugar bag
This paper bag is folded and has no closure at the end. Nevertheless, sweets, small toys or stationery can also be given away in this crafted mini school bag. Have fun with this tutorial!
You need:
- square clay box
- double-sided adhesive strips
- Falzbein, scissors
- Decoration material
- filling
Step 1: Pick up the square construction paper. Thicker craft carton is usually available in A4 format. So cut yourself out of this easy fitting squares. Our school bag is made from a cardboard box measuring 20 cm x 20 cm.
Step 2: Now fold one of the two diagonals to create a triangle.
Step 3: Now fold the two corners, which have not yet been folded, inwards along the fold from step 2. The result is a dragon form. Open these folds again.

Step 4: Fold the point that points up here, down to the starting point of the two folds from step 3.
Step 5: Now fold the construct together. Lift the paper and fold it backwards at the diagonal from step 2. The tip from step 4 is outside.
Step 6: To seal the school bag, now attach a piece of double-sided tape in place as shown in the picture. Place the other side of the bag on top of this tape - slide side-by-side to the opposite outer edge, then the bag is tightly closed.

The home made schoolbag is ready!
Step 7: Let your creativity run free and decorate it. Stickers, colorful stones, handicraft felt or patterned tape add some extra flavor to the candy bag. You can also label them with the name of the recipient.

Then fill the bag with small treats and surprises. Gifts for the beginning of school can also be packaged well with this sugar bag. Every schoolchild is guaranteed to be happy! This gift is creative and personal at the same time, because you made it yourself.
Tips for quick readers:
Round mini school bag
- Print out the craft template and transfer to construction paper
- Cut out the paper and roll it up
- Close with glue
- Glue crepe paper
- Fill the sugar bag and close it with gift ribbon
- Decorate and label the school bag as you like
Triangular school bag
- Fold square construction paper into a kite as instructed
- close with adhesive tape
- decorate and decorate the school bag
- Fill and label the school bag