Kinetic Sand - Instructions: Make magic sand yourself
- Kinetic sand with only 5 ingredients
- Instructions - step by step
- Instructional Video
- Inspiration - Magic Sand
Anyone who has ever gotten their hands on so-called magic sand will undoubtedly understand the great fascination that goes out to children and teens in particular. Even some adults should already succumbed to the game with the enchanting colorful mass. The following tutorial shows an absolutely simple and above all really working method to make normal sand kinetic like with magic!
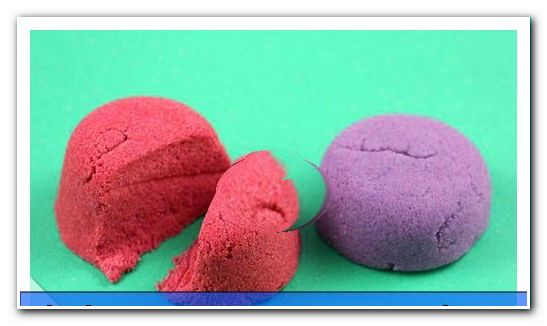
Magic sand - kinetic: fluffy and malleable like wet - only dry
Before you start to create your own kinetic magic sand according to the instructions, it is recommended to touch the original once. Only then will you know which incomparable consistency your personal duplicate has to accept. Basically, behind the secret behind it: The mass behaves like wet beach or Sandkastensand, with so many great tricks are possible. But: Kinetic - which literally means "based on movement" - because the optical and mobile properties are similar, while the magic sand itself remains completely dry, the whole thing does not stick to the hands and always magically to a doughy amount together. Between the fingers the kinetically trimmed mass of sand feels ravishingly fluffy and the mostly squeaky-colored colors also make your eyes happy.
Incidentally, there should be no confusion with so-called Magic Sand, whose special feature is being able to form special artistic forms under water without actually getting wet themselves. Of course, both of these popular creations are also available on the market, however, as is often the case, the DIY method is much cheaper, fun and gives free rein to creativity.
Are you interested in homemade DIY slime "> make slime yourself
Kinetic sand with only 5 ingredients
You need this:
- ¼ tsp any liquid detergent
- 1 tsp adhesive without solvent
- shaving cream
- Food coloring of your choice
- 2-3 cups of fine sand
- Bowl or similar container for mixing
Which types of sand are suitable:
First and foremost, the starting edge used should be as fine as possible - the finer, the better the result. Commercially available decorative sand works wonderfully. If you want to produce larger quantities - for example for an entire indoor sandbox - you can better rely on quartz sand from the DIY store. This is just as fine, only much cheaper. Animal lovers may also be able to use chinchilla or bird sand in their household. The latter, however, should be sieved beforehand, as it usually contains coarser calcareous elements, which are helpful for the birds, but not for the magic sand.
Tip: ordinary sand from a public sandpit or from the beach is less suitable. After all, its purity remains in the dark, which on the one hand represents a question of hygiene and on the other hand can negatively influence the mixture.
Difficulty: very easy
Time required: 10 to 15 minutes
Costs: for the amount suggested in the manual a maximum of 5 Euro
Instructions - step by step
Step 1: First put 1 teaspoon of your glue in the bowl.
Step 2: Slowly add the liquid detergent.
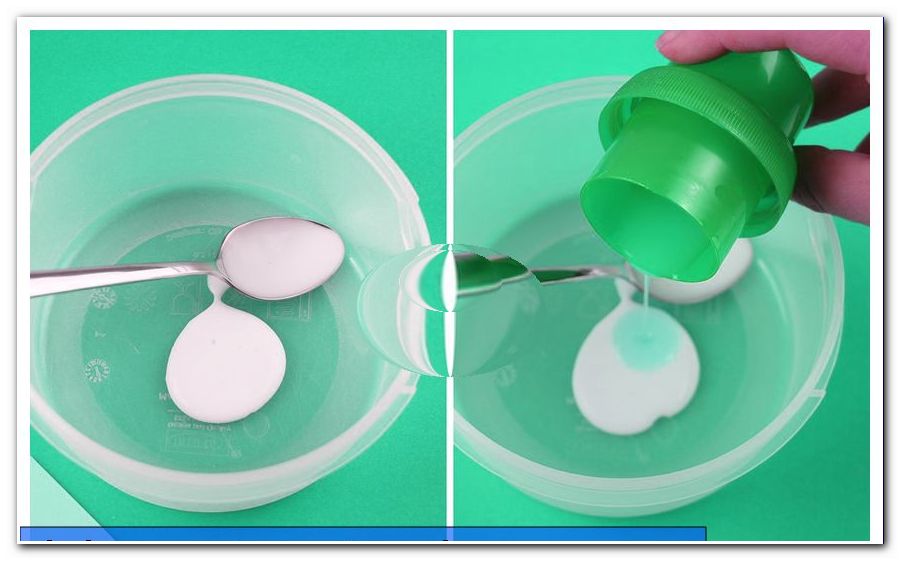
Tip: Slowness is very important here. If you simply pour the detergent directly into the bowl in one go, you will not gain strength. This must first build up.
Step 3: Now stir the compound until a slimy mass is formed.
4th step: Now to bind this mucus, add some shaving cream.
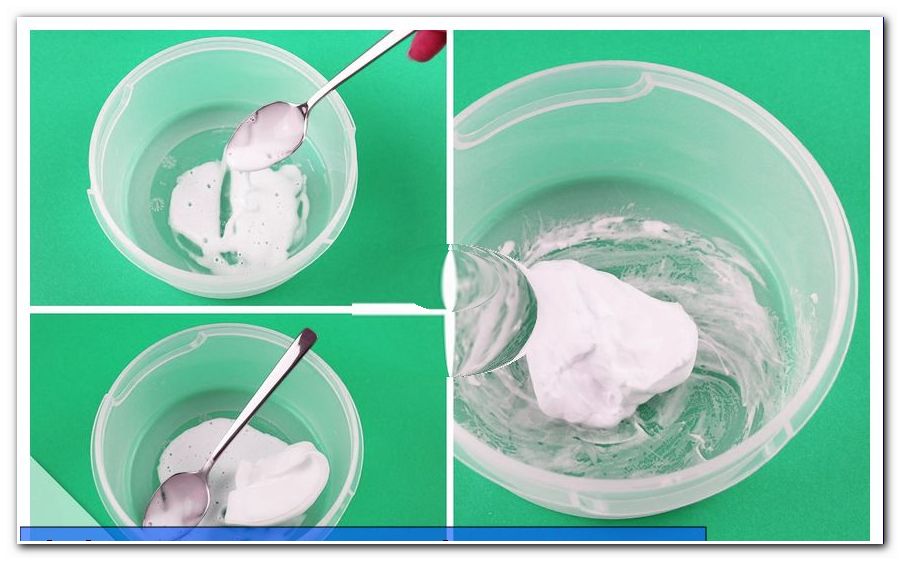
Tip: This mass can be shaped with your hands like clay - or for the ladies: like Sugaring Paste - without any residue sticking to the skin. Only then is the right consistency achieved.
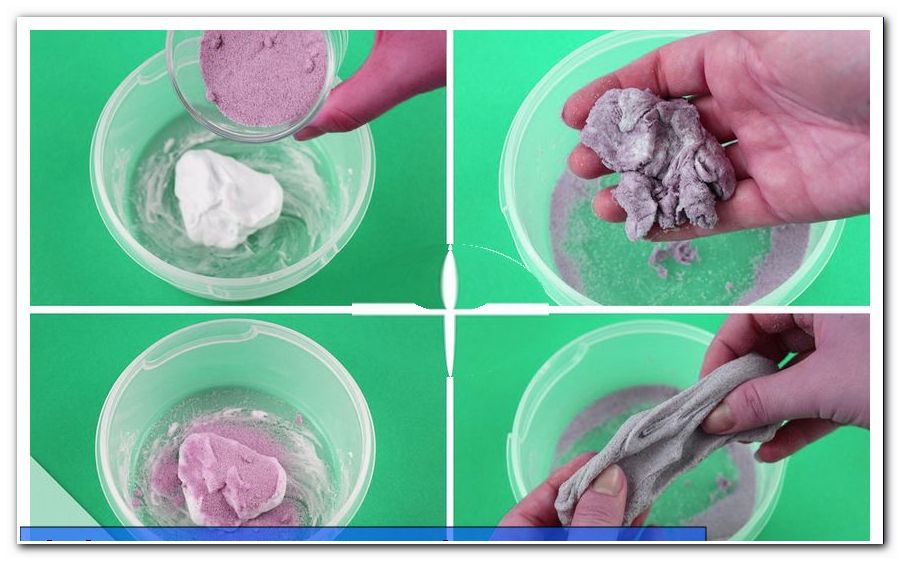
Step 5: It is equally important to add the sand. Pour over the kneading with several layers of sand and mix well before adding again.
Step 6: Add small amounts of your sand over and over again until you like the consistency or in other words, until the unique feel of Magic Sand is reached.
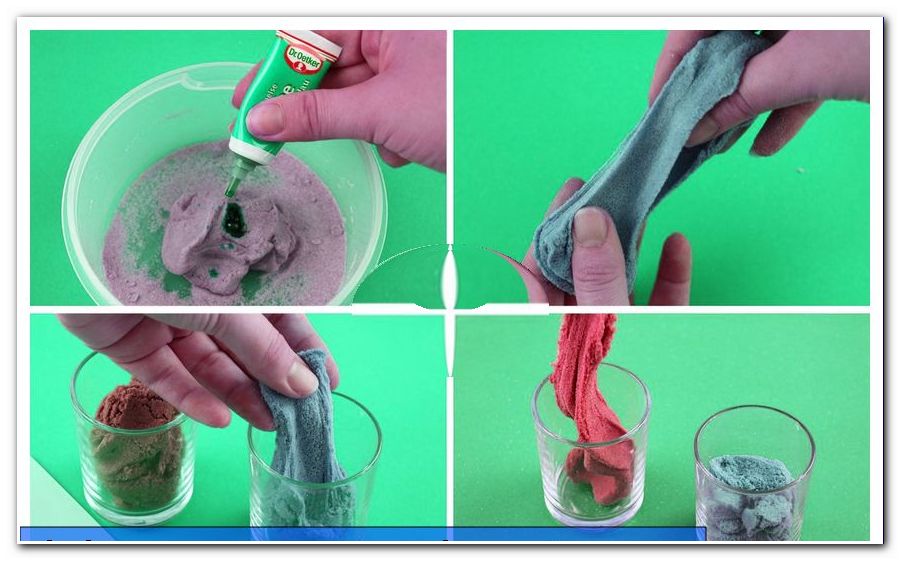
Step 7: Finally, color comes into play. So as not to disturb the structure of the perfect consistency beforehand, add the food coloring at the very end.
Step 8: Choose one of the basic colors or mix them creatively to taste and according to the color theory. For example, green and blue give a fresh turquoise, while red and blue turn purple. Start with a few drops for delicate pastel tones and increase the dose for a stronger result.
Tip: Online you will find numerous handy color tables if needed! A particularly beautiful sight also arises if in addition to the color of a small amount of glitter dust (from the craft supplies) is added. However, do not choose too much, otherwise the mix might get mixed up.
Step 9: Fill the kinetic magic sand into a sealable container to protect it from dirt, so you will enjoy it for a long time and can use it again and again.
Tip: In order to produce larger quantities, simply use the following mixing ratio: Always use a quarter of the amount of detergent you use on the adhesive. So if you want to start with 100 ml of glue, add 25 ml liquid detergent. Naturally, you also have to provide more output accordingly. However, an exact amount of this usually results individually, depending on the other products used.
Instructional Video
The sand will not be kinetic, what to do "> Inspiration - magic sand
1. Instructions - Decoration: Anyone who makes his colorful sand creation with pretty little molds to small locks, shells or hearts, conjures up a summery decoration idea for your own four walls. Even without special sand molds can create free hand imaginative structures, as the sand magic is so flexible. Simply put on a pretty tray and decorate with artificial flowers, real stones and shells, if necessary.
2. Instructions - Relaxation: Keep your kinetically made magic sand near your workplace and let it slide through your hands for relaxation. If you like the feel, you will be spoiled with a little wellness moment in between.
3. Instructions - Indoor Sandbox: Of course, the magical sand is mainly known and loved as a children's toy. Just set up your kids a great sandbox for the apartment. This is an absolutely useful employment opportunity even in bad weather.
- Since kinetically acting magic sand does not crumble and therefore can not cause chaos, you do not need a special pad or a lot of space.
- Just fill the preferred amount of self-made sand into a large, rather flat vessel, such as a bowl-shaped flowerpot.
- Decorate your vessel at will, add some sand molds and you're ready to go!