Shorten pants - instructions for beginners in 3 steps

- Shorten trousers - without original hem
- Shorten pants - with original hem
- Shorten pants to shorts
Everyone knows that: When shopping you can find the pants of his dreams. Unfortunately, the trouser legs are clearly too long and the fabric strikes the floor when walking. So that you can still go shopping in the future, I'll show you today how to shorten a pair of trousers in just a few steps.
The pants can either be shortened without original hem, or you can keep the existing hem. Maintaining the original hem makes sense, especially for trousers that have a washed-out or differently colored hem. I'll explain both options today in the following tutorial.
I'll also show you how to shorten a pair of trousers to a great summer shorts with a self-made hem.
You need this:
- a pant
- ruler
- scissors
- pen
- matching yarn
Difficulty level 1/5
Suitable for beginners
Time expenditure 1/5
about 10 minutes
Cost of materials 1/5
We only need matching yarn

Tip: Especially when shortening trousers without original hem a color-matched yarn should be used. In our case, I tried to use the same yarn as the trouser manufacturer, so you can not see any difference at the end.
Shorten trousers - without original hem
Step 1: First of all, it has to be determined how much of the pants have to be shortened. It's best to put your pants on with shoes. Then you can see how far the pants touch the ground and how much of the fabric has to be cut. In our case, I will shorten the pants by a total of 7 cm.

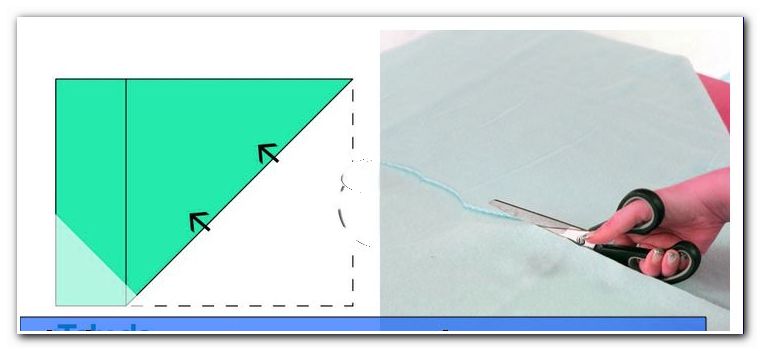
The pant leg is now turned to the left and measured from the end of the fabric up. From the piece that we will cut, we draw a total of 3 cm. We need this part to make a new hem. Along the trouser leg, we draw a line with our pencil or tailor's chalk and cut off the lower piece there as exactly as possible.

Step 2: Now we can start with the hem. To do this, we fold the pants up 3 cm on the left side. Then we fold these 3 cm inwards again, so that the fabric is now threefold. The whole thing is pinned with pins, so that nothing can slip during sewing.

Attention: If you also cut a pair of jeans: Before you start sewing, make sure you are using a denim needle. Another needle could break and make work a lot more difficult. For all other pants, of course, the designated needles can be used.
Step 3: Along the seam that we have now stuck, sew it around the trouser leg.
Tip: For the seams on the sides of the pants, it is recommended to pull the fabric slightly from the back so that the bead can slip under the presser foot. I use the handwheel so that the needle pierces slowly through the fabric and the needle does not break because of the many fabric layers. If sewing the side seams is not possible, sew the seam short before and put it back on the side seam.
That's it! The pants are shortened and can now be turned to the right. With the right yarn you can hardly see a difference to the previous hem!

Shorten pants - with original hem
We now shorten the other trouser leg and keep the original hem of the trousers.
Step 1: Again, we measure how much we want to cut off the pants before. Then we fold the pants right to right up, so we have half of the piece to be cut (in our case, that would be 3.5 cm) from the end of the pants to the beginning of the hem.
Carefully pin this section with pins.

Step 2: Afterwards, we quilt with the straight stitch of the sewing machine into the original hem around the trouser leg.
Step 3: Finally, cut off the excess fabric about 5 mm from the seam. If you want, you can sew the cut piece over again with the overlock or the zigzag stitch of the sewing machine so that the fabric does not rise on this side.
The pant leg is already finished and we kept the original hem including the original stitch.

Shorten pants to shorts
Finally, I'll show you how to shorten a pair of pants easily to shorts. Especially with parts that have holes or stains, this is a great way to save the pants in front of the garbage can!
Step 1: First, we should set the length to which we want to shorten the pants. Sometimes it helps to put an already existing pants, whose size fits best, on the fabric and draw in the edges. We add 3 cm, so we can sew a hem later. Then the first trouser leg is cut off with the cloth scissors or the rotary cutter.
Tip: First I cut off only the first trouser leg, fold the pants in the middle and draw the line on the second trouser leg. So I can avoid that the legs have different lengths.
Step 2: Both trouser legs are folded up about 3 cm. Then the half (ie 1.5 cm) is folded inwards again and pinned the whole thing with pins.

Step 3: Finally, we stitch the trouser leg once again with the straight stitch of the sewing machine, trying to stay as close as possible to the upper edge of the hem.

Finished! Our pants are cut and ready for use in the summer. ????

I wish you a lot of fun sewing!