Wood stain - instructions for painting, glazing and oiling

- Determine the type of wood
- Special features of softwood
- Special features of hardwood
- Preparation and application of the stain
- Types of stain
- Aftertreat the surface
- Apply wood oil
- Painting after pickling
- Apply wood wax
By applying the stain and the subsequent painting, oiling or glazing care and protect wood furniture, wooden floors and many other items. The objects shine in new splendor and are more resistant to external influences. In our guide you will learn through the instructions, which steps you must perform and what benefits the individual measures.
Wooden furniture and floors require regular care to keep their natural appearance. By painting, you also get the opportunity to change the color. But also the stain provides for an adjustment of the color intensity. The previous sanding can affect the appearance even further. But before you start working, you have to decide whether you want to paint, varnish or oil. In our guide you will get help.
Determine the type of wood
If you want to treat wood furniture or wood boards with stain, then you must first determine the type of wood. This is important to choose the right approach and the right products. The wood species can be roughly divided into softwood and hardwood. The most common woods include:
Softwood:
- Spruce, cedar, pine, fir, larch
- Linden, alder, poplar
Hardwood:
- Yew, elm, ash,
- Beech, birch, oak, maple
- Cherry, teak, walnut

Special features of softwood
If the wood has an uneven grain or a mottled pattern, then it is very likely a softwood. By pickling it can happen that the coloring is uneven. This effect can be counteracted by applying a primer.
Tip: Unfortunately, not all primers are suitable for pickling. Therefore, pay attention to the properties of the products when buying.
The primer penetrates into the wood fibers and ensures a uniform coloring of the wood. However, the stain does not enhance the natural grain of the wood. You therefore have two different options for softwood and can either emphasize the natural grain or create a uniform color.
Special features of hardwood
If the wood has an even grain or pattern, then it is probably hardwood. In this case, you can emphasize the wood grain with a suitable stain. Some hardwoods require the application of several layers of stain, so the result is satisfactory.
Preparation and application of the stain
Step 1: Freeing up dirt
The wood must be clean and free of dirt and grease. Otherwise, the stain would have a reduced effect at the sites concerned and the paint would spread the deposits over the entire surface. If dirt particles are on the wooden surface, then you must remove them thoroughly. Then allow the material to dry well before continuing to work.
Step 2: The grinding
Next you have to sand the wood surface. Use sandpaper of a suitable grain size for this purpose. You have the choice of a low or a high grain size:
Low / coarse grain:
The wood surface becomes rougher and a large amount of stain is absorbed.
High / fine grain:
The surface becomes less rough and a smaller amount of stain is absorbed. There is also a smoothing.
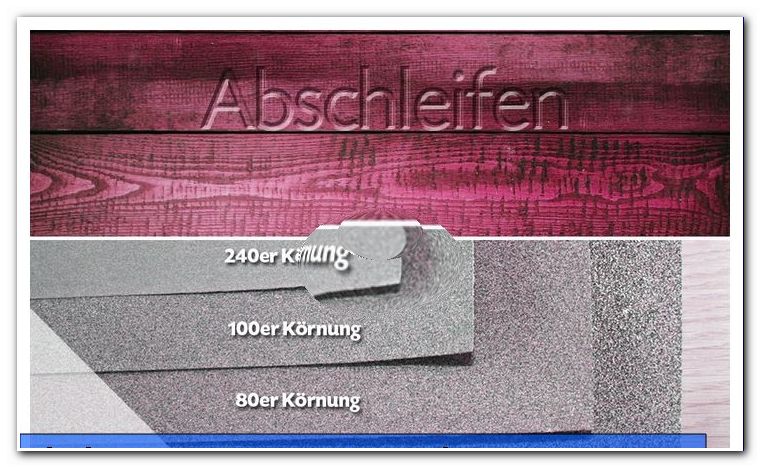
A low grain size is when the grain size is 60 to 80. You can create a smooth surface by starting with a coarse grain and then sharpening with a finer grain. For the second sanding process, for example, you can use a grain size of 100 to 120 (or higher). The finer the grain, the brighter the result after pickling. This gives you the opportunity to influence the color.
As a rule, the wood surface becomes darker due to the stain, so that the color can also be influenced by the amount of pickled pickle. The rougher the surface, the more stain is absorbed.
Tip: You can also grind with grain sizes of 200 or more and thus ensure a particularly bright color. But also the number of pickling processes have an influence on the result.
Step 3: The cleaning
By grinding wood chips have deposited on the surface. These must now be removed. Wipe the wood with a cloth and remove any loose particles.
Step 4: Water the wood
Before the wood is stained, it should be watered. The stain is thus better absorbed by the wood fibers. For this you apply lukewarm water evenly with a sponge. If individual wood fibers arise, remove them with very fine sandpaper and thoroughly clean the wood again before further processing. Let wood dry again before pickling.
Step 5: Pickling
When pickling, it is important that you wear protective clothing. In order to prevent the stain from getting on the skin, you should always wear gloves. Also, make sure the stain is well mixed and, if necessary, stir thoroughly before starting work.

Use a brush, sponge, cloth or rag to apply. When using brushes, make sure to use a brush without metal as the stain may react with the metal and leave unsightly stains on the wood.
Apply the product generously to the surface. When applying, make sure that you work with one continuous movement. In addition, always stroke in the direction of the grain. The surface should be sufficiently and evenly covered.
Leave the stain for about 5 to 15 minutes. A longer exposure time leads to a deeper penetration of the stain into the material. Finally, remove the remaining stain with a rag.
Tip: If you want to test how the wood boards react to the stain, apply the medium to a piece of wood and wipe it off with a rag immediately. This gives you an idea of the speed with which the stain is taken.
It is better to apply less stain first, and possibly make another round to get the desired color result. Too much applied stain, however, can not be removed.

Step 6: Drying
Once you are satisfied with the color of the wood, lay the material on a flat surface to dry. The drying time is around 6 to 8 hours.
Types of stain
pickling powder
Powder stains are mixed with warm water and can be used on all types of wood. Advantages lie in the individual miscibility of the shades. The color intensity can also be influenced by the amount of water used.
Water-based wood stains
If you use a stain that has been made on a water basis, you will get a particularly even shade. This makes it possible to compensate for slight irregularities in the wood. Important: In the after-treatment of water-based wood stains, care must be taken not to use water-based paints as these may cause irregular surface staining.
Wood stains based on water-alcohol
With this stain you get a nice clear and shiny effect, whereby the pores are discreetly emphasized. Another advantage lies in the relatively short drying times.
Solvent-based wood stains
The color pigments are processed here in a solvent. The pores and branches are particularly emphasized and highlighted.
lye pickling
Lye stains achieve the optical effect of a leached oak. The color tone can be influenced by mixing.
Tip: Pigment or color stains easily obscure the grain, which can lead to beautiful effects. Chemical stains, on the other hand, rather emphasize the grain.
Aftertreat the surface

 After pickling you should definitely treat the wood surface as stain does not provide any protection. You can either varnish the wood with varnish or wood oil or wax. This protects the wood particularly well and is less sensitive to environmental influences. The final color of the wood is finally created by the combination of the original wood tone, the stain and the aftertreatment. The sole application of the stain does not protect the wood, it basically just improves the look. Only through the further treatment, the wood surface is protected against mold and weather.
For this you have the choice of different products:
- clearcoat
- wax
- wood oil
Clear lacquer and wax are considered to be very hard-wearing and are therefore used in heavy-duty applications. Wood oil, however, is applied faster, but not so resistant. If it is a floor painting is a good choice. This prevents the cleaning water from dissolving the stain again.
Apply wood oil
After applying the stain, you can apply an oil layer to protect it. This has the advantage in comparison to painting that the wood remains more breathable. In contrast to the paint, no complete sealing of the surface is made. However, this also has the disadvantage that the material is more susceptible to the weather. By sanding before pickling, you have already removed any existing scratches, so you now give the optics the finishing touches. As the oil penetrates and bonds with the material, the wooden table, wooden benches or other objects still feel natural.
Step-by-Step Guide
Step 1: Choose the right oil. This must harmonize with the stain and the wood species. For example, special teak oils or similar products are offered. Hard oil and linseed oil can be used on many woods.
Step 2: Apply the oil.
- One possibility is to use a brush to apply the oil to the wood surface step by step.
- You can also use a rag and put a little oil on the fabric. Then distribute the oil evenly on the wooden surface.
- As a third option, you can tilt a little oil on the wooden surface and then distribute it.
Tip: Be careful not to put too much oil on the wood surface at one go.
Step 3: Let the oil soak in for about 15 to 25 minutes.
Step 4: Remove excess oil with a rag. As a rule, not all the oil absorbs, so you have to lose the rest. If the oil remained on the surface, then unsightly oil stains could arise, which are difficult to remove later.
Step 5: Let the wooden objects dry for about 12 hours. If necessary, apply further oil coatings so that maximum effect is achieved.

Painting after pickling
Step 1: Select a clear coat according to the stain used (water-based or solvent-based paints). Important to note for water-based stains.
Step 2: Choosing the right brush. If you use a water-based varnish, you can use a brush with plastic bristles. For solvent-based varnishes, a natural hair brush is recommended.
Step 3: Apply the varnish on the first draft thinly and evenly along the grain. Then repeat this across the grain. This technique is also called a cloister.
Step 4 Allow the paint to dry sufficiently. Step 2 can be repeated after drying if necessary.
Apply wood wax
Wood wax is a natural treatment to protect the wood. For heavily used surfaces, you can also use a hard wax, with solvent .
If you are using liquid wax, stir it well and apply quickly with a flat brush
When using solid wood wax, apply it with a soft cloth, let it soak in for a few hours, then polish it down.
Tips for quick readers:
- Determine the type of wood
- Softwoods can pick up stains unevenly
- First clean the wooden surface
- work with sandpaper
- fine grain: stain is absorbed less
- coarse grain: stain is absorbed more
- Water wood and sand if necessary
- Apply stain
- Exposure time and frequency determine the color intensity
- Grinding determines the brightness
- then paint, grow or oil the wood
- Clear varnish and wax are very hard-wearing