Spring crafts - 4 great craft ideas for the spring
- Make felt clover
- Required materials
- manual
- Do rattan balls yourself
- Required materials
- manual
- Make tealight holder yourself
- Required materials
- manual
- Dream catcher make yourself
- Required materials
- manual
Spring tinkering in particular is always a nice topic. Spring is approaching, so that you are already looking forward to tinkering with beautiful things. Here we show you nice, fast and simple ideas around the topic of spring crafts.
Our first topic in spring tinkering is the felt clover leaf. The following section contains all the information you need. We wish you a lot of joy in the spring crafts with our craft ideas for you.
Make felt clover
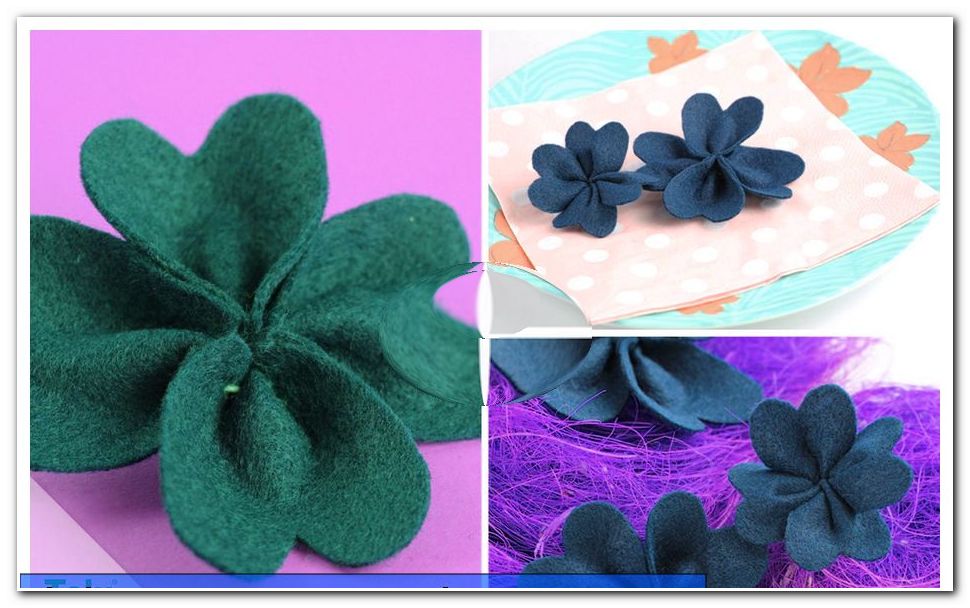
Creating a lucky cloverleaf made of felt
You can use a cloverleaf made of felt to decorate your home or as a lovely gift.
Required materials
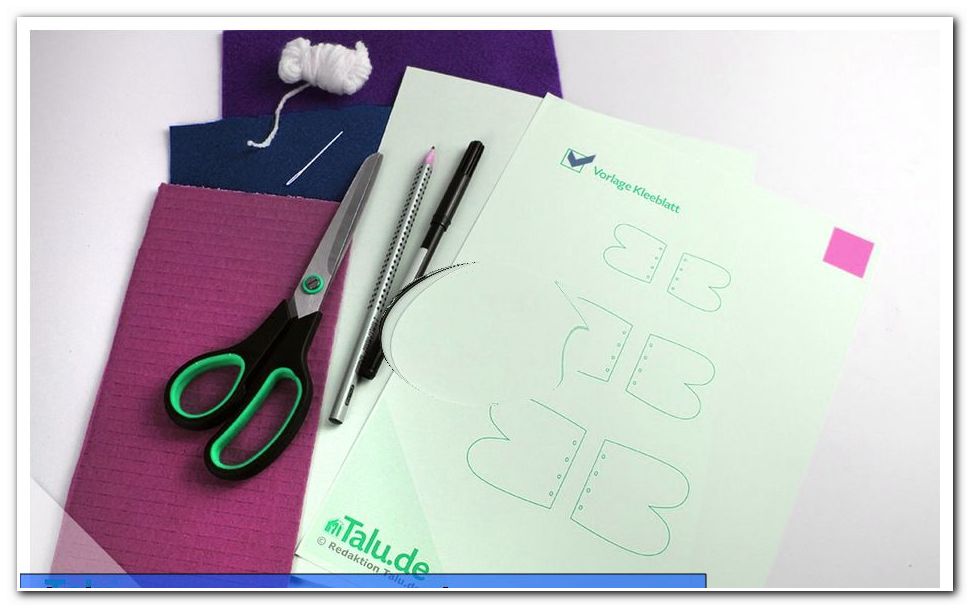
You need this:
- thin felt in green
- Plakatmalstift
- scissors
- needle
- tear-resistant thread
- our template
- paper
- cardboard
- pencil
manual
How to proceed:
1. Print our template on paper, then cut it out.
Click here: To download the template
2. Transfer the outlines of the shamrock piece to cardboard with a pencil and cut it out.
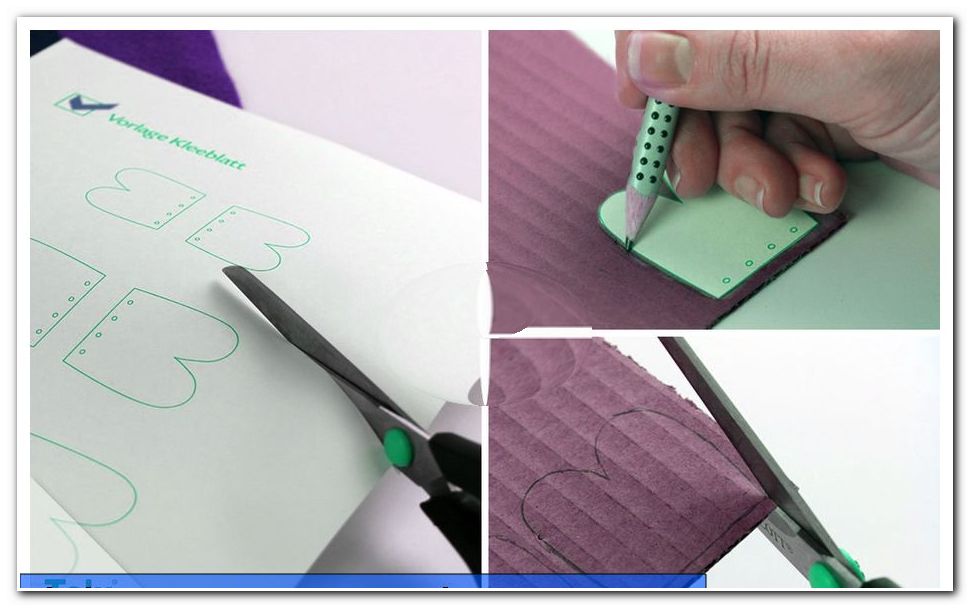
3. Then take the template to draw the cloverleaf element on the green felt several times with poster pencil (Edding).
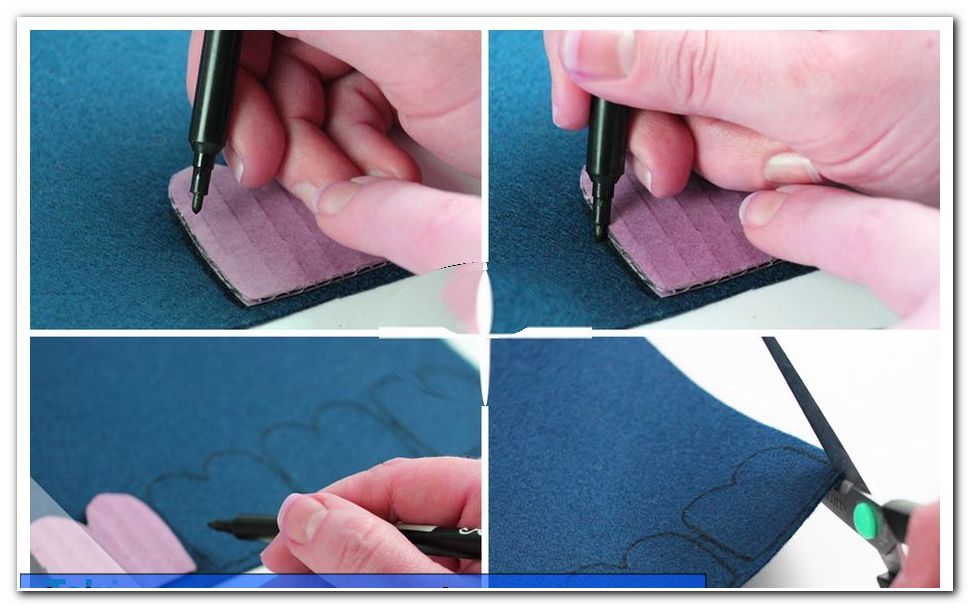
4. Cut out the cloverleaf elements with scissors, see previous picture above.
5. Grasp the needle and thread and thread each cloverleaf close along its edge. Take a look at our pictures - also in the following steps.
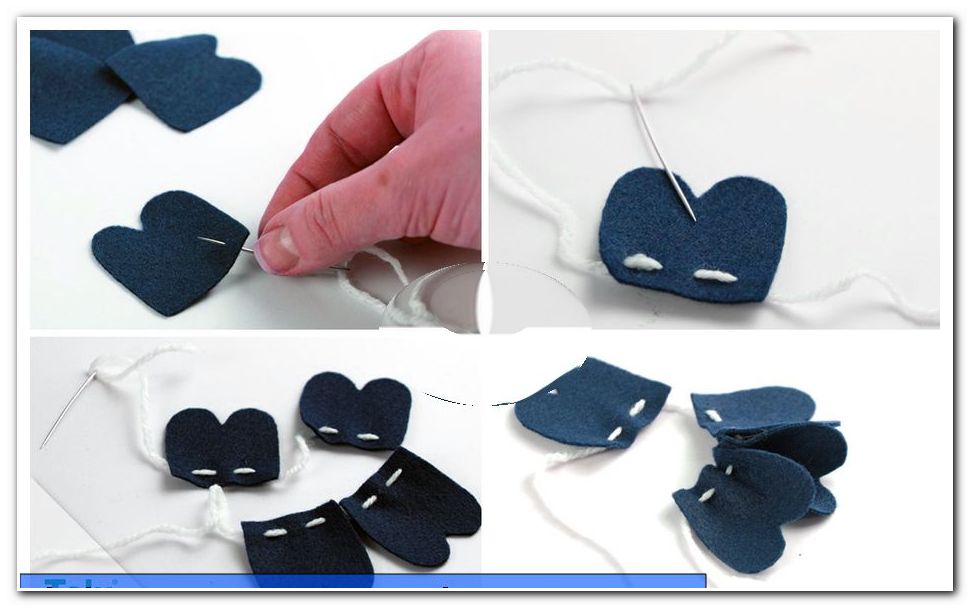
6. Remove the needle and knot the two ends of the thread together. Pull the thread together tightly.
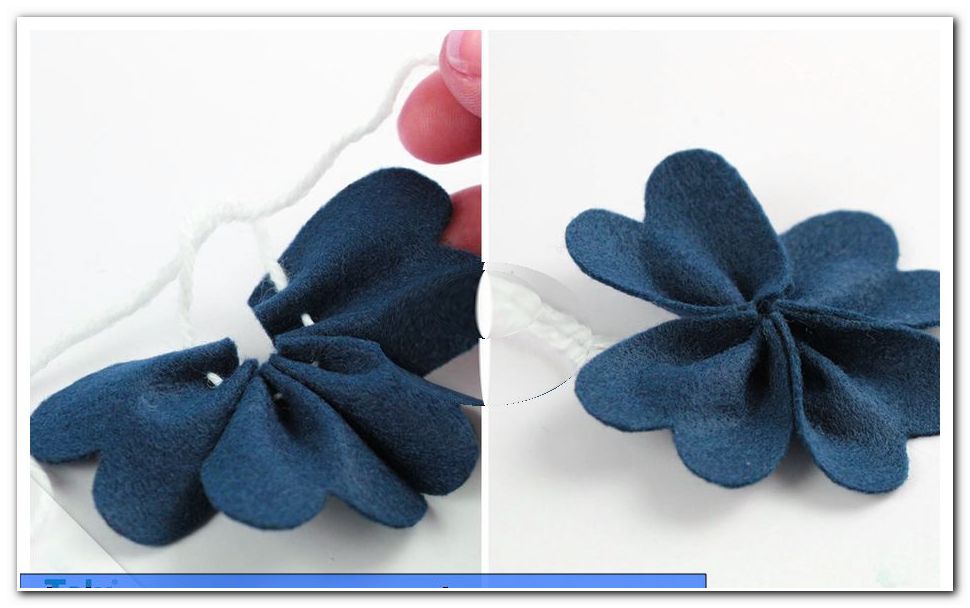
7. Looks beautiful the clover "> 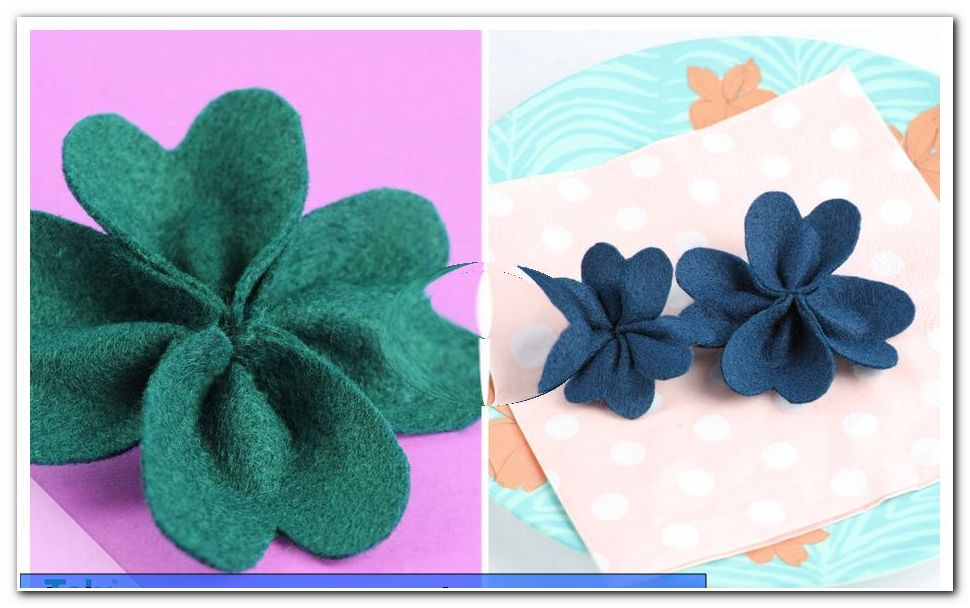
Tip: Depending on whether you want to leave the cloverleaf for yourself or want to reuse it, for example, to decorate a pencil case, the thread is (already) cut off or not.
Our second theme for spring crafts are now our decorative rattan balls. Here we show you how you can easily make these.
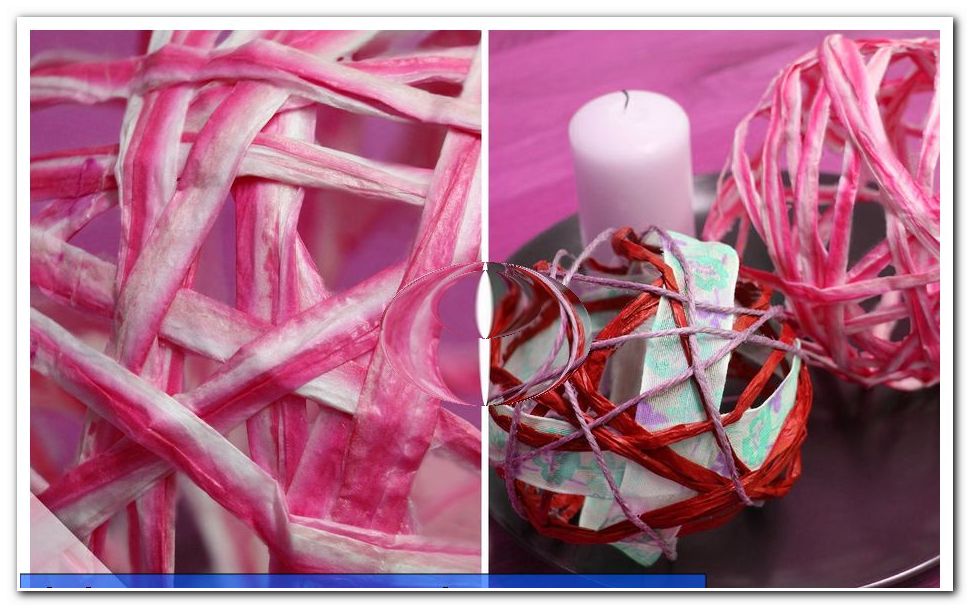
Do rattan balls yourself
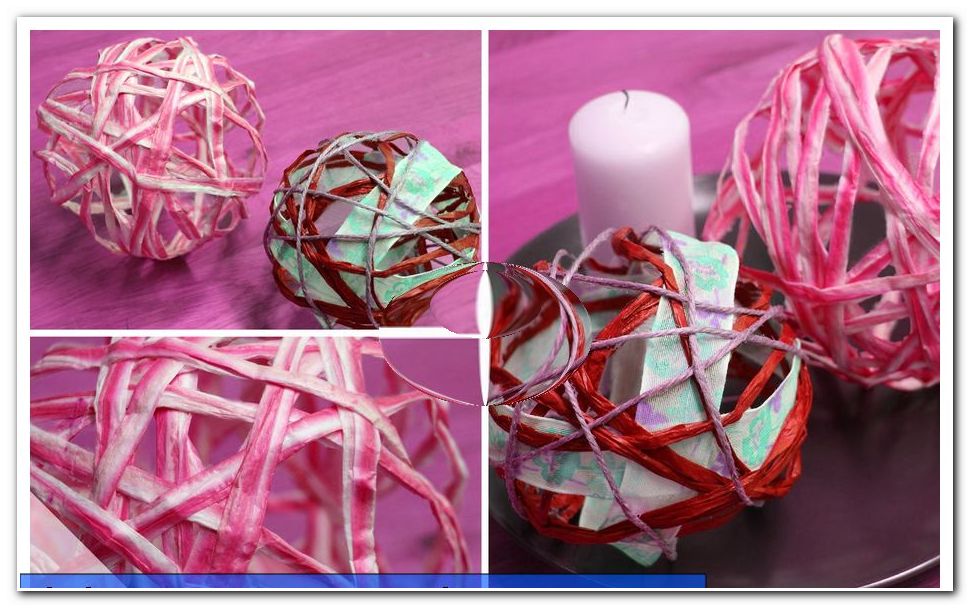
Rattan balls as a cool spring decoration
Rattan balls are especially popular spring elements that you can place in every room.
Required materials
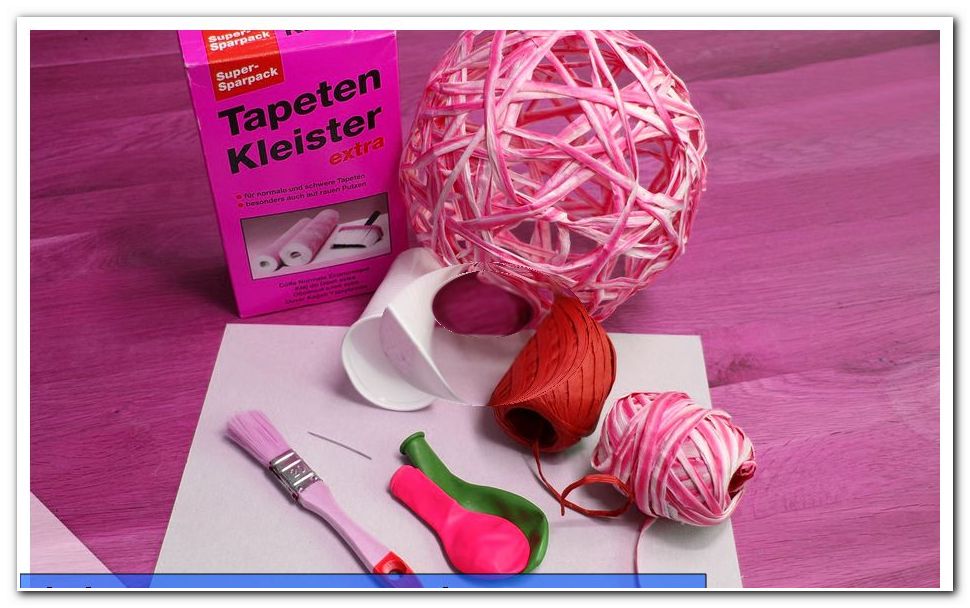
You need this:
- balloon
- Nature sliver
- Wallpaper paste, plastic cups
- brush
- Plastic underlay or alternatively cardboard
- needle
Tip: The natural fiber tape should be kept in a fresh, spring-like color - for example in green, yellow, red or light blue.
manual
How to proceed:
- Stir the wallpaper paste tends to viscous.
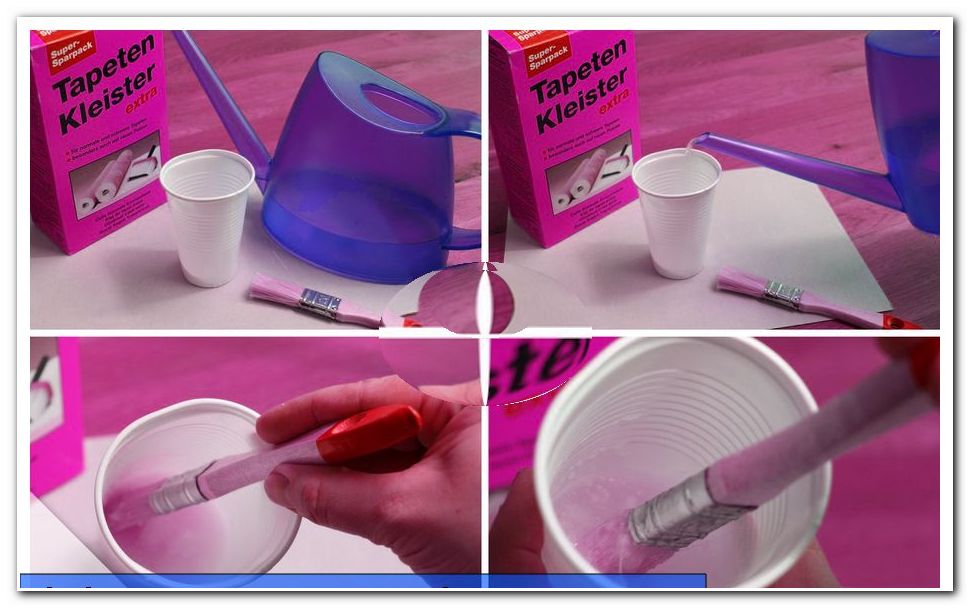
2. Blow up the balloon more or less and then close it with a tight knot.
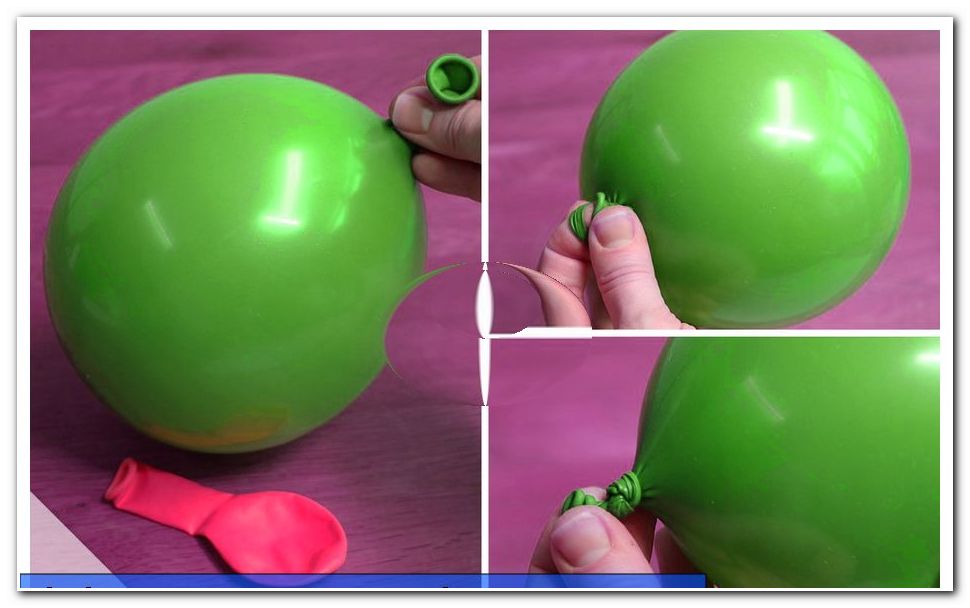
Tips: The more you inflate the balloon, the bigger the rattan ball will be. Be sure to achieve a round shape as possible. If necessary, knead a little. Otherwise, you risk your rat ball being given an oval shape.
3. Then wrap the balloon criss-cross the natural fiber tape.
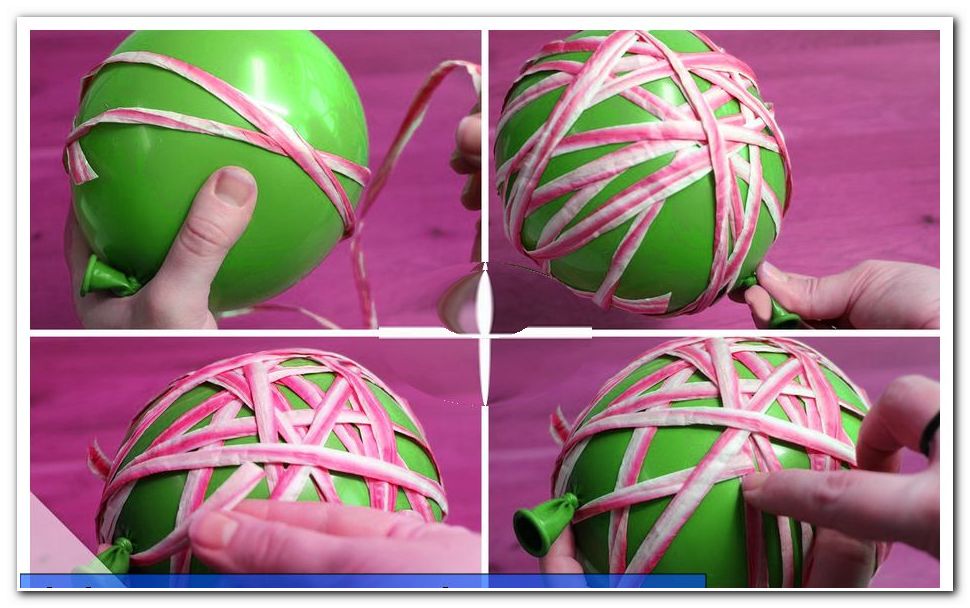
Tips: You can wrap the bulging balloon as often or as strong as you like. Wrap the beginning relatively soon to keep it stable. Push or pinch the end under other tape parts on the balloon.
4. Place the wrapped balloon on a plastic pad or use a plastic cup to help put the balloon on it.
5. Now paint the balloon completely with wallpaper paste (with the help of a brush).
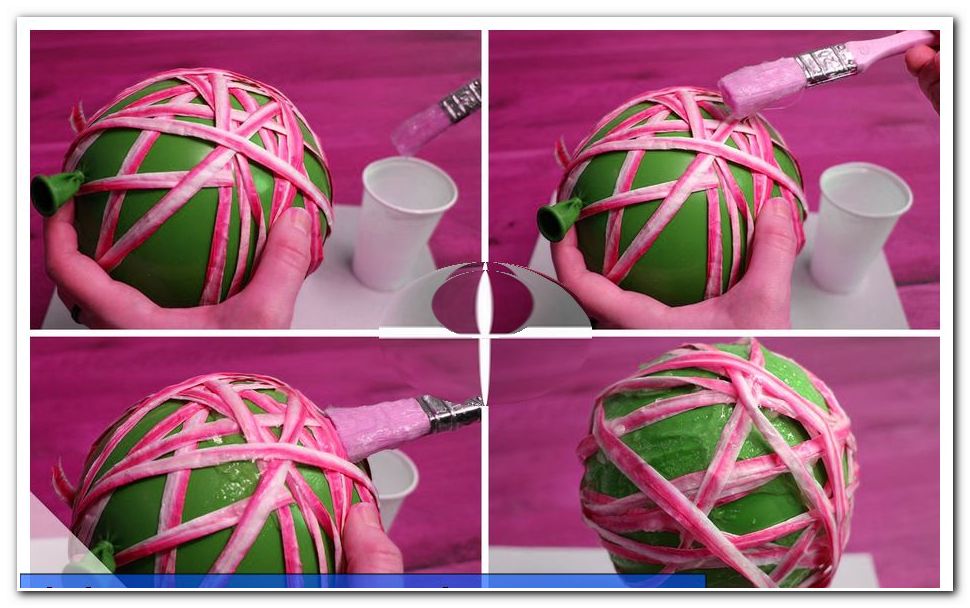
6. Allow to dry for 24 to 48 hours - either directly on the base, on a small glass, in a plastic cup or hanging.
Tip: Of course, you can tinker even more rattan balls according to this principle and all at the same time hand over the drying time.
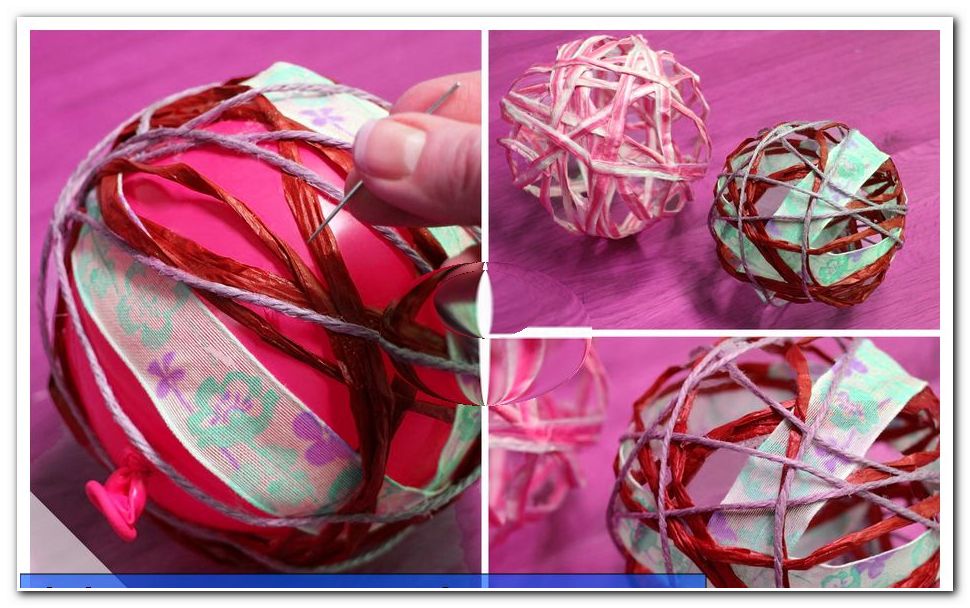
7. Carefully pierce the balloon with a needle and remove it. Your own individual rattan balls are ready for your decoration!
Our next crafting idea for you to make spring crafts is this colorful tealight holder in the form of a flower. You will make it very fast and easy and thus create another eye-catcher for your home and it is another pretty idea for spring crafts.
Make tealight holder yourself
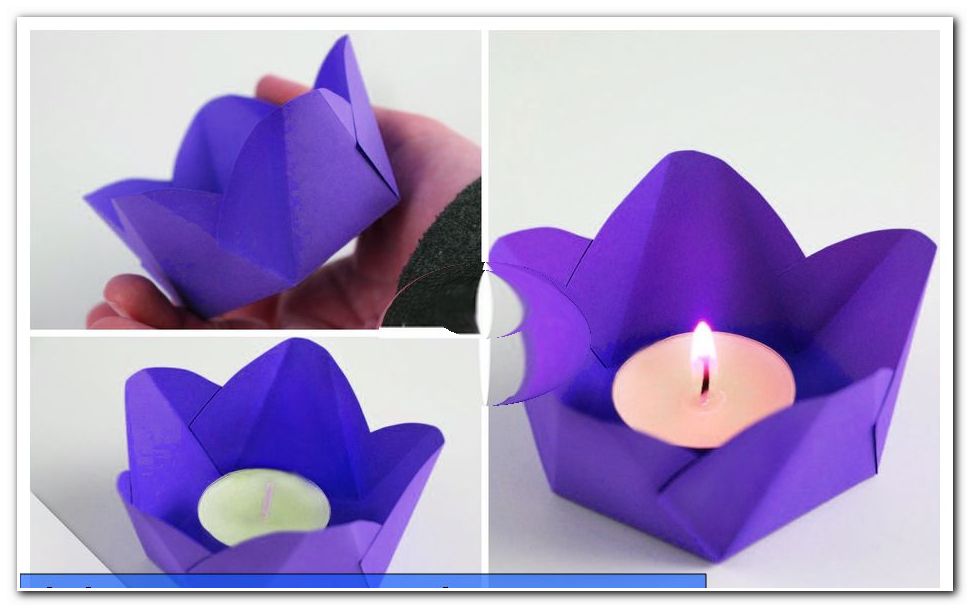
Create beautiful floral tealight holder
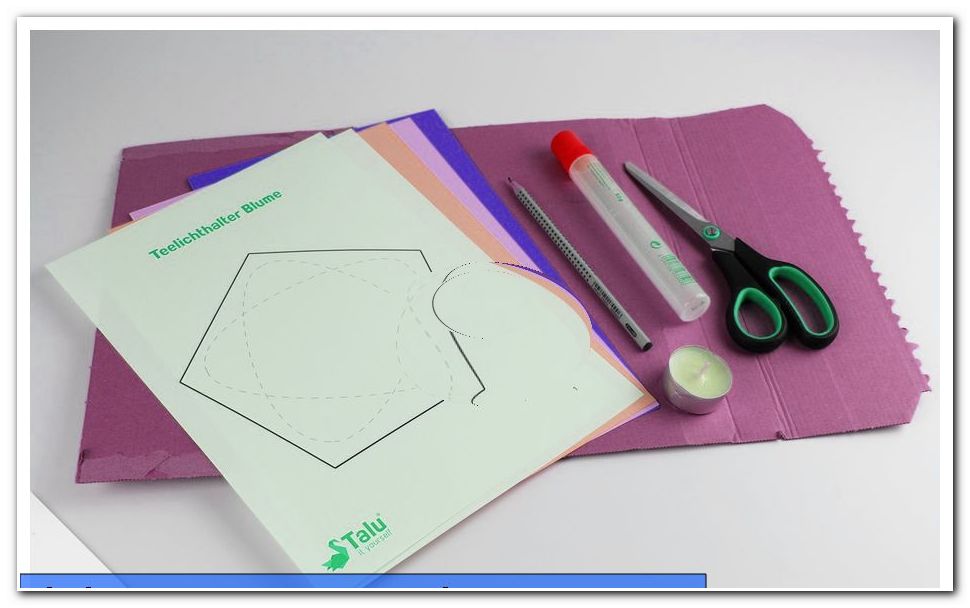
Candlelight does not hurt even in spring. So how about a tealight in a home-made flowered container "> Required materials
You need this:
- thin cardboard or semi-transparent crafting foil
- scissors
- Glue
- tealight
- our craft template
- paper
- pencil
manual
How to proceed:
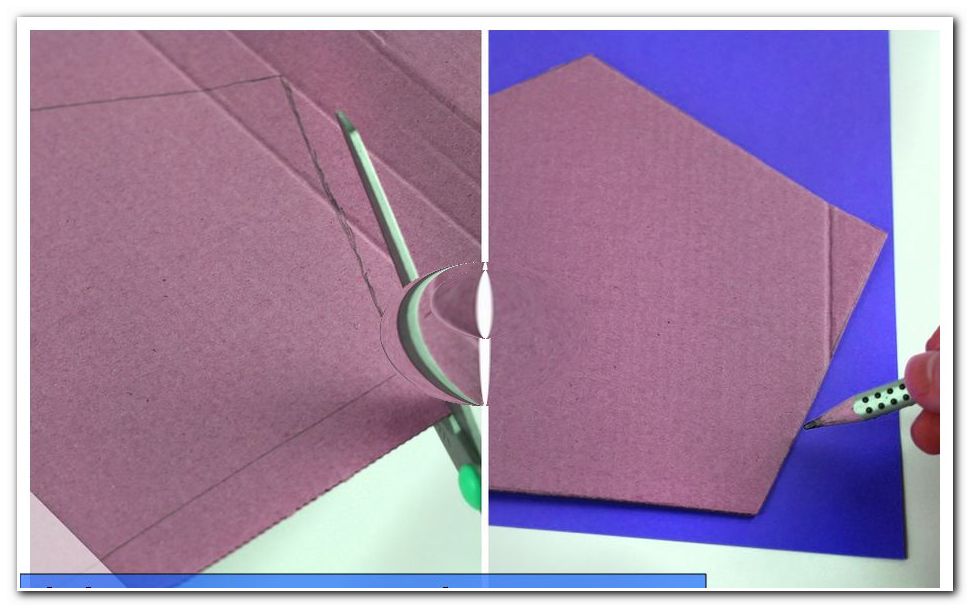
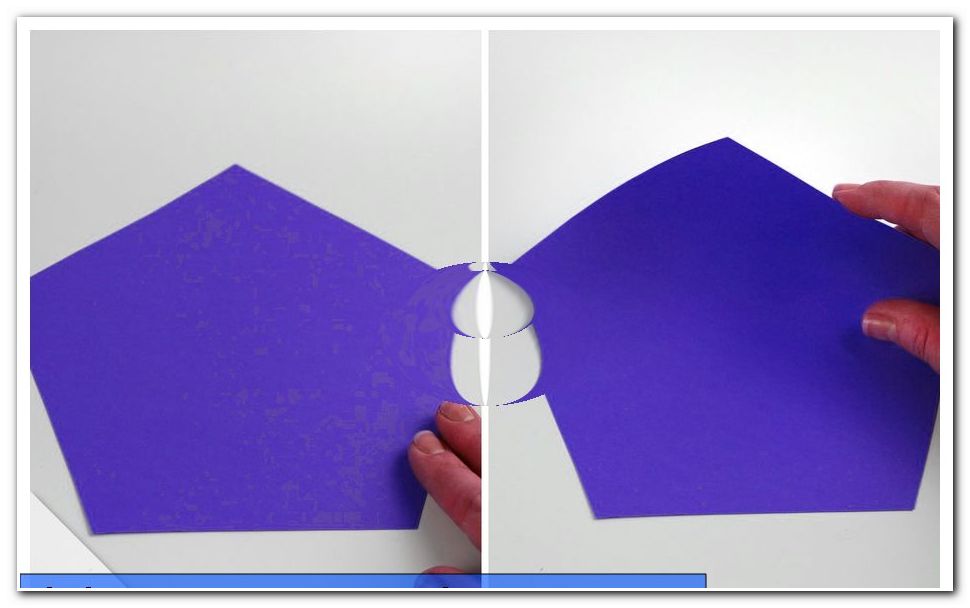
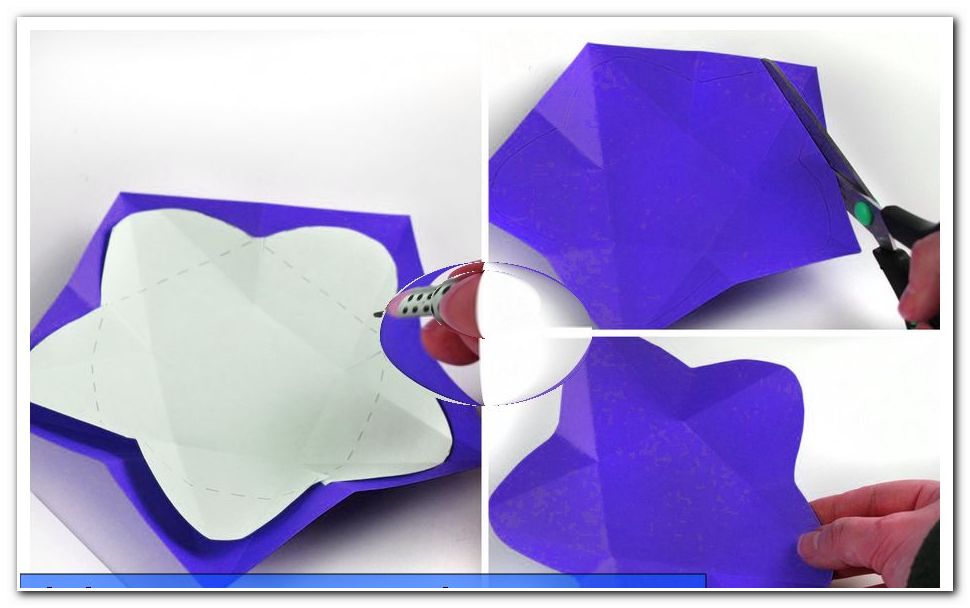
- Print our craft template on paper and cut out the pentagon.
Click here: To download the template
2. Transfer the outlines of the pentagon to thin cardboard or semi-transparent craft foil.

3. Cut out the pentagon again. From him arises in the following the tealight holder.
4. Place the pentagon in front of you so that the tip points upwards.
5. Now it's time to fold the corners of the pentagon in pairs. Simply orient yourself to our pictures.
6. The folds make it easier for you to continue folding the pentagon. First, take care of the section on the top left. These fold together as you see it in our pictures.
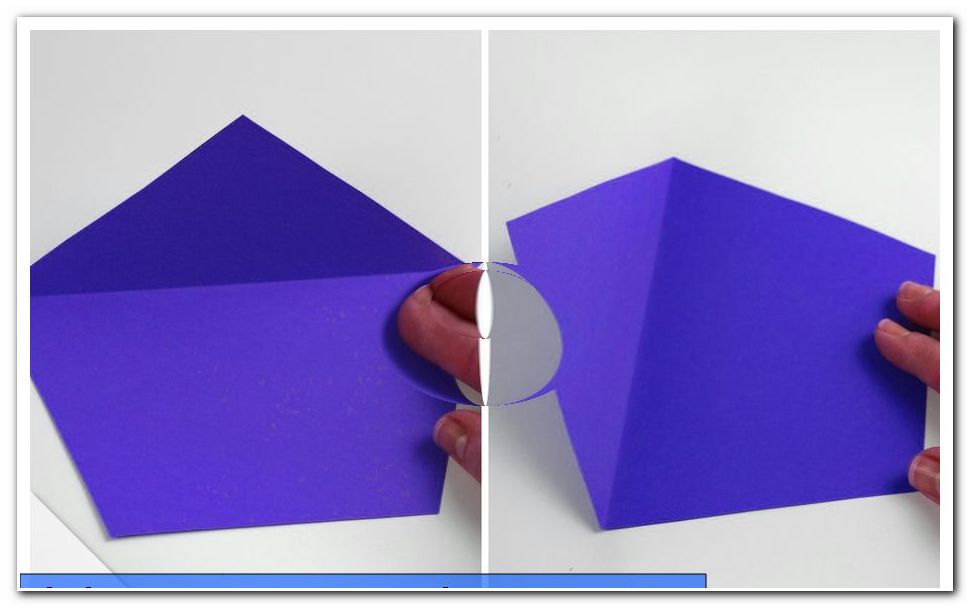
7. Repeat step 6 with the remaining four edges.
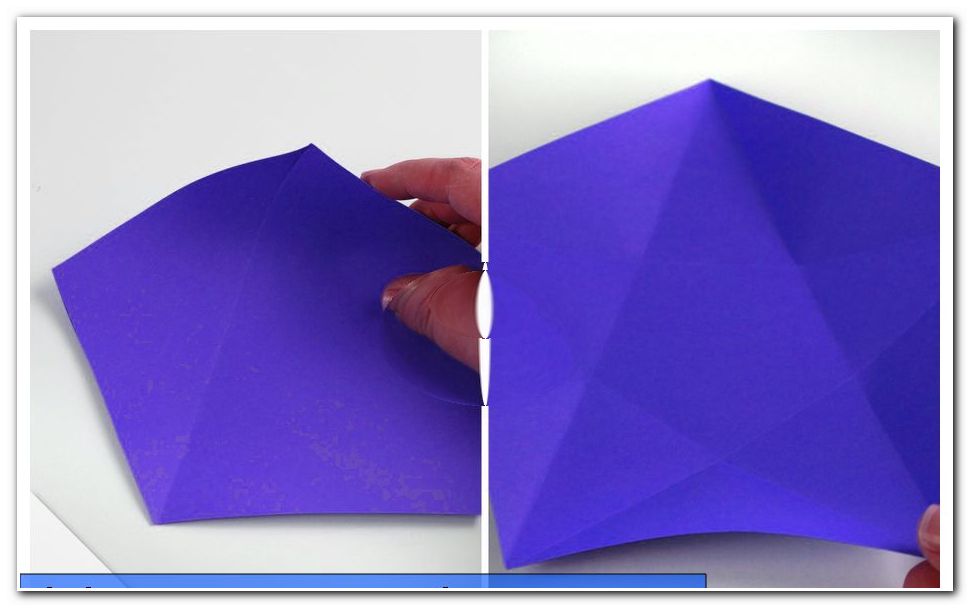
Then fold the resulting corners inwards. This will be illustrated in the next picture.
8. Place now again our crafting template on the color box, which you have previously cut out in the flower shape. Draw the outlines on the color box and then cut out the flower shape from the color box.
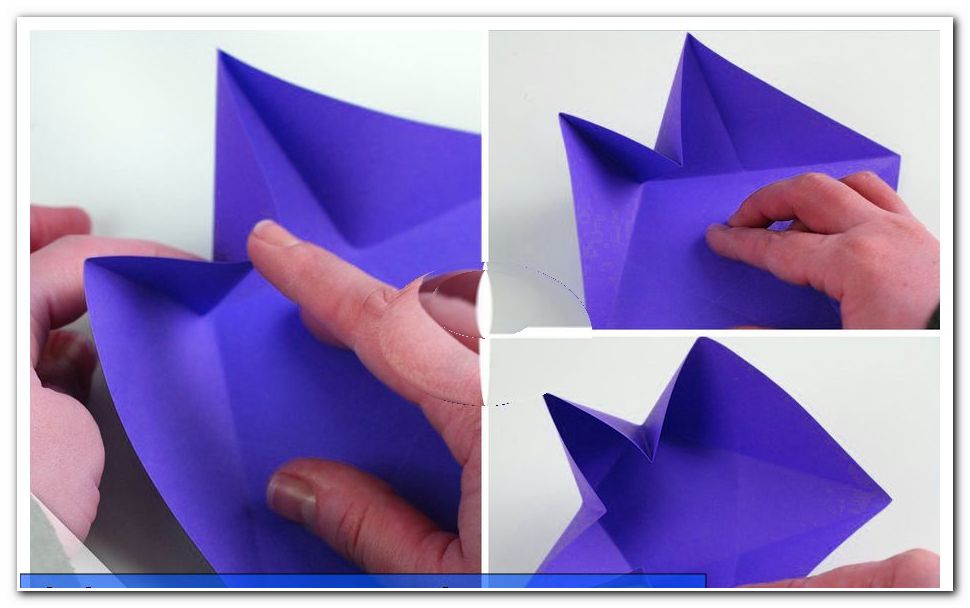
9. Cut the centers of the five folded edges.
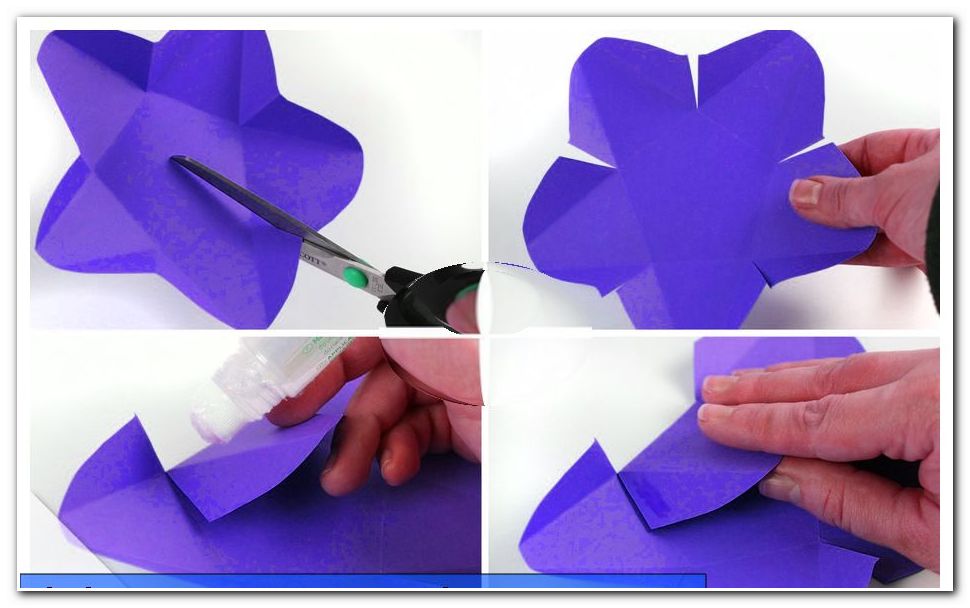
Tip: Before glueing the cut edges, cut along the dashed line. So you get beautiful round shaped petals.
10. Always coat one half of the incised edges with glue and join them to the adjacent ones - this is how the flower-shaped tealight holder gradually becomes.

11. Place the tealight in the container. Done is now your colorful spring tealight holder!
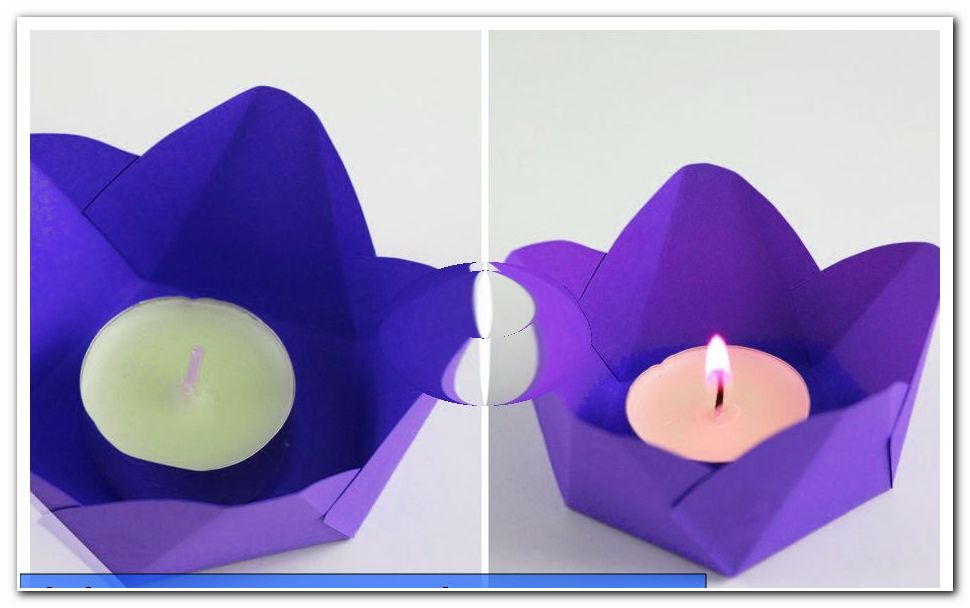
Tips: Work with colorful cardboard or patterned crafting foil to conjure especially spring-like tealight holders. If you have a pattern scissors available, you can use them to cut out the pentagon (step 3). This creates a great edge, which gives the tealight holder even more charisma.
Finally, another wonderful crafting idea for your spring crafts. How about this magical dream catcher "> Dreamcatcher make yourself
With a dream catcher in the spring
To make a loose light dream catcher for a good night's sleep, is therefore recommended in any season more than in the spring.
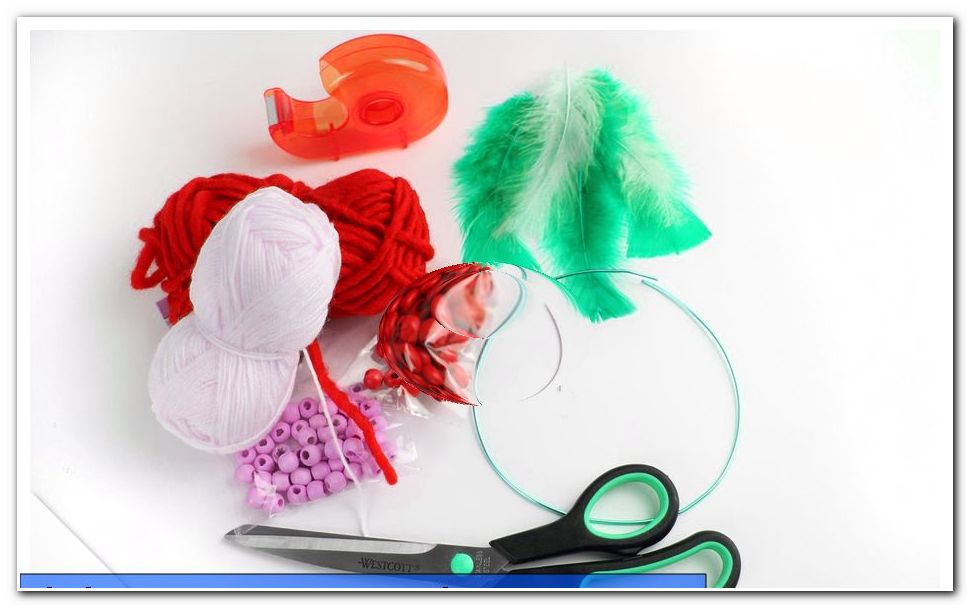
Required materials
You need this:
- Wooden hoop or aluminum wire
- Bastband, ribbon or parcel cord
- Twine, wool or cord
- needle
- scissors
- transparent adhesive tape
- Wood or Indian beads
- Crepe paper
- Bells or feathers from the craft shop
manual
How to proceed:
1. Form the aluminum wire into a ring shape and then close it with a piece of transparent tape.
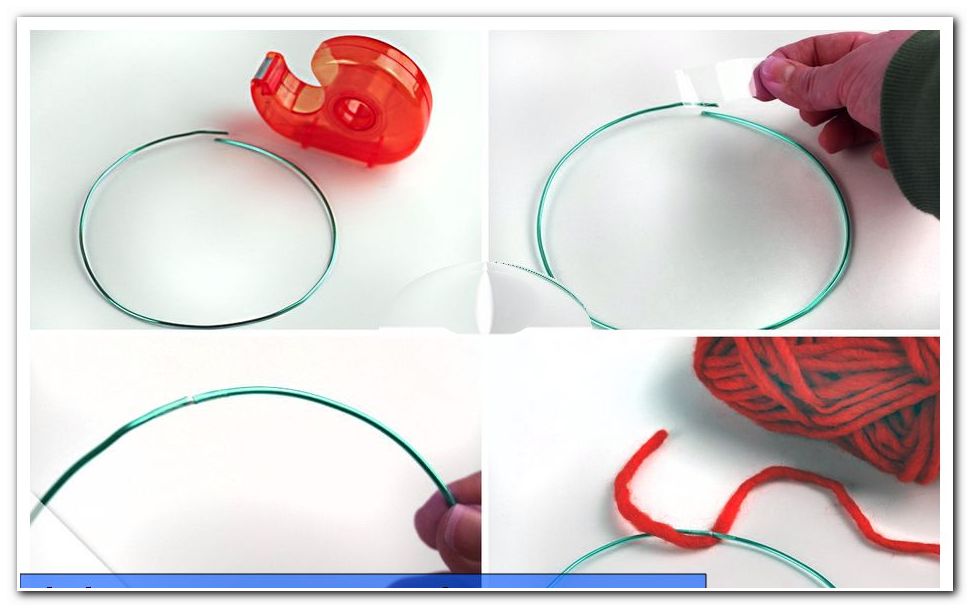
2. Wrap the wooden hoop or wire with a ribbon of your choice and tie the ends tightly together.

3. Tie now the two ends of the tape and close to a suspension loop. So you can then attach your new dream catcher just above your bed. Finally, cut off the protruding ends of the strip with scissors.
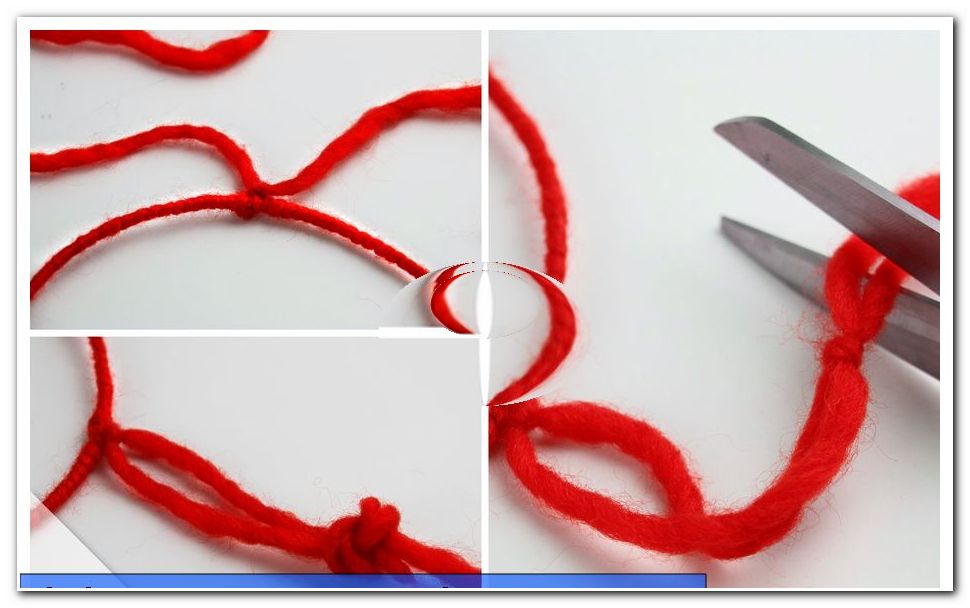
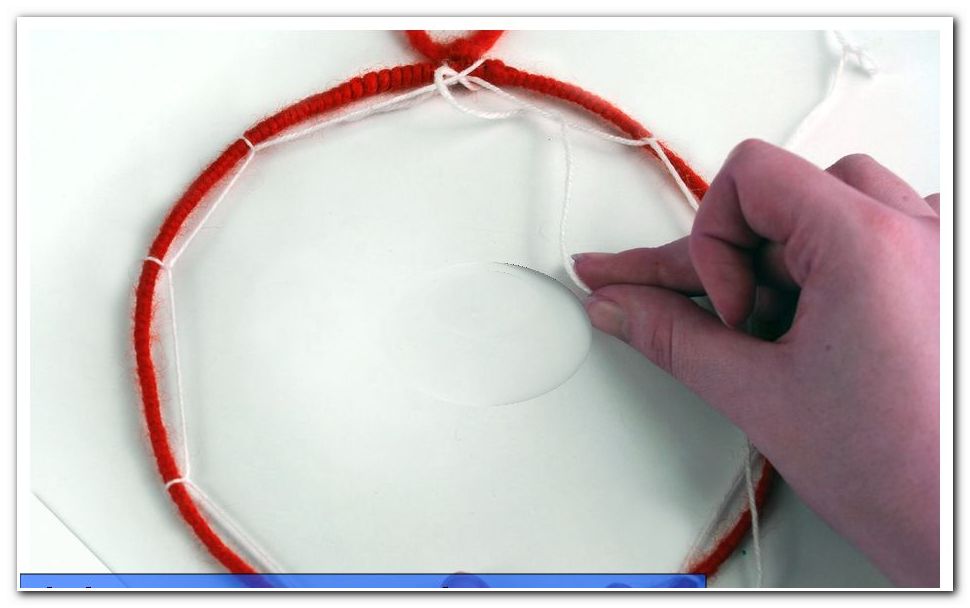
4. Cut off the twine or cord from an approx. 100 cm long piece. Knot one end of the thread anywhere on the wooden tire. Thread the other end onto a needle. See picture below.
5. Then guide the needle with the thread from the front to the back over the tire (see picture above, bottom right) and then through the loop that has formed.
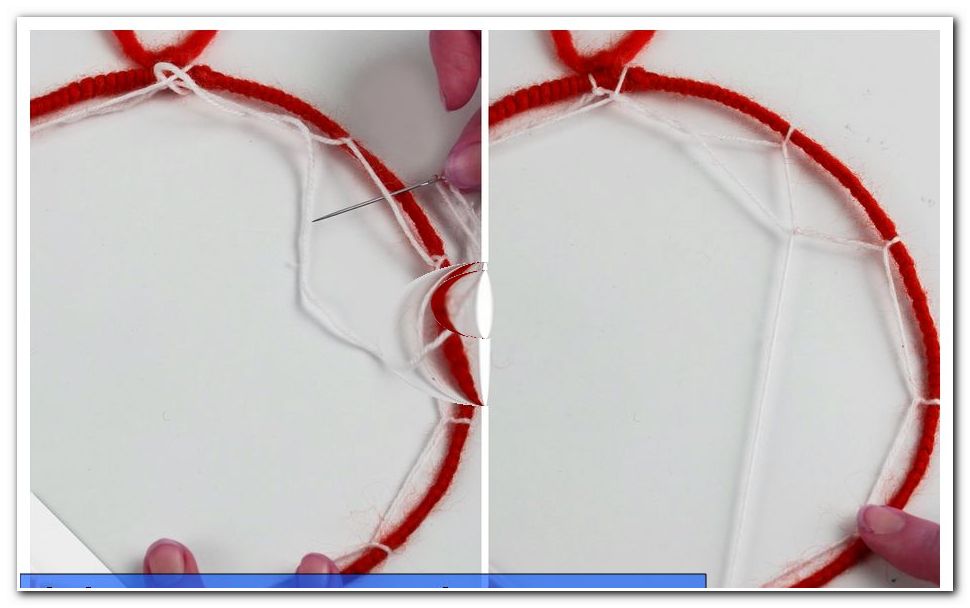
In this way you get a small knot and your loops do not slip anymore. This sounds more complicated than it is. Take a look at our pictures. In the next picture you can see how the result should look like.
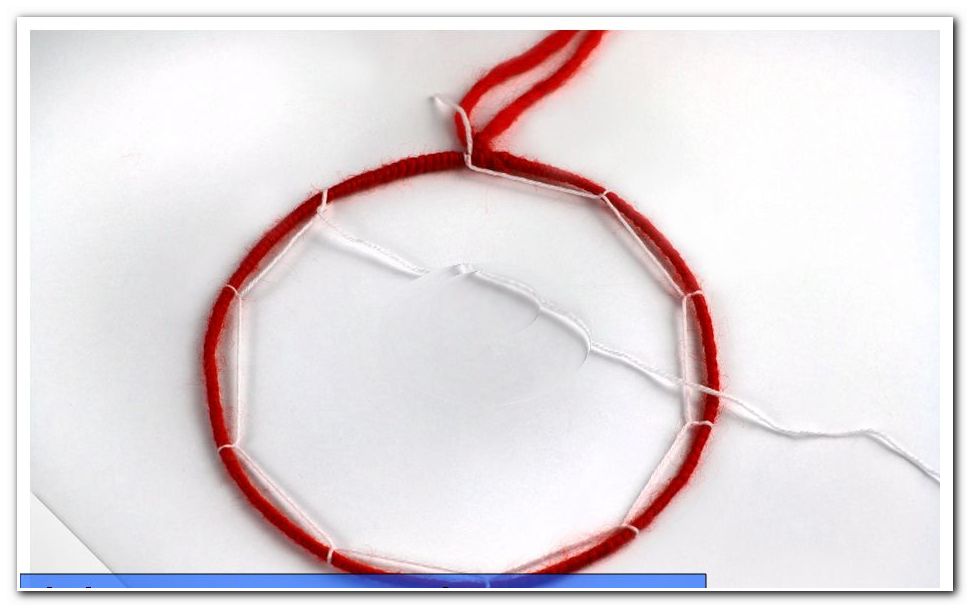
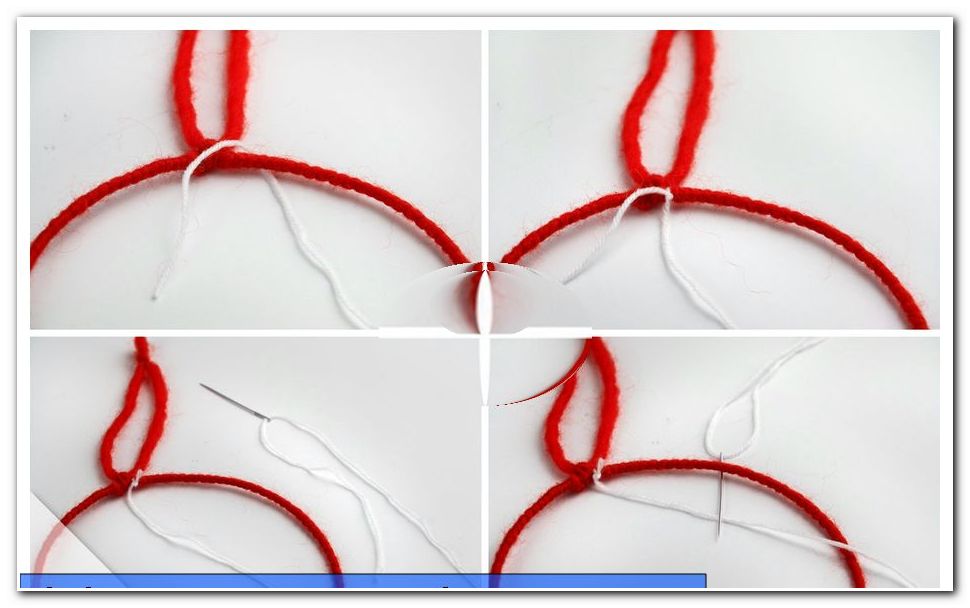
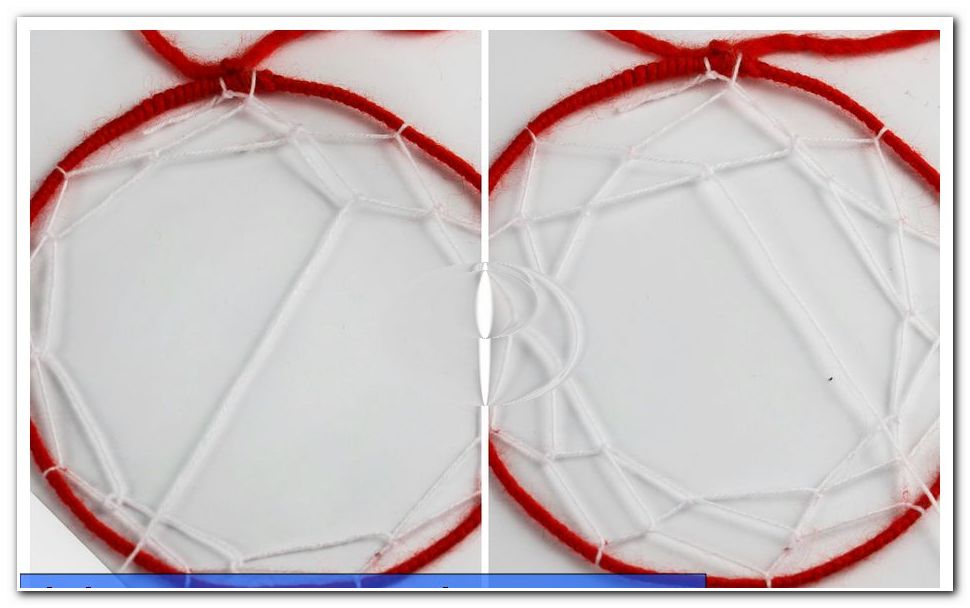
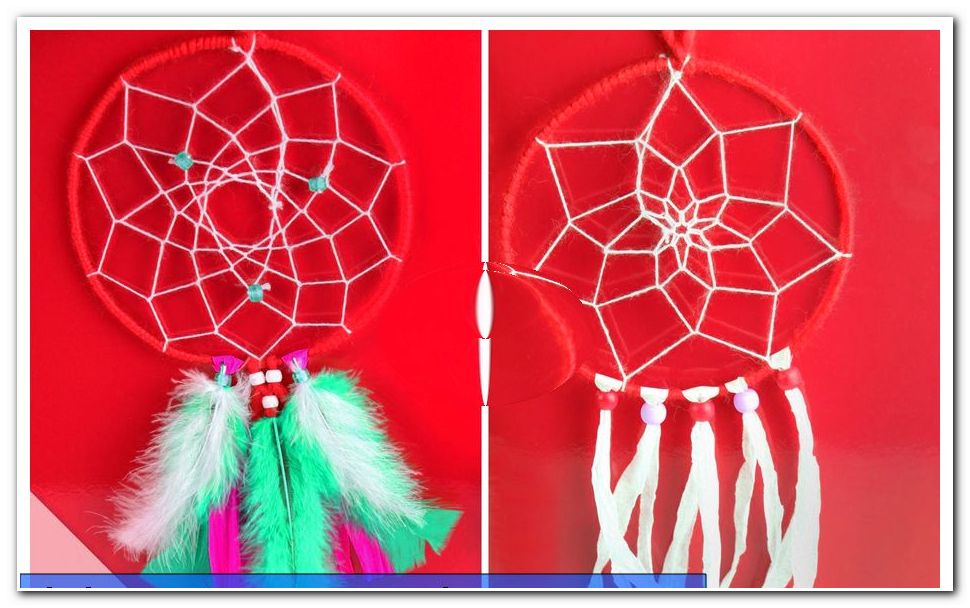
6. In the next step, pull the thread through the ring and loop as shown in the following illustration. In this step, you now close your first round.
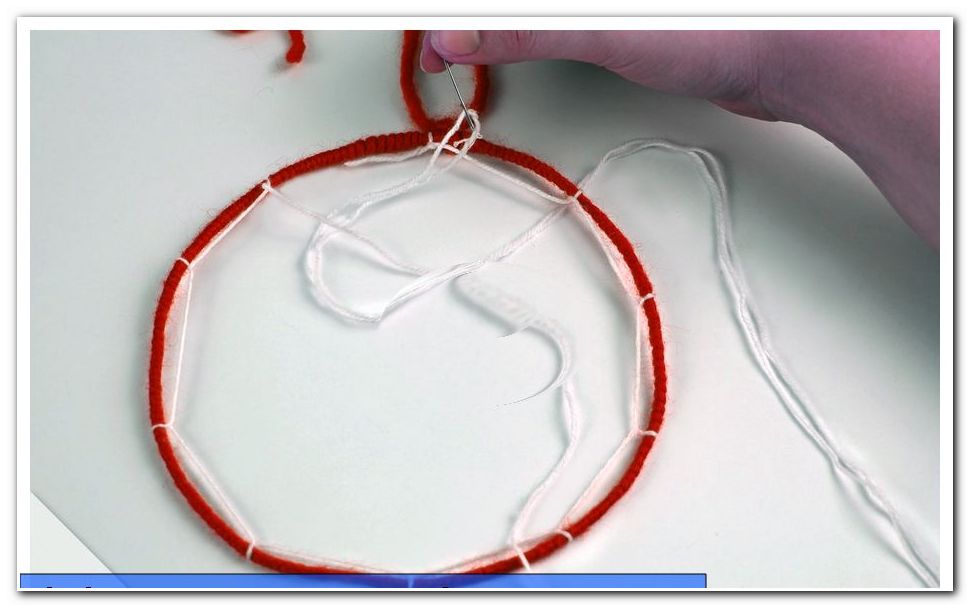
7. Tighten the resulting loop at the starting point, as you can see in the next picture.
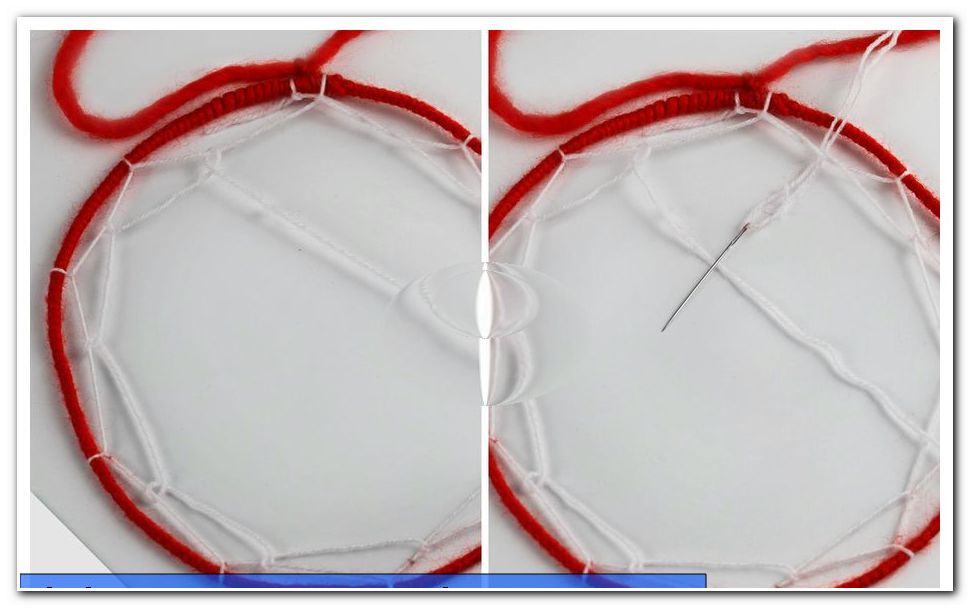
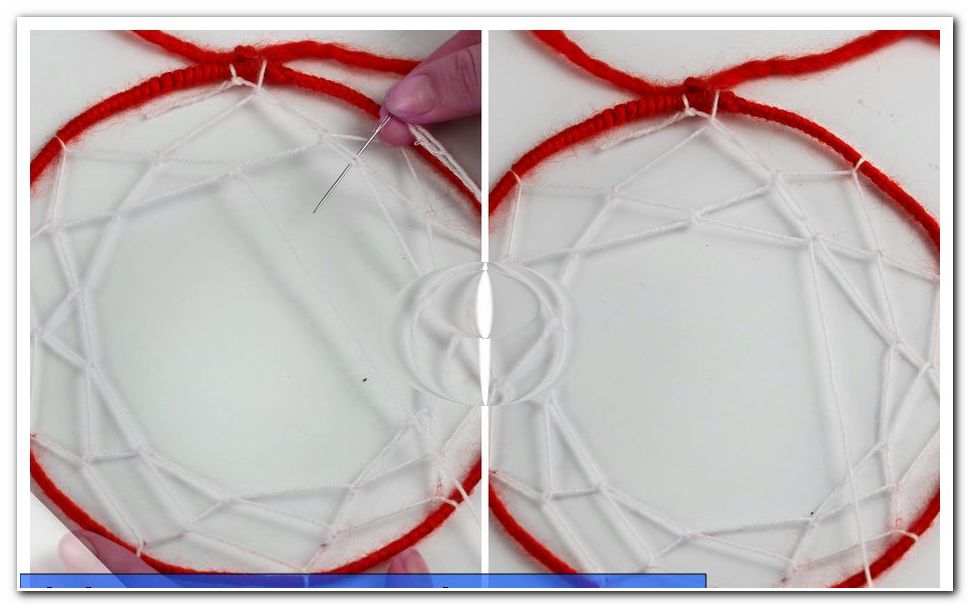
8. Now start a new round by going through the eyelets with the needle as in the picture below.
9. Loosely leave the resulting loop in place.
10. Guide the needle back to front through the following existing loop. Proceed as you can see in the following picture.
11. Proceed in the same way until you reach the end of this round.
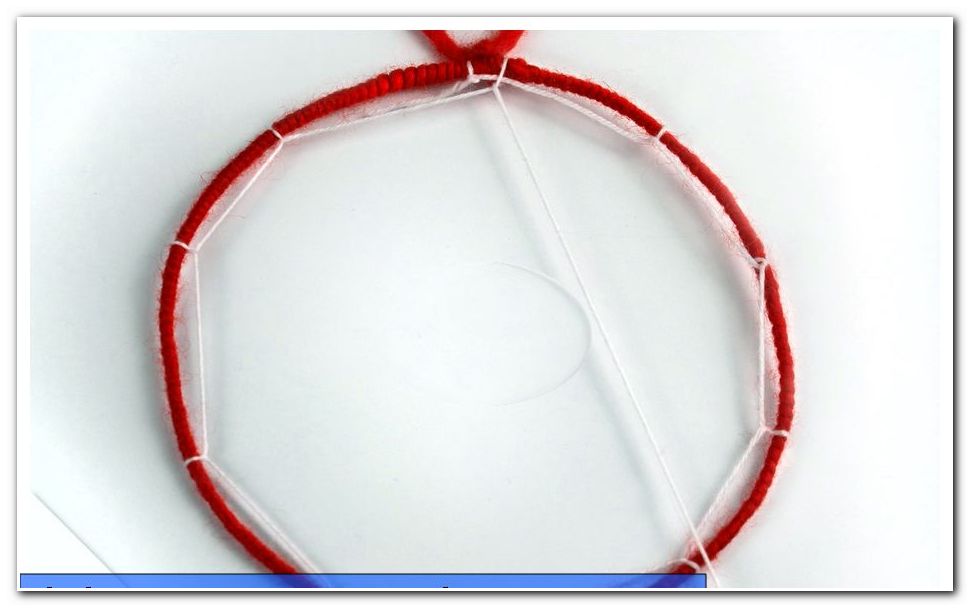
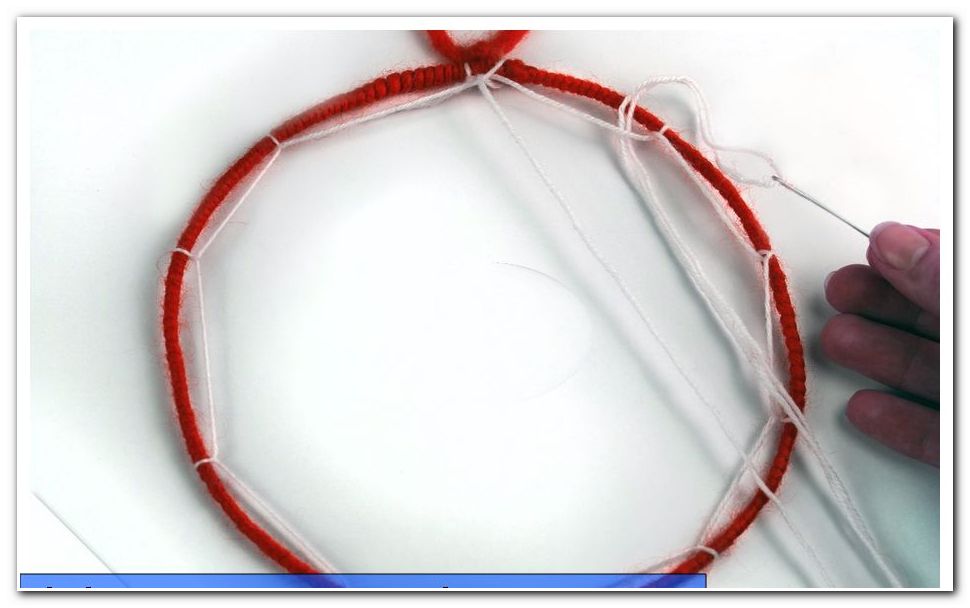
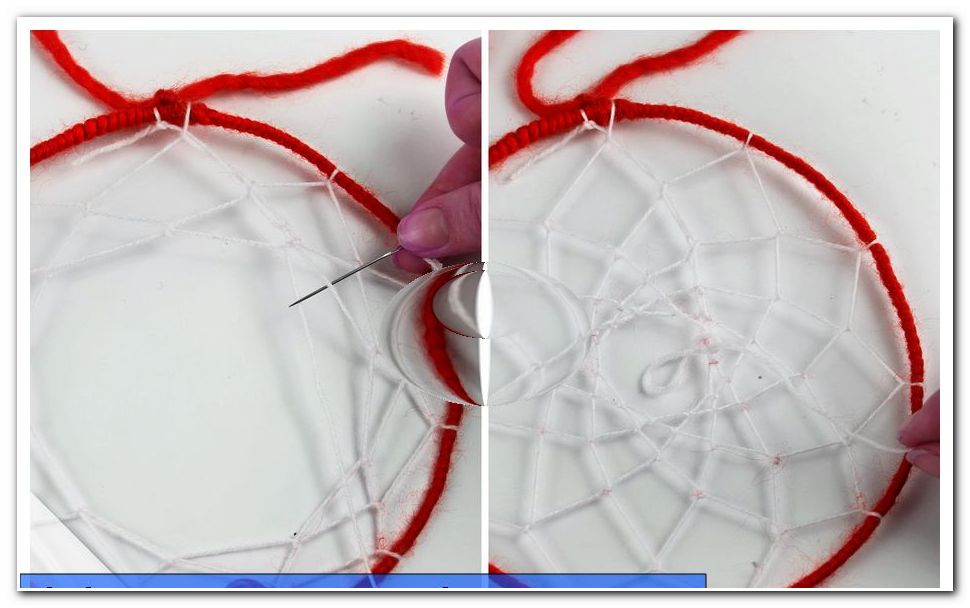
12. Also close this now completed round as you have already closed the first round. Repeat from point 9.
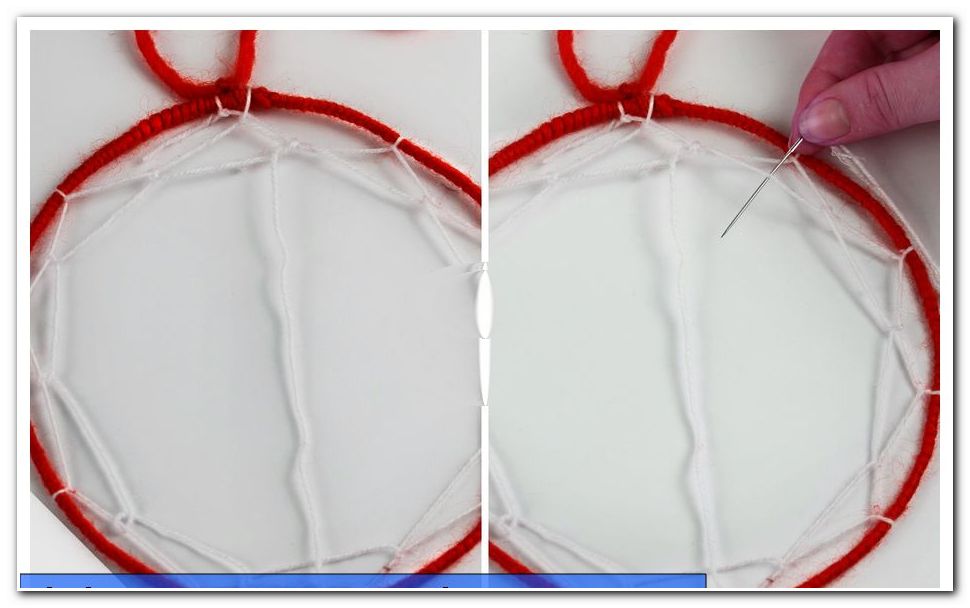
13. Repeat the steps from point 9 again.
Until you can close the net by tightening the thread.
14. Now tighten your created net and tie it to the middle. You can also attach a bead to the created knot later on, then it will no longer be visible.
Tips: While creating your net, you should always keep the thread as tight as possible. This will prevent you from accidentally knotting the net. Despite keeping the thread tight, it is important that the latter does not tear. If this happens, tie a new piece to the old thread and cover the resulting knot with a bead.
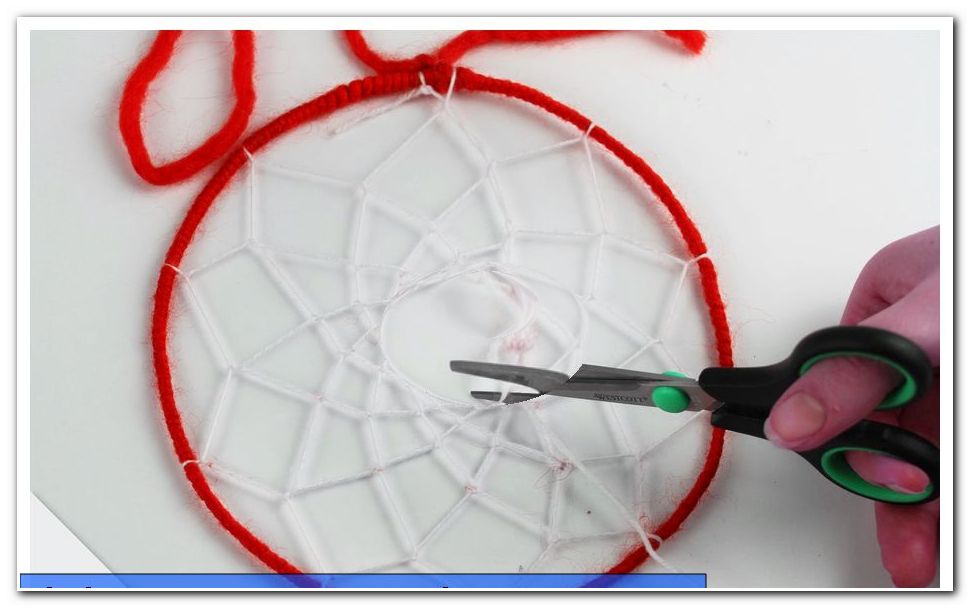
15. After knotting at the midpoint, cut off the remaining thread.
Tip: While you are stretching the web of your dream catcher, you can already integrate beads. These simply thread them in time.
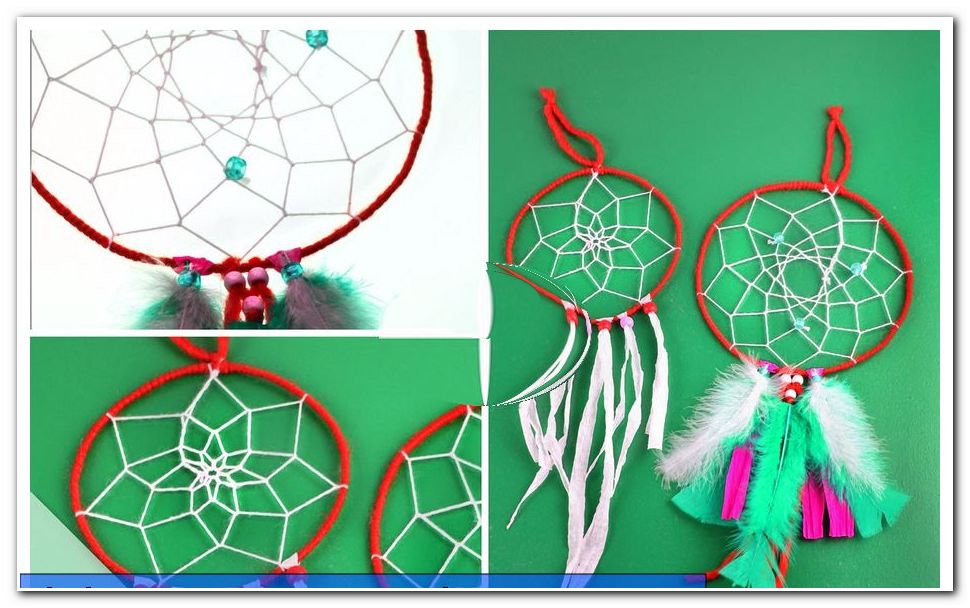
16. Then decorate your dream catcher with beads and feathers, which you attach to other ribbons and fix in the lower part of the wooden tire. The feathers can be put into the pearls and fixed in this way.
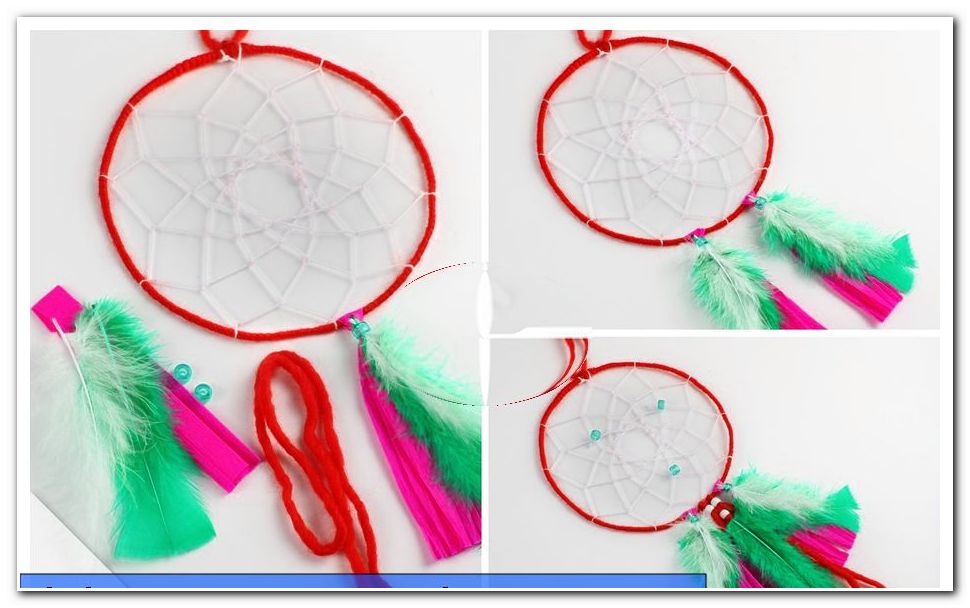
17. Now you can give your new piece of jewelry a beautiful place in your home.
We wish you a lot of joy when tinkering our ideas on the topic of spring crafts! Do you fancy other individual ideas around the topic of creative crafts "> craft ideas for the spring