Leashes with a rattan - 2 DIY instructions

- Classic: Wicker wicker basket
- Bracelet made of rattan
- Instructional Video
- To dye
With the natural material rattan can be created many small works of art: We have two real classic among the popular wickerwork for you. Make a pretty wickerwork wicker basket or a special piece of jewelery step by step: a wonderfully natural braid with cable pattern! Thanks to a relatively small amount of time and materials, these classic rattan classics are also ideal for beginners or children.
Classic: Wicker wicker basket
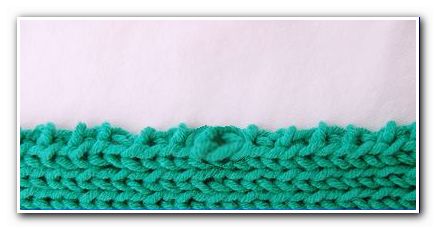
Basket weaving is one of the most famous handicrafts with rattan. So that even beginners can start without any problems, we have opted for the variant with a prefabricated wicker floor. Alternatively, there is the opportunity for braiding professionals to create the floor itself from the flexible natural material. In addition to the easier handling, however, the finished floors offer another advantage: there are so many different shapes, from typically round to rectangular to the cute heart shape, that every taste is guaranteed to come at its own expense!

Difficulty: to be patient, even for beginners
Time required: about one to two hours, depending on individual abilities
Material costs: If you have basic features such as side cutters and dimensions already in the house, you invest around 25 euros for the wicker and the floor.
You need this:
- Rattan: threads (about 2.2 mm thick) *
- Peddigrohr: Staken (about thickness 2.6 mm) *
- Wicker floor (in many forms in craft supplies or online available)
- Vorstecher (awl)
- side cutter
- Measuring tape, ruler or folding rule
- Warm (!) Water and large vessel for soaking

* How much rattan is needed ">
1. The first step is to determine the necessary height of the pegs. These will form the framework of your basket. For the 10 cm high example basket you would add an additional 5 cm as a floor area and about 15 cm as the rest for the edge - you would need bars of a total length of about 30 cm. If you do not plan to produce baskets that are just meters high, you can follow the pattern: Desired basket size in cm plus 5-10 cm bottom plus 15 - 20 cm border.
2. Cut your pegs to the required length using the side cutter or pincers. Cut as many as your basketwork bottom has holes.

3. Now place the stacks about one-third in warm water and let them soak for about 10 minutes. This makes this sturdier rattan tube flexible enough to easily fix the floor afterwards.

4. Thereafter, the so-called "Fußflechten" begins - ie the linkage of the framework with the bottom plate. To do this, pull a first stake with the soaked end through a hole in the bottom - far enough that about 5 cm at the bottom look out again. Do the same with two more pegs.

5. Now fix the short ends to the underside of the bottom plate by placing the first stake first over the second and then under the third stake.
Tip: "Over" means towards the bottom edge, while "below" means towards the bottom.
6. Now you continue with Stake number 2: You lay it over your neighbor - in the direction of the outer edge. Then take them under their neighbor to the center of the floor. There she is now stuck.

7. Repeat steps 4 through 6 until each hole in the bottom plate is filled with a stake and it is intertwined with its adjacent ends at the bottom.
8. Once you have plaited around and returned to the first stake, gently pull it out a little with the help of the awl, leaving enough room to push the end of your last piece of stick through the resulting cavity and fix it in place, Press everything tight!

9. Half done, now you should have a sturdy frame with base plate and upturned pegs in front of you! These empty "pillars" are now braided with the thinner - first soaked for 20 to a maximum of 30 minutes in water - Peddigrohr threads.

10. Take three different lengths of thread from about 50 cm to a maximum of 1 m. (Longer threads would be impractical and would tangle too often.) These should be of different lengths so that they do not end at the same time when braiding. The threads are now placed in three adjoining interspaces, from inside to outside. In other words, the starting pieces point inward towards the center of the basket. Hold it lightly with one finger until tightly intertwined.
Tip: The starting pieces may remain slightly visible. How to find your starting point later. This is important for the basket to become straight!
11. Now lay the first thread:
a) over the other two threads,
b) then behind the next free stake
c) and pull it forward again as in an S-curve.

According to the motto: "The first will be the last!", Thread number 1 has now become the third thread in the series. Following the same principle, we continue with the former second thread, which now leads the series!
12. In this way you work your way forward. Like in a spiral, more and more rows are forming around the framework. Continue until the first thread is used up - or breaks off. That can happen and is not bad. Simply break the break clean with the side cutter and continue to braid as follows.
Tip: In the meantime, always press the resulting rows down well so that no gaps or bumps are created!
13. Place the remaining piece behind the next stake so that it points inwards into the basket. The new thread is crossed over and simply takes over from here the task of its predecessor. Just as from step 11c: The "new" is now thread number 3 and is braided by the other two.

14. Braid the framework until only about 15 - 20 cm of the pegs are visible. These need you for the edge. Be sure to stop with the last thread exactly where you see your initials inside the basket. Only then the basket is completely straight and even. Just let the thread scraps leak inwards.

Tip: If you need longer and your threads become dry in the meantime - and thus less flexible - simply moisten them again with a little water.
15. To finish, soften the protruding pegs or, most likely, the entire basket upside down in your water jar - last about 10 minutes.
16. For a simple edge, first lay each stake behind the next and pull it forward again - very lightly, creating small loops. Once they have done this step around, then all the pegs point outward like sunbeams. The last stake pull you through the first space, as if you wanted to knot it.

17. Finally, bring the "sunbeams" inward by pulling everyone in through the second loop.

 18. Now everything is well intertwined and very stable. Cut too far inward ends with the side cutter - but not too tight: let stand at least an inch, so that the stakes can still support each other well. Finished!
Bracelet made of rattan
Someone may still know the second classic of wickerwork with a rattan cane: nature lovers have the opportunity to weave pretty bracelets out of wicker. This naturally beautiful jewelry is completely free from questionable additives - and looks remarkable. If you like it colorful, you can color the finished piece of art with simple means: Following the basic instructions, you will learn how!
Tip: In smaller form, the bangles become stylish napkin rings.
Difficulty: No problem for patient beginners!
Time required: Depending on the skill, between 30 minutes and one hour of work.
Material costs : About 10-20 euros for the rattan - everything else most DIY friends already own.
You need this:
- about 2.5 - 3 m rattan (in any thickness between 1.8 and 3.0 mm)
- warm water
- Vessel for soaking (bucket, sink, etc.)
- side cutter
That is how it goes:
1. To make the rattan flexible like rubber, soak it in warm water for about 5 minutes. In any case, save it after 25 minutes from its bath, as the natural substance becomes brittle again with longer soaking periods.
2. Now lay your rattan thread twice in your hand so that it forms two rings of equal size. Keep them well in place, that nothing slips any more, once you are satisfied with the scope. The diameter should correspond to the size of the later bangle. So make sure that your hand fits comfortably through, but does not slip out.

Tip: If it should be a gift, consider a diameter that could fit or measure well - secretly - another piece of jewelry that suits the recipient well.
3. Now you have three components in front of you, with which we will work in the following, their two rings formed in step 2 and the resulting long wicker thread. For the sake of simplicity, we call the left ring A, the right B, and the flow thread C.

4. Like braiding, cross B over A first and then pull C under A once. Then C should be on the far right of both rings B and A.
5. Now the other way round, first the left ring (in picture B) is pulled over the right ring (in picture A) and the thread C runs through the middle once, so that C then lies completely to the left again.

Tip: Slant C with the side cutter to make threading easier.
6. Continue to weave until you have got around the entire circumference. The procedure is always the same: First, the rings intersect alternately, then the thread pulls through the gap once on the leftmost, and after the next ring crossing on the right side.
Tip: It sounds more difficult than it is in the direct execution. Just try it out practically!
7. Once you have circled the circle and thus have returned to your starting point, it is only to be noted that the braid thread C does not cross with the initial thread - which still looks out of your braid - but always parallel to this runs.
8. In this sense, continue to braid by pulling C alternately left and right through the cavities. In doing so, orient yourself by the already visible cable pattern. A and B no longer intersect, but are already fixed by the first braid round. Always orient yourself for a whole round on a thread. If this round is done, take another.

9. Depending on how thick your bangle is to be, stop after three rows per thread or continue to braid until the thread barely fits through the gaps.

Tip: In the meantime, if your rattan cane thread becomes too dry and therefore inflexible, just moisten it with water again and again.
 10. Finally, insert both the end of C and the out-looking leader into the circle so that both face the inside of the bangle. There you separate both ends with the side cutter close to the bangle, so that they can be easily clamped.
11. Done! As long as your bangle is still a bit clammy, you can pull it in shape as desired.
Instructional Video
To dye
Whoever finds the "raw state" too dull or rough, paints the bangle with thinned wood glue. To bring some color into play, there are the following before painting
Possibilities:
a) stain with wood stain
b) create loud tones with silk color
c) Use natural colors such as onion skins, chamomile or beetroot for a gentle result

Tips for quick readers:
- Basket made of wicker with prefabricated basket braiding plate
- Soak the peg, cut it, pull it through the bottom holes
- Intertwine and fix the foot
- Braid framework with three wicker threads
- Press all rows well
- Form edge of scaffolding pegs
- Bracelets of wickerwork braid
- Soak the rattan thread well
- Put the thread over your hand
- Make two rings with it
- Intertwine according to the braid principle
- Thread alternately penetrates both rings
- In the second pass thread follows cable pattern
- Make ends disappear inside, separate
- Dye and paint as desired