Learn how to make a felt crochet - basics and DIY instructions

- Basics
- Häkelschriftzeichen
- Filet crochet - the techniques
- Crochet the air stitch
- Crochet chopsticks
- Crochet the patent sticks
- Calculate stop
- Filet crochet instructions
- Air Mesh Chain + Row 1
- Row 2
The filet crochet is ideal for crocheting self-designed, straight-sided doilies, small table runners or even large curtains. At first glance, the crochet patterns look complicated, but they are not. With us and the following instructions, you can bring light into the dark and learn Filetti crochet.
A filet crochet pattern is based on a template, a crochet script, which has to be understood. Of course you can also design such a template yourself.
In the following basic instructions we will explain the crochet characters used and the crochet techniques you need. Filetakers can actually be compared to "painting by numbers" because it is based on a counting pattern. For crochet beginners this is a pretty easy way to start your new hobby. However, you should know - this guide is for beginners. The filet crochet is a wide area where you can discover much more.
Basics
We start our tutorial with the basics necessary for filet crochet. The Filet crochet is an imitation of Filetstickerei. The crocheted filet net is made up of meshes and chopsticks, which on the whole make a pattern, just like in embroidery.
Häkelschriftzeichen
There is a symbol in crocheting for each technique that tells you exactly what to do in which place in the template. For simple felt crochet you should know the symbols for the air mesh and the chopsticks.

Note: We recommend crocheting patent sticks when filet crocheting, instead of single sticks. These result in a better and more uniform stitch pattern. Nevertheless, we will introduce you to both variants.
These symbols are to be found in some templates, so we wanted to mention them.
But it is much easier: A complex crochet pattern of air mesh and chopsticks can now be transferred to an even simpler cross pattern - perfect for every beginner. This consists of empty boxes and boxes with an X. Most filet-crochet templates consist of these boxes.
IMPORTANT
empty box: 2 air meshes, 1 sticks (patent sticks)
X-box: 3 sticks (patent sticks)
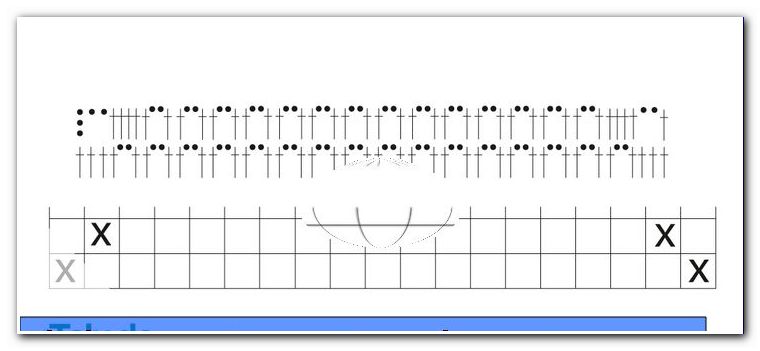
These two lines are the first rows of our example pattern from the tutorial.

The exercise scheme with the boxes is simplified. Therefore, the boxes are much better suited for the self-creation of such templates - the dots and dashes can confuse very quickly when designing.
Tip: If you create a template yourself, you should start with a symmetrical image. This is very easy to crochet compared to unsymmetrical designs.
Filet crochet - the techniques
Now we'll explain how to crochet air mesh and rods (or patent sticks). Each picture shows you exactly what to do.
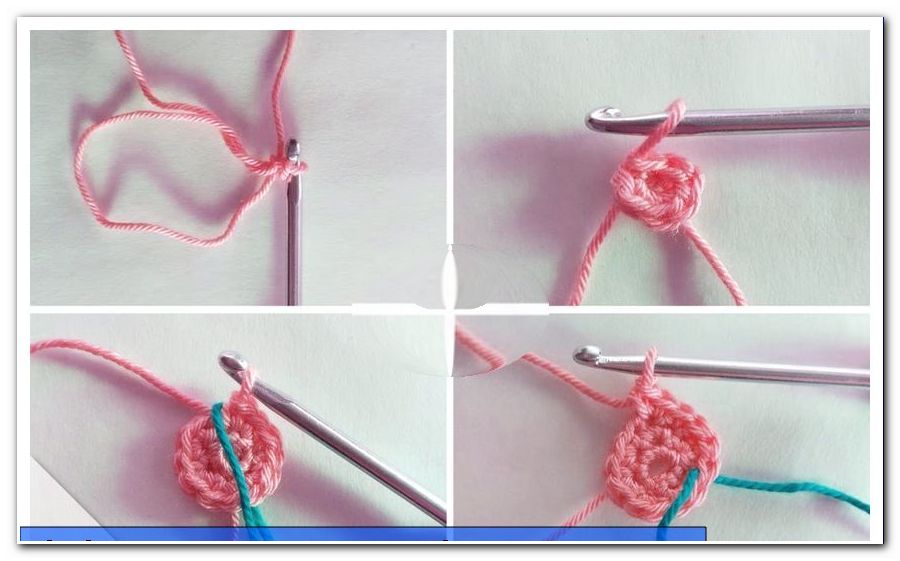
Crochet the air stitch
The chain of stitches consists of aligned air meshes and serves as a stop for many crocheting techniques. Make a loop with your fingers. Through this the crochet hook is guided.

Now crochet a few small pieces of air as follows: use the crochet hook to pull the thread and pull it through the loop on the crochet hook.

Within the crochet piece, the mesh of the previous row is inserted for an air mesh, the thread is taken and pulled directly through the loop on the needle.
Crochet chopsticks
The second important ingredient in filet crochet, next to the air mesh, is the stick. Crochet this:
Before you cut into the stitch of the preliminary round, get the thread with the needle.

Then pierce through the stitch.

Now get the thread again and pull it through the loop. There should now be three loops on the crochet hook.

Now get the thread again and pull it through the two front loops on the needle. Now there are only two loops on the needle.
Finally, the thread is retrieved again and pulled through the last two loops.

Crochet the patent sticks
The patent stick is crocheted similar to the normal whole stick.
Get the thread and then insert it into the desired stitch. Now the thread is taken again and pulled through the stitch - this results in three loops on the needle.

Now there is a change. Get the thread and just pull it through the first of the three loops (three loops are on the needle).

Now pick up the thread again and pull it through the two front loops (two loops are on the needle).

Finally, the thread is retrieved and pulled through the remaining, two loops - finished is the patent sticks.

Calculate stop
Each piece of felt crochet is started with an air-knit chain. In order for the pattern to be accurate, the number of air stitches in that chain must first be calculated. In good templates, this number is usually given. If you are missing the number, count the number of boxes in the first row.
Multiply this number by 3, add one air mesh and 3 spiral air meshes. This gives the number of air meshes.
(nx 3) + 1 + 3 = chain stitches in the chain
example
The exercise scheme includes 21 boxes in the first row. Therefore you calculate:
(21x3) + 1 + 3 = 67
The chain of links must therefore contain 67 air meshes.
Note: Conversely, if you want to design a template yourself, the number of boxes in the first row must be divisible by 3.
Now you can start crocheting.
Filet crochet instructions
You need:
- thin crochet yarn (thin yarn makes the crocheted piece optically filigree)
- matching crochet hook
- template
- scissors

Below we use a crochet yarn with 100 g at 560 m run length from 100% mercerisierter cotton. Here we recommend a crochet hook of strength 1 - 1.5.
Air Mesh Chain + Row 1
Step 1: Now we show you step by step how to crochet for a template. The used crochet template can be printed here:
Click here: To download the crochet template
The bottom row consists of 18 boxes. So we start with a chain of 58 meshes (= 18 x 3 + 1 + 3). The last three air meshes serve as spiral air meshes, so the work is then turned.

Tip: When crocheting, make sure that the meshes become even. Only then will the following rows and boxes become even.
Step 2: Now start with the template - this starts with an X-box, so three sticks. Depending on which variant you have chosen, crochet with regular chopsticks or with the patent stick. For the first of the three sticks, insert into the 5th stitch in front of the needle. Then crochet two more sticks and the first X-box is completed.

Step 3: According to the template, 16 empty boxes follow. Crochet two meshes for the first empty box and skip two stitches of the previous row. The stick (or patent stick), which now makes the empty box complete, is therefore only crocheted in the third next stitch.

Step 4: Crochet all 15 empty boxes in this way.

Step 5: Finally, you need a filled box again, consisting of three rods (or patent sticks).

Row 2
Step 1: The first row of the crochet pattern is complete. To start the next row, crochet three spiral meshes. The work is turned.
Step 2: Our template tells us we need an empty box as the beginning of the second row. So crochet two pieces of air and a stick (or patent stick) as described above.

3rd step: Now follows a filled box, which again consists of three sticks.
Step 4: Then crochet 14 empty boxes, consisting of two air meshes and a stick.
5th step: The penultimate box of the second row is filled again with three sticks.
Step 6: Finally, this row ends with an empty square box made of two pieces of air and a chopstick.

Now crochet the complete crochet pattern in this fashion. To turn and start each new row, always crochet three spiral meshes.

When you arrive at the end, the thread only needs to be cut and sutured. Ready is your first Filethäkel piece. This can now be used as a small doily or even as a patch for a larger blanket.
Note: As can be seen in the last picture, the crochet piece becomes rectangular for normal sticks. For patent sticks, the doily would have become square. This is of course a matter of taste and depends on the intended use.
If you want to try a more complex pattern, we recommend this stylish anchor:

Click here: To download the template
With the Filethäkelei you can easily create beautiful and filigree doilies and patches - according to your individual ideas.