Sewing bedding silo: free instructions for a nice bed pocket

- Material and preparation
- Fabric and Co.
- Before sewing
- Sewing bedding silo | manual
Especially in the bedroom we often lack storage space to store various utensils such as handkerchiefs, books, medicines or toys. Since the bedside tables offer only limited space, a bedding silo or a bed bag is often the solution of choice and can be attached to both cots and other bedsteads.
Today I would like to show you how you can sew a great bag for your bed or the cot of your little sweetheart in just a few steps. The bag can be attached to the side panels of your bed and is suitable for larger and smaller items as needed. Depending on what you want to stow in it, the pockets can be stitched a little wider or narrower (see below).
So that even beginners can sew the bed linen silo, I have written a very detailed guide. As a newcomer you should not have any problems with the processing.
Material and preparation
Fabric and Co.
You need this to be able to sew the bed linen silo:
- various fabric remnants of cotton (woven fabric)
- fusible web
- ruler
- scissors
- pen
- if necessary ribbon
- pushbuttons
- sewing machine
- our guide

Difficulty level 1/5
also suitable for beginners
Cost of materials 1/5
smaller fabric remnants / push buttons
Time expenditure 2/5
1 to 1.5 hours
Before sewing
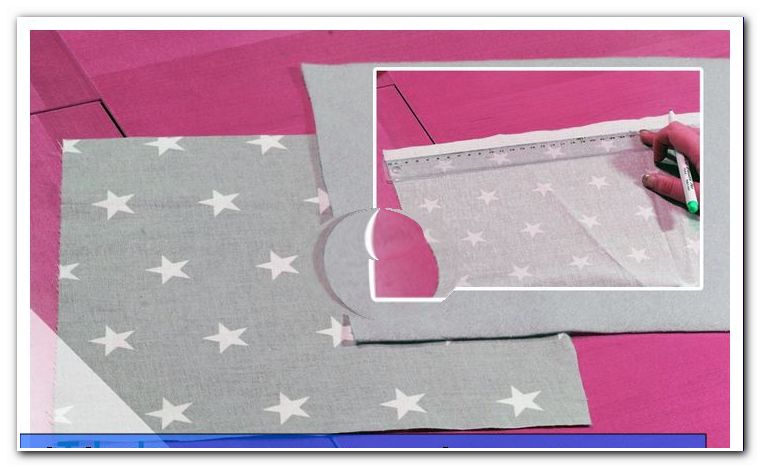
Step 1: First, take one of the cotton fabrics you still have at home. From this fabric (A) we sew the front and back of the bag, not the bags themselves.

Use this ruler to cut two 40x20 cm rectangles.

ATTENTION: NO elastic fabrics like cotton jersey are suitable for this project. The fabric is too soft and is forgiving when sewing.
Step 2: Now you need several smaller squares for the pockets on the front of the Utensilos. Cut three squares of 15 x 15 cm .

TIP: If you want to sew the pockets on the front of the same fabric, cut only a 40x15 cm rectangle instead of the squares. This is later processed by stitching to several pockets!
Step 3: So that the bag does not become too soft and provides enough stability for books or other heavier items, we use a non-woven fabric on the back of our fabrics.

This is cut twice in the size of the fabric A and once in the size 40 x 15 cm .

TIP: Cut the ironing fleece 0.5 cm shorter on each side so that it does not protrude beyond the fabric sides after ironing.
4th step: Finally, we cut the 4 tapes, which will attach the bedding silo to the bed, too. Cut 4 pieces of fabric 30 x 10 cm .

Continue to the sewing machine!
Sewing bedding silo | manual
Step 1: Four carrying straps are needed to hold the bag.

Fold the fabrics lengthwise right to right and pin the long side with pins or clips.

Now, with all four bands, stitch the long straight line and one of the two short sides with the sewing machine.

The fabric is under the sewing machine foot, as shown in the following picture.

On the open (short) side, the ribbons can now be turned to the right side of the fabric.

You now turn your sewing over the small turning opening, as shown in the picture below.

Step 2: Now put the three parts for the front pockets ( 15 x 15 cm ) together on the sides right to the right and stick everything in place.

These seams can now be stitched with the straight stitch.

The three squares should now form a queue.

Step 3: With all fabric parts we go now to the iron.

First, iron the ironing fleece on the left side of the fabric of the two large rectangles of the bag.

TIP: The non-woven fabric has a slightly uneven side with noticeable small nubs. This page is placed on the left side of the fabric and then ironed with the iron. Iron over the fleece several times so that it adheres firmly to the fabric.

Now iron the row of pockets with the squares and the four straps for the bracket so that the seams are as flat as possible and can then be processed well.

4th step: The long side of the pocket piece is now folded inwards approx. 2-3 cm and ironed firmly.

Then you quilt the slip with the straight stitch .

So, as in the following picture, your sewing result now looks like.

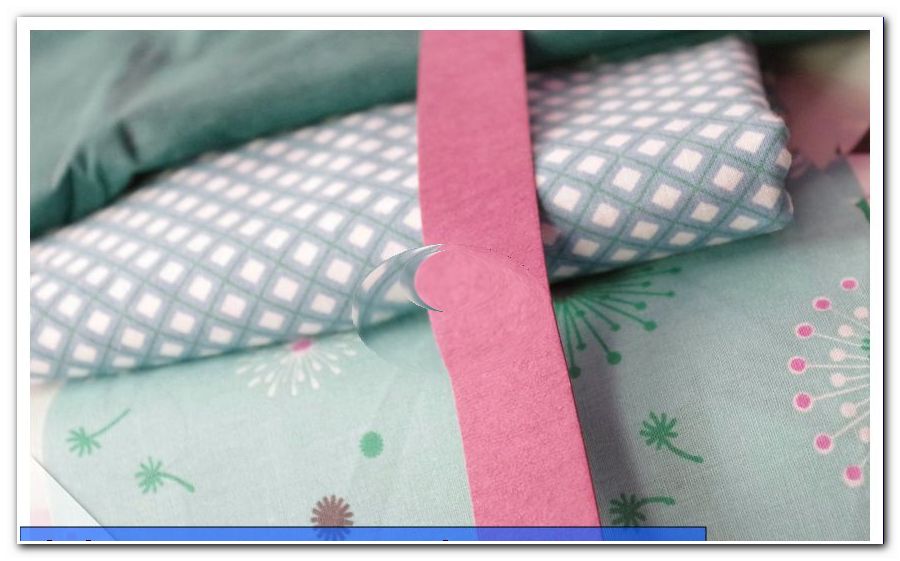
Next, you can now leave the resulting seam as it is, or attach a ribbon or (as in my case) a SnapPap tape over the seam.

Tuck it in again and stitch it tightly on both sides with the straight stitch.

ATTENTION: For these stitches it is recommended to use a matching yarn, as all these seams will remain visible at the end!

Step 5: Now place the pocket piece with the ribbon on the front of the bed pocket.

Stick the sides firmly to prevent slippage during sewing.

The pockets are now sewn to the dividers on the front. I have stitched this piece together exactly on the existing seams, so that no further seams and shapely subdivisions are present.

TIP: Of course, you can divide the front pocket exactly as you would like it later, with smaller or larger pockets.

Step 6: Next, we'll put all the pieces on top of each other: The ribbons will now be pinned with the open side (!) At the top of the front.

Fold the straps a little so that you do not end up in one of the sides or bottom edge of the bag in the sewing machine!

After the pinning of the tapes, the back now follows, which is laid on right to right. Attach all four sides of the bag with needles or clips.

So your sewing is now in front of you.

ATTENTION: There is an approx. 10 cm wide turning opening at the bottom, which should not be closed when sewing!

Everything is pinned and so it can go on in the next step with the sewing machine.

Step 7: Stitch the bag all the way round (with the exception of a turning opening!) With the straight stitch.

Then you can turn the bedding silo through the opening on the right side.

Be careful not to damage the trim strip or SnapPap.

Step 8: We are almost done!

At the bottom, the turning opening still has to be closed. Slide the two fabric edges in with your finger and insert everything firmly.

We quilt the entire bag again with a short edged (about 1-2 mm to the edge of the fabric) with the straight stitch .

This makes a clean, beautiful impression and at the same time closes the turning opening.

TIP: Of course you can also close the opening by hand with the so-called mattress stitch. Take a look at our tutorial on this topic!

Step 9: Once you have closed the seam, iron the outer seams again.

Now the push buttons can be attached to the tapes.

For this you need the buttons and pliers. I opted for 2 push buttons each, because the bag hangs so beautiful.

Voilà - our bed bag is ready and can be attached to the bed. I hope you enjoy sewing!