Crafts with plaster - DIY ideas like plaster casts of the hand & Co

- Mix plaster for crafting
- Plaster casts by hand or foot
- plaster cast
- Plaster figures with shapes
- Gypsum figures without forms
- plaster pictures
- Crafting with plaster bandages
- Tipped paper bag
Plaster as a craft material is absolutely versatile. Not only is it a very cheap remedy, crafting is fun, not just for kids, but for adults too. Whether gypsum figures, plaster paintings, reliefs, pendants, bowls, baby belly, foot or hand print, plaster mask, animal tracks, picture frames or many other things, there are tons of possibilities.
Can be tinkered with different types of plaster and of course with plaster bandages. These pads can be cut to any size and used. They greatly facilitate the shaping and imprints of body parts. Whether it is an imprint of the baby's stomach, hand or footprint or even the making of a face mask, it is quite easy and can even be tinkered by children.
Mix plaster for crafting
For crafting with plaster is model or modeling plaster, also called alabaster plaster. It is the plaster, for all artistic and artisan work. Model plaster is white, not greyish, like many other types of plaster and finely ground. Because it hardens very hard, this plaster can be well worked with tools. It is used for the construction of plaster molds and casting of plaster relief, in modeling for landscapes and diorama construction.
When mixing the gypsum-water mixture, it is essential to ensure that the quantities indicated on the packages are observed. The mixing ratio must be right. The individual ingredients, ie gypsum and water, must be weighed exactly. Professionals do that mostly for feeling, but for beginners or crafts enthusiasts who rarely work with plaster, it is worth measuring.

- Measure gypsum and water accurately. Both should be at about the same temperature, so do not use too hot or too cold water.
- Always put the water in the mixing bowl first. This must be large enough to be well stirred and nothing spills over.
- Sprinkle gypsum powder. Not too fast and do not fill in everything at once, otherwise air can be integrated.
- First fill everything and do not stir yet. The right amount of plaster is interspersed when a kind of crust forms on the surface and the interspersed plaster does not sink.
- Stir until a smooth mass has formed. Mash lumps on the edge of the vessel. Do not stir in air.
- Trapped air bubbles can escape by knocking on the vessel or shaking, or they come to the surface and can be crushed.
- Let the mass rest briefly, about 20 seconds
- Continue stirring, manually or with a machine. Manually it takes longer. 30 seconds are usually enough with a machine. The mass must be smooth, without lumps and bubbles. Depending on how fine work is to be done, it must be a little firmer or more fluid. One should not wait too long, otherwise the plaster will start to harden.
Plaster casts by hand or foot
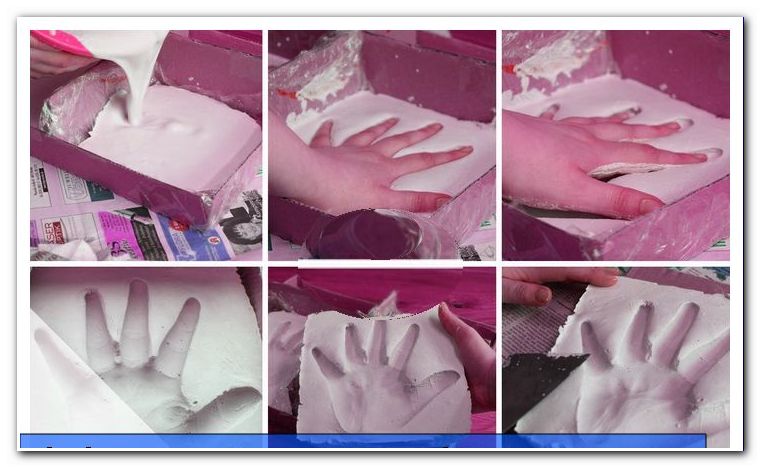
For this one uses the best a shoe box lid, which is designed with aluminum foil (cling film also works). Mix the gypsum mixture lukewarm and pour into the lid. He has to get stuck, but still be malleable. Then hand or foot can be carefully pressed into the mass. Usually both hands or both feet are desired. Slightly spread the fingers and lightly press in the plaster. Press in feet normally. Carefully pull out the hand or foot again. The plaster must dry out properly and harden. The edges can be smoothed. If you paint the picture, it does not fade and can be cleaned better. You could also paint it beforehand.

plaster cast
There are very beautiful glass bowls with floral or animal patterns. Some also have simple stripe or shell or ornament patterns. Unfortunately, the patterns are usually on the outside of the bowls and if you make an impression of it, then this is inside in the finished shell. Now you could make another impression, because, then he is out again, but with small patterns, he is then usually quite inaccurate. That's why you have to look for bowls that simply have an extraordinary shape. These are then simply turned over, covered with plastic wrap and then covered with gypsum. The gypsum must dry, but still be workable. Then you can easily scratch nice patterns on the outside. After curing, the trays can be carefully separated from each other.

Flower pots, lanterns and candlesticks can all be fashioned in the same way. For flower vases and candlesticks empty plastic bottles can be used. For flowerpots you can use existing vessels.

Plaster figures with shapes
There are a variety of forms or even sets of shapes in the trade. You can cast horses and ponies, dinosaurs, dogs and cats, farm or zoo animals, marine animals, memo holders, butterflies and much more out of plaster. Soap forms, sandbox forms, silicone baking molds, which are available in beetle, flower and butterfly shapes, can be used for it. Just search for molds. The largest selection is on the World Wide Web.

From liquid silicone can also be easily made a shape. Also suitable is the variant below: casting mold or as a video: silicone mold
The figures are painted beautifully after curing and the little artworks are ready.

Gypsum figures without forms
For this, the gypsum must be mixed with less water. One part of water is calculated on three parts of gypsum. The plaster is quite tough and can be processed similar to clay or plasticine. So you can create a variety of characters.
plaster pictures
The simple version to make plaster paintings is to pour out a special mold. Thats is quite easy. Just make sure that there are no air bubbles. The gypsum must be very thin so that it runs into the smallest depression. It has to be worked very fast.
These plaster pictures were created by pouring out forms: plaster pictures They only have to be painted. There are many different motives.
Crafting with plaster bandages
Plaster bandages facilitate work with plaster. You can buy them in pharmacies, drugstores and on the internet. There are different qualities, coarser and finer ones. For beginners and children usually the cheaper models are enough. Who wants to immortalize his baby bump or the prints of children, should use such bandages that do not fray (arttex). It pays to invest a bit more.
When working with plaster bandages is always spilled plenty of, so everything should be well covered around the work surface. The plaster bandages are cut into pieces, in the appropriate working length. In addition, only a bowl of water is needed, in which the pads are dipped for moistening.
- Immerse first piece of binding in water and express briefly.
- Pull apart and place in the desired position and smooth. The bandages are more heavily coated on one side and have a rougher surface. This page must be on top. Depending on what you want to edit, you start at one end, up or down, right or left, not centered. Then you work your way to the other side.
- Smooth well with damp fingers until the grooves of the plaster bandage are almost gone. The now liquid gypsum must be evenly distributed.
- Wet the next piece, express and place slightly overlapping over and next to the first piece.
- So cover once the entire desired area. First put on a complete layer
- Then move on to the next shift. At least two to three complete layers are needed.
- When everything is completely covered at least twice, let it harden. Depending on the used binding material takes 20 to 60 minutes.
- Loosen impression carefully and allow to dry, at least 2 days
- After drying and curing, the plaster cast still needs to be sanded.
- If there are still thin or unstable places, they can be reworked.
- Cut the mask. So that the edge is smooth and not frayed, put moist plaster strips over the edges. This results in smooth, flat edges.
- Smooth the surface with a surface treatment. Small bumps and holes can be compensated.
- let dry
- Cut off threads and bumps.
- Apply surface finishing agent Gesso. This protects against yellowing, but also compensates for small bumps. It is also a good primer for painting. Beware, the remedy makes nasty stains that are very difficult to wash out. Apply a thick coat to the outside of the mask with a brush.
- let dry
- Paint and decorate
- Possibly. paint
Tip: If impressions are taken from the body, always cream the skin thick with Vaseline or a good fat cream. Cover hair with foil, otherwise it will pull well when removing. Apply a thick coat of eyebrows and eyelashes.
Detailed instructions for an imprint of the baby bump under: DIY-instructions - make and paint baby belly plaster impression
Tipped paper bag
Solid paper bags can be wonderfully plastered and decorated. You should have a large enough floor space so that you can fill in something at the end. The procedure is very simple. Cut smaller pieces of bark and proceed piece by piece. The entire bag including handles is triplicated. At the end, squeeze the bag slightly and then let it dry. Then add plaster to a porridge and apply with a brush over the bandages to smooth the surface. Let everything dry again. If required, the gypsum bag can be decorated in color or otherwise designed. Since the bag is not waterproof, a glass or pot must be put into it should it be used as a vase or planter.