Paint baby belly - instructions + great motives & ideas

- material selection
- Which motive should I choose "> The order
- Motif 1: The template mandala
- Motif 2: painting the baby's belly with glitter gel pens
- Motif 3: Throw you out, little man!
- Motive 4: Many hands hold you
- Variation: A plaster cast of the baby bump
Create a wonderful memory of your pregnancy by painting and decorating your baby bump. We show you great and simple ideas for copying.
Her very personal memory: the lovingly painted baby bump
If you are "good hope", there are many ways to create beautiful memories. A particularly valuable experience is the common painting of the baby's stomach. Whether you do it with your partner, with your children or with your best friends - it's always a beautiful experience and will be remembered for a long time.
Tip: Also remember to take a picture after each motif!
Difficulty level 3/5
(depending on motive and number of different motives variable)
Material costs 2/5
(depending on your preferences between EUR 4, - and EUR 40, -)
Time expenditure 2/5
(including preparation and photos variable)
material selection
At the beginning of course, the question arises, how to design the painting of the babybump. There are different stains that are suitable for drawing and painting on skin. If you want to apply several motifs in a short time or to help small children with the design, offer washable colors, which are suitable for children and the surrounding textiles not discolor long-term.

For example, special children's colors, which are available in every paper or craft shop. Other materials, such as acrylic paint or watercolors, are more likely to be used when painting a plaster cast and are less suitable for painting on the skin. Water colors are very light and are also not opaque. Acrylic paint is not made decidedly for painting on the skin, which is why I prefer to play it safe and do not recommend this. On the topic of plaster cast painting with watercolors or acrylic paint but I still come after this tutorial below to speak briefly.
Tip: When choosing colors before buying, always read the description on the packaging or get advice from an employee so that you do not experience nasty surprises.
For filigree and elaborate patterns, there are also commercially available in the trade gel colors (with and without glitter, in fluorescent colors, etc.), but unfortunately can not be removed without residue from the skin (one sees after washing still red paint residue on the baby's stomach), the but after two to three days completely faded.
Another option is henna tattoo paint. This usually stays visible on the skin of your baby's stomach for a longer period of time - ie for two to three weeks - and you can enjoy your artwork longer.
You do not really need any other material unless you have certain motives. In my tutorial, for example, I also show a motif that is simply dabbed onto the baby's stomach with a self-made template made of paper. Some color pencils also contain plastic templates with different motifs in the packaging.
Which motive should I choose "> The order
If you want to do more than one day, start with the colors that can be quickly and easily wiped off the skin (for example, children's finger paints) so that the other subjects are not disturbed by the shadows of the previous ones,
Tip: Finger paints are easy to wipe off with baby wipes. If you would like to apply another motif to the baby's stomach, first clean with a damp, then with a dry towel to remove the oil layer. If you do not want to apply another motif, the moisturizing wipes keep your skin well-groomed.
With a lot of dried up, dark paint it is often easier to take a shower for a short time. With soap and water everything goes off effortlessly and you have the opportunity to stroke your baby belly a bit more.
Tip: Place an old blanket or towel / sheet underneath so your upholstered furniture will not get any paint.
Motif 1: The template mandala
Of course, it is also very attractive to apply a beautiful, filigree mandala with fine pencils in many colors. But so that our two-year-old can participate, I have decided to use a very simple tool: a paper template.
To do this, take a sheet of A3 block (or a correspondingly large newspaper - but the block paper is better because it is stronger) and fold it into a triangle so that the lower edge is exactly on the side edge. The protruding rectangle will cut off and thus have a square with a diagonal fold line in the middle.
Now fold three corner to corner in such a way that ever narrower triangles arise. Then you can use scissors to cut any pattern into the folded paper.
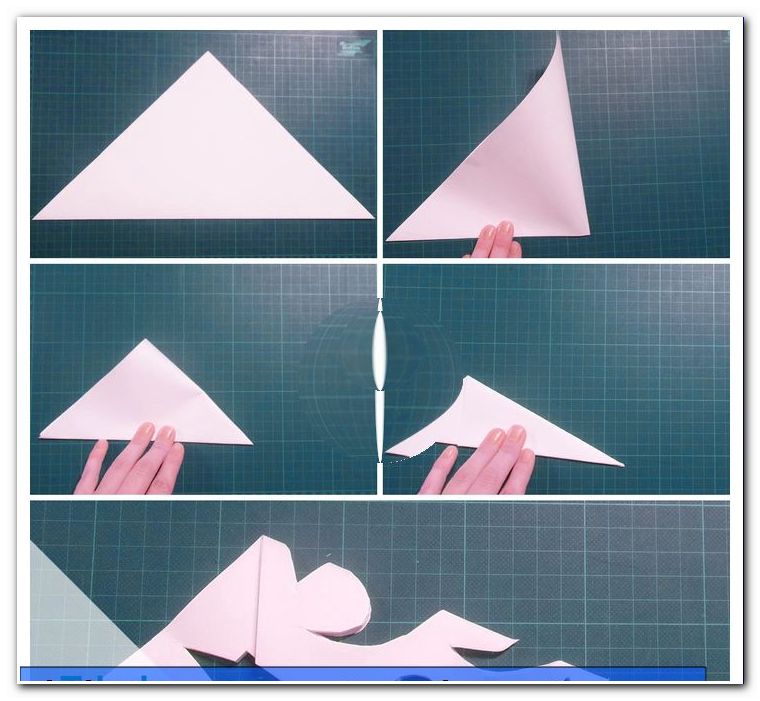
Tip: If you cut the point straight, it creates an octagon in the middle. If you cut it in a bow, a circle. This provides a nice marker for the navel, so that your stencil comes to rest centered on your baby bump.
Fold the paper apart and place it on your baby's belly, where they hold it, and your helpers can begin to apply color to the open fields of the template.

Then remove the template carefully and the first motif is ready. Of course, you can now attach more ornaments.

Motif 2: painting the baby's belly with glitter gel pens
This motif is less suitable for two-year-olds, as these colors are not as easy to remove as the finger paints. In addition, straight lettering make especially beautiful when you are painted. Since the fine motor skills is not sufficiently developed.

In this case, dad has considered a spell and then attached flower tendrils with ornaments, while I was allowed to paint the individual letters, as long as I have looked.
Other ideas about this technique are:
- a loading bar with a percentage of how far the pregnancy has progressed
- a loving saying with beautiful ornament
- "Little brother" or "Little sister" (with siblings)
- "Prototype", "single child" or "first attempt" (at the first baby)
- male / common sign with question mark (for surprise "eggs")
- "Lausbub" or "Lausemaus" (if you already know the sex)
- Mandalas and much more
Motif 3: Throw you out, little man!
A creatively designed motive of our son. We left him free to choose which colors to use when and where to paint. And it was not finished until he said "Done!"

A beautiful, unique painting on my baby bump, which already makes a lot of fun while creating and keeps a great memory for the whole family.
Motive 4: Many hands hold you
This is a very simple, but no less effective motive: Everybody in our little family was allowed to put his hands on the baby's stomach. How exactly the different hands are positioned is, of course, freely selectable according to taste. It also looks beautiful when there is overlap. An alternative would be, for example, to set all handprints with the palm of your hand in the same place, so the size differences would be more visible.

In any case, it makes sense that the person starts with the biggest hands. If you want to go fast, use the brightest color to cover it up. We let each handprint dry for a few minutes before attaching the next one.
Quick Guide:
1. Select colors according to selection criteria (skin adhesion, helper, motif)
2. Possibly buy templates or design yourself
3. Prepare the base and prepare wet wipes, damp and dry towels
4. Paint and shape the baby's belly
5. Take pictures!
6. Done!
Variation: A plaster cast of the baby bump
As promised at the beginning, I would like to briefly talk about the alternative with acrylic paint and watercolors:
Another wonderful way to create a lasting memory is to make a plaster cast of the baby bump. Depending on the provider, there are a variety of options for materials here.

This plaster cast on the photos was made, for example, with plaster bandages, which were gradually applied in beautiful tracks on the baby's stomach and chest. Afterwards, it took a few minutes to wait for the impression to be released and then let it dry for two days. Then it was carefully sanded (with sandpaper) to iron out the bumps. Then it was finally time, he could be painted.

With watercolors it was too pale for our wishes, so we decided for acrylic paint, which still shines beautifully even after many years.
Tip: Cream the body parts that you want to plaster in advance with coarse-grained Vaseline or a very greasy cream so that the plaster does not bond with the fine hair and can easily be removed.
Detailed instructions on how to make a plaster cast of the baby's belly yourself can be found here: //www.zhonyingli.com/babybauch-gipsabdruck-machen/
The twisted pirate